
Sweet Summer Sunflower Bag
This post may contain referral/affiliate links. Please read my disclosure for more info.
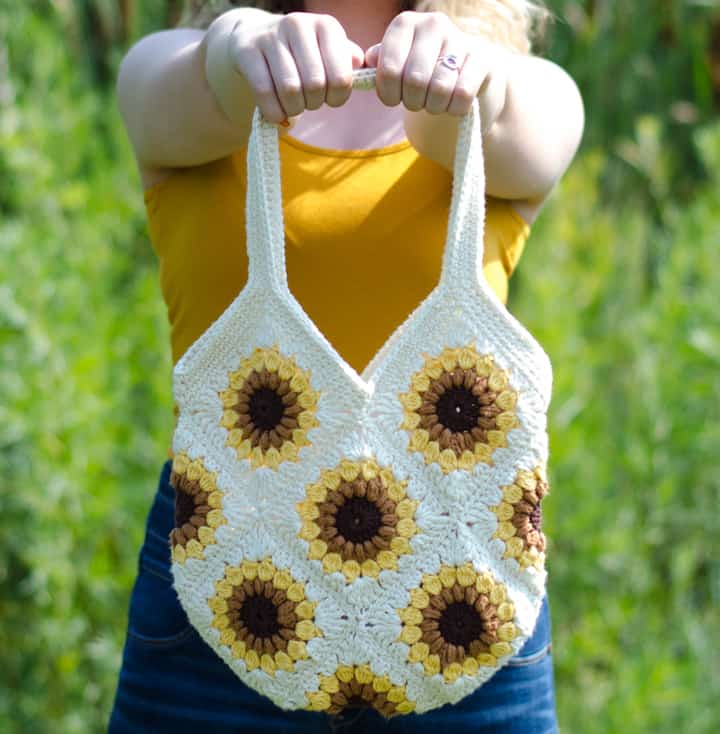
You know the most delicious thing about summer? SUNFLOWERS! A sunflower is the last little showoff of summer, busting out in all it’s cheerful glory just as the days are getting shorter and summer is transitioning to fall. This sweet summer sunflower bag just might be the best thing of all.
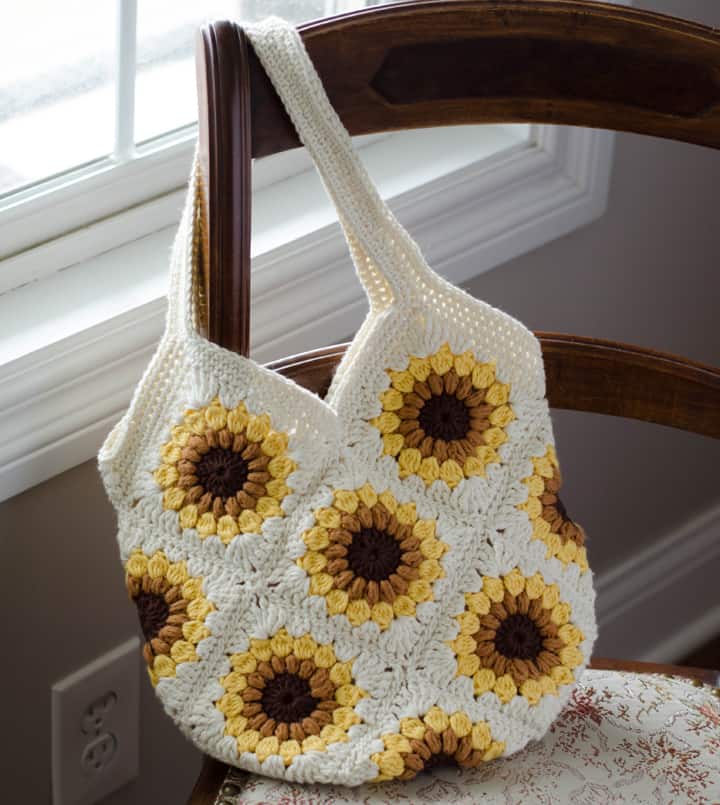
I’m in love with this sunflower bag. There. I’ve said it. And I’ve probably said that a lot. But I can’t help myself. There’s something about taking granny square variations and putting them together into a bag that just makes me happy.
All this sunshiney goodness just warms my heart. Let’s talk about this beauty for a few minutes before diving in. First up.. the granny square. This is the simple Starburst Granny we learned last week worked in summery colors in Hobby Lobby’s I Love This Cotton yarn.
I fell in love with this yarn when I used it for the Crochet Octopus pattern. It’s a great purse yarn because it’s not too bulky and with a G6/4mm crochet hook it works up nicely. It’s not too “holey” so it’s an easy bag to leave unlined, which is how I’ve worked mine. But you could certainly line it later if you wish.
For whatever reason, working 13 granny squares for this granny square bag does not seem like much work at all. Your favorite beverage. Your best chair (recliner, I’m talking to YOU!) Flip on Netflix. We are watching all episodes of Arrow (hello…where has THIS show been all my life)! And before you know it…the squares are done.
Since the squares are the star of the show, they are simply sewn together and then.. an easy border/handle! While I loved the fancy handles and bling on the Boho Boss Bag and Titan Tapestry Bag and the fancy crochet spiral handle on the Daisy Mae Bag, there’s something refreshing about a darling bag made entirely out of simple crochet stitches. Am I right?!
Settle in and let’s get going on this Sweet Summer Sunflower Bag!
print & stitch
Purchase the Beautifully Crafted AD-FREE PDF Download Today
Do you just want to relax and crochet? This nicely formatted pattern features clear instructions and perfectly sized photos for a more enjoyable crochet experience.
Get the free pattern below or purchase an ad-free pattern on Etsy or Ravelry
Sweet Summer Sunflower Bag
Here is what you will need:
- US G6/4mm crochet hook (these are my absolute favorite hooks I recommend to everyone!)
- Worsted weight cotton yarn. Sample used Hobby Lobby I Love This Cotton, 3.5 oz (1 skein) Ivory, 1.75 oz. Curry (yellow), 1 oz. Antique Gold (caramel color) and .75 oz Brown. I used almost every bit of the ivory yarn. You may want to buy an extra skein if your gauge is larger than mine or plan to stripe the handles if you run out of ivory yarn.
- Tapestry needle and scissors
Resources and tutorials you may find helpful in following this pattern: Crochet Abbreviations, US to UK Crochet Conversion Chart. Find links to stitches on the “Tutorial” menu: Getting Started will show basic stitches used in many patterns and Crochet Stitch Dictionary shows our growing collection of crochet stitch tutorials.
Special Stitches:
Puff Stitch: Yarn over, insert hook into next stitch and pull up a loop to the height of a double crochet (3 loops on hook). Then yarn over again and insert hook into the same stitch and pull up another loop ( 5 loops on hook). Yarn over again, insert hook into the same space and pull up another loop. (7 loops on hook). Pull yarn through all loops. Chain 1 to lock in the stitch.
Bobble Stitch: Yarn over, insert hook into space between 2 puff stitches and pull up a loop. Yarn over and pull through 2 loops (this leaves 2 loops on hook). Make 3 more incomplete double crochet stitches. There are now 5 loops on the hook. Yarn over and pull through all 5 loops. Chain 2 to lock in the bobble stitch. Here’s a detailed bobble stitch tutorial.
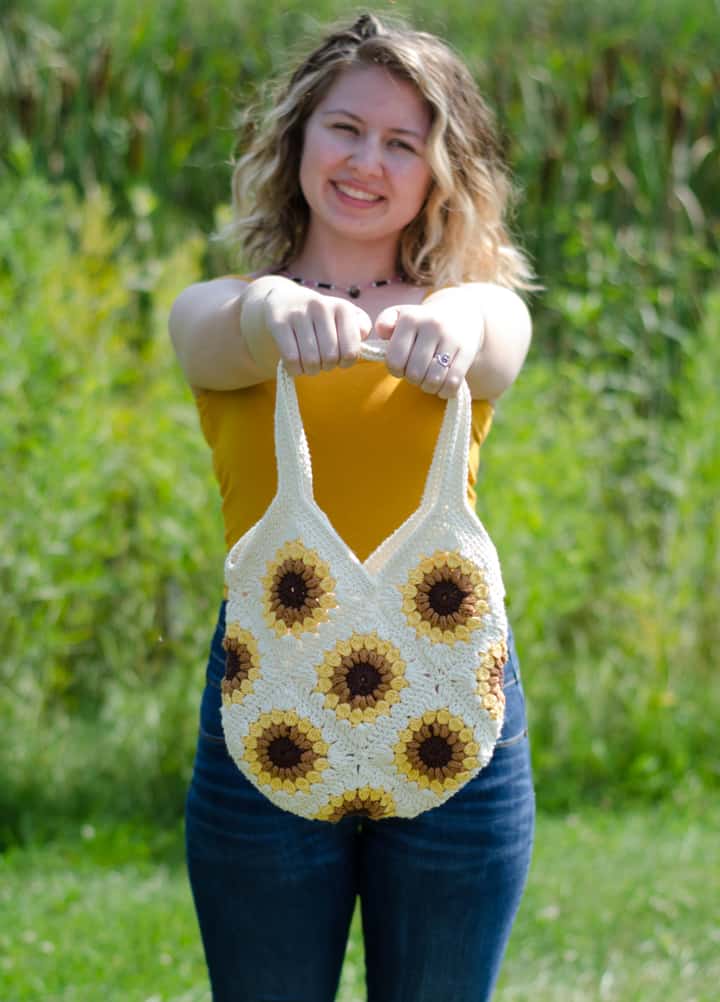
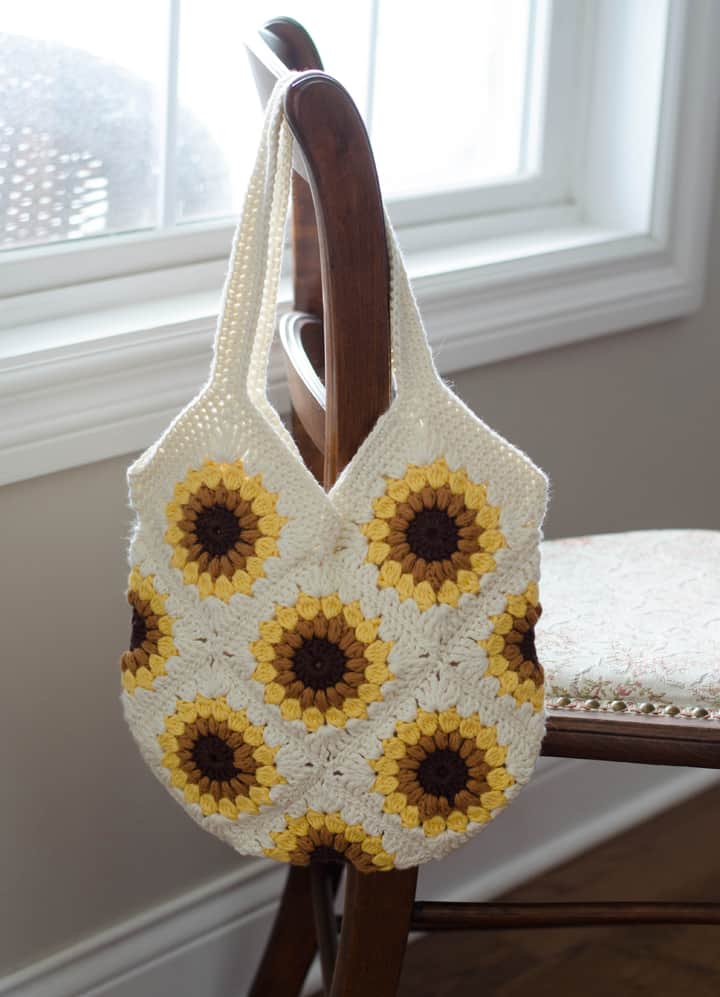
Crochet Sunflower Bag is approximately 11″ wide by 19″ tall (including handles). However if yours turns out bigger or smaller it will still be a lovely. Remember if it is larger, you may need to purchase more of the main color yarn or be willing to change colors in the handle.
Crochet Sunflower Square (make 13):
To start a granny square bag, you will need to make 13 crochet sunflower squares. For a more detailed tutorial, follow the instructions for the Starburst Granny Square. Shortened instructions are provided here as well.
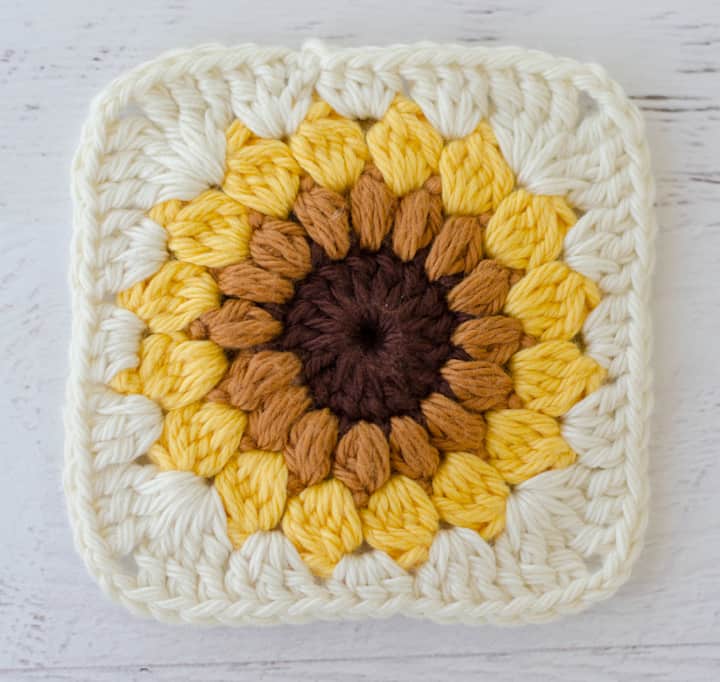
R1: Using center color and a G hook, ch 5 and join with a slip stitch to the 1st chain to form a loop. Ch 3 (counts as first dc), make 15 dc into the loop. Sl st to top of 1st stitch in the row to join. Fasten off 1st color. (16 st)
R2: This row is comprised of puff stitches (described above). First, attach the 2nd color in any stitch and chain 2. *Yarn over, insert hook into same stitch as joining and and pull up a loop to the height of a double crochet (3 loops on hook). Then yarn over again and insert hook into the same stitch and pull up another loop ( 5 loops on hook). Yarn over again, insert hook into the same space and pull up another loop. (7 loops on hook). Pull yarn through all loops. Chain 1 to lock in the stitch. First puff stitch made.
Make puff stitches in all the stitches in the previous row as follows: Yarn over, insert hook into next stitch and pull up a loop to the height of a double crochet (3 loops on hook). Then yarn over again and insert hook into the same stitch and pull up another loop ( 5 loops on hook). Yarn over again, insert hook into the same space and pull up another loop. (7 loops on hook). Pull yarn through all loops. Chain 1 to lock in the stitch. At end of round, sl st to top of 1st puff stitch. Fasten off Color 2. (16 puff stitches).
R3: This row is worked in bobbles (described above). You can start the row in one of 2 ways. Either attach color 3 in between 2 stitches and chain 3. Or start with a standing stitch. I started with a slip stitch of the new color on my hook, carefully held a yarn over and worked the first bobble. Continue to work bobbles across the row into the spaces in the previous row. At end of row, slip stitch to top of 1st bobble stitch. (16 bobble stitches) Fasten off color 3.
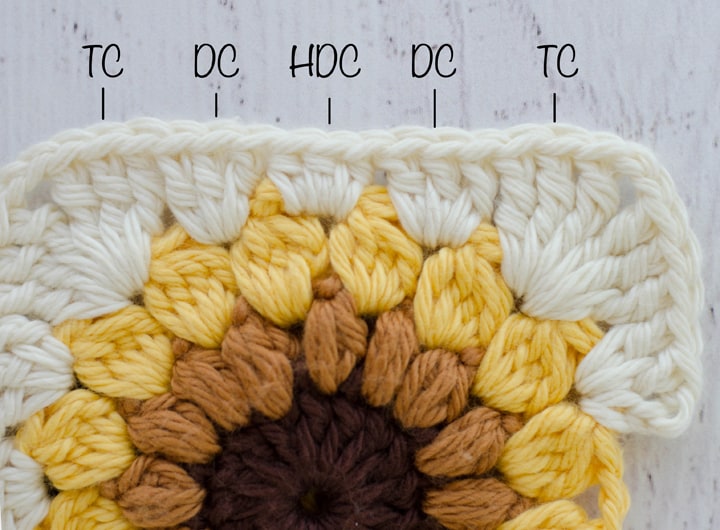
R4: Join color 4 in any space in previous round. Chain 3 (counts as 1st dc). 2 dc in same space. *In next space, work all of the following: (3 triple crochet, ch 2, 3 triple crochet). Corner made. 3dc in next space, 3 hdc in next space, 3 dc in next space*. Repeat from * 3 more times. Then work 3 dc in next space, 3 hdc in last space and join with a sl st to top of 1st dc in row. (I like to use an invisible join for a nice finish instead of the sl stitch join). Fasten off yarn and weave in the ends.
Sew Crochet Sunflower Squares Together:
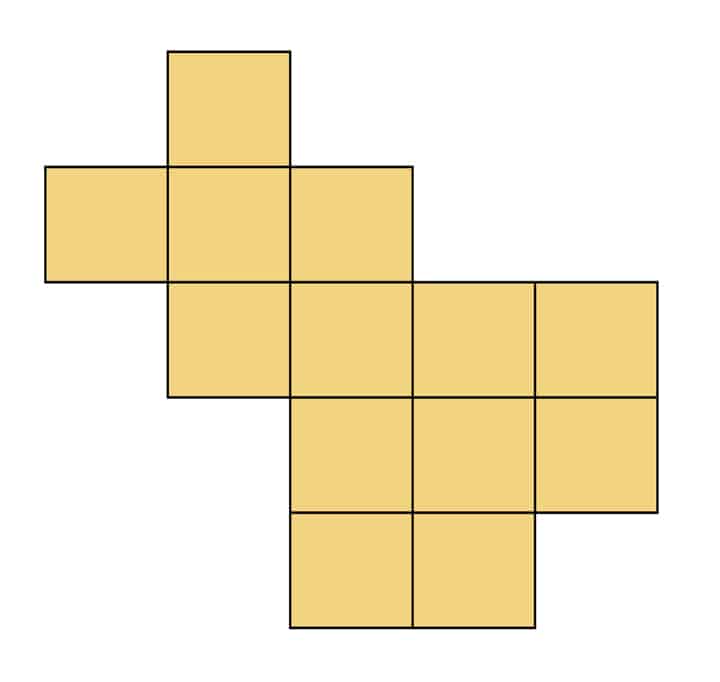
Time to sew the squares together! Lay squares out in rows according to the diagram below. Whip stitch squares together.
Rotate work so it looks like the below diagram. Then, find the center bottom square in the middle of the work and fold up so that the 2 top ends are meeting. Fold in the squares that form the sides of the bag and sew those squares to the opposite side (front or back) and continue to sew the squares together that make up the lower sides of the bag. Repeat the process on the opposite side of the bag.
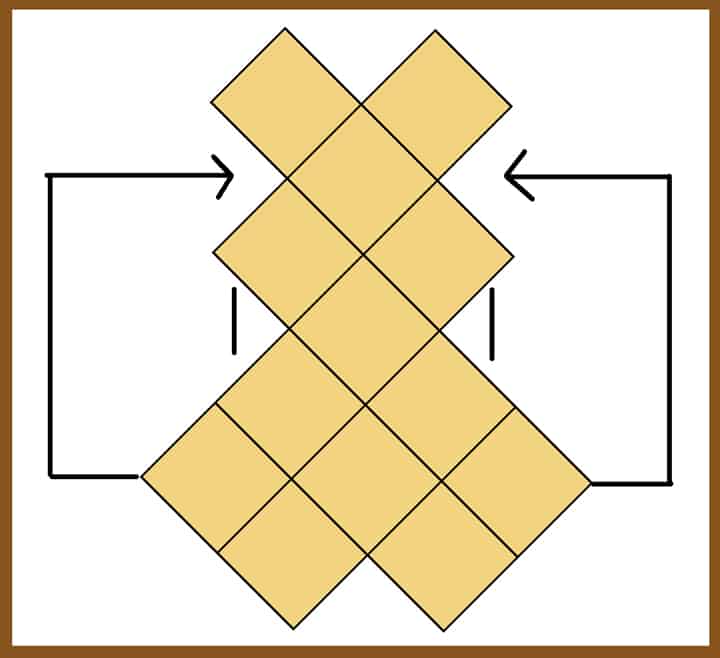
At this point, the blocks of your granny square purse are attached everywhere except the upper half of the two squares on either side of the bag. This portion forms the opening of the sunflower bag. You will notice that this looks a bit like two “mountains” with a peaks at the top where the handles will go. And valleys where the edge dips down: in the center front and center back and at either side.
Crochet the Border and Handles:
Let’s talk about the border and the handles on this sunflower bag for a moment before we dig in. I feel that it’s really important to be a bit flexible when working the border and handles. Working over the valleys can be tricky. You and I can “think” we’ve sewn our bag together exactly the same, but because of the little nuances in our gauge and style, the valleys may lay a little bit differently. What is important is to be mindful of your valley and how your purse lays as you work the rows of stitches over that area.
Take a moment now and then to put down your work and see how it’s laying as you work the border. You don’t want “holes” in the valleys and you don’t want your work to pull this way or that. There are several ways to work the decreases in the valleys. You can skip the center stitch in the valley. You can decrease 2 stitches together over the center of a valley. Or you can decrease 3 stitches together over the center of a valley.
There is no “right” or “wrong” way–just the way that you prefer and the way that keeps your work neat. You should, however, stick to the same “method” for each row. So, for instance, if you are skipping the center stitch on the center front valley, you should also skip the center stitch on the center back valley. That way both sides of your work will look the same. But feel free to change decrease style the next row if that works better for that row.
Finally, you may wish to lengthen or shorten the handles of your bag. Be mindful that if you did not buy a 2nd skein of the main color, you may not have enough yarn to make longer handles in the main color. Changing to a contrast yarn as a stripe in the border & handles is a nice variation if you find you’re running low on yarn.
MORE GRANNY SQUARE STYLE PATTERNS
If you love this Sunflower Bag crochet pattern, you might also like to check out our other crochet bag patterns:
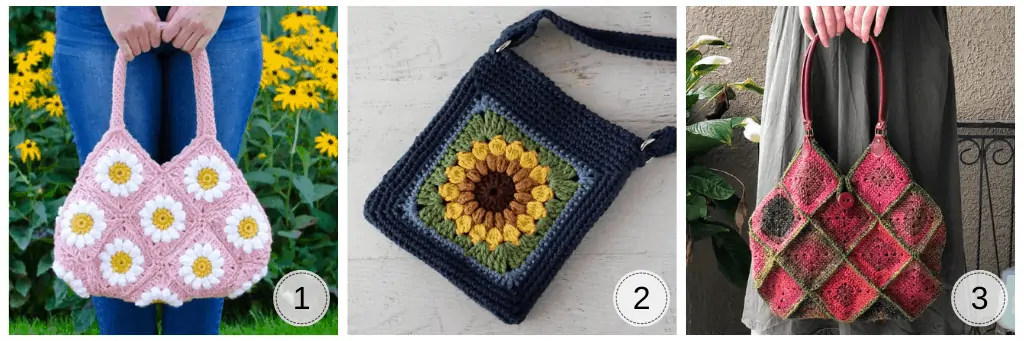
1. Crochet Daisy Bag // 2. Sunflower Crossbody Bag // 3. Boho Boss Bag
You also might enjoy my Wander Bloom Crochet Bag pattern too!
Sunflower Bag Handles
Attach ivory yarn about 4-5 stitches before a side “valley”.
R1: Single crochet around. Work 2 single crochets in the top of each “peak” (the stitches that form the corner of the square). In the valleys, single crochet to the last stitch of the square the forms one side of the valley, do not work any stitch into the point where the 2 squares join. Then continue working single crochet starting with the 1st stitch of the next square. If this leaves a large “hole” in the side, then simply work a decrease and include the point where the 2 squares join as part of the decrease. At the end of the round, sl stitch to the first single crochet of the round.
In Round 2, we begin the handles.
R2: Ch 1 and single crochet in same stitch. Single crochet around. This time when you get to the peak, chain 70. Skip the next valley and join to the opposite peak, being careful not to twist the chain. Continue to single crochet across the row. When you get to the valley on the side of the bag, work a single crochet decrease. You may work the decrease over 2 or 3 stitches. Try one way and go past the valley a few stitches and see how your work lays. If you don’t like the look, go back and try the other way. Be consistent. The decreases on either side of the bag should be the same and the decrease in the front center and back center of the bag should be the same for each row.
When you get to the peak on the opposite side, chain 70. Skip the next valley and join to the opposite peak, being careful not to twist the chain. Continue to single crochet across the round. At the end of the round, join with a slip stitch to the first stitch.
Rounds 3 & 4 are worked on the outside edges of the handles and sides of the bag. Later we will come back and work some rows over the center front and back.
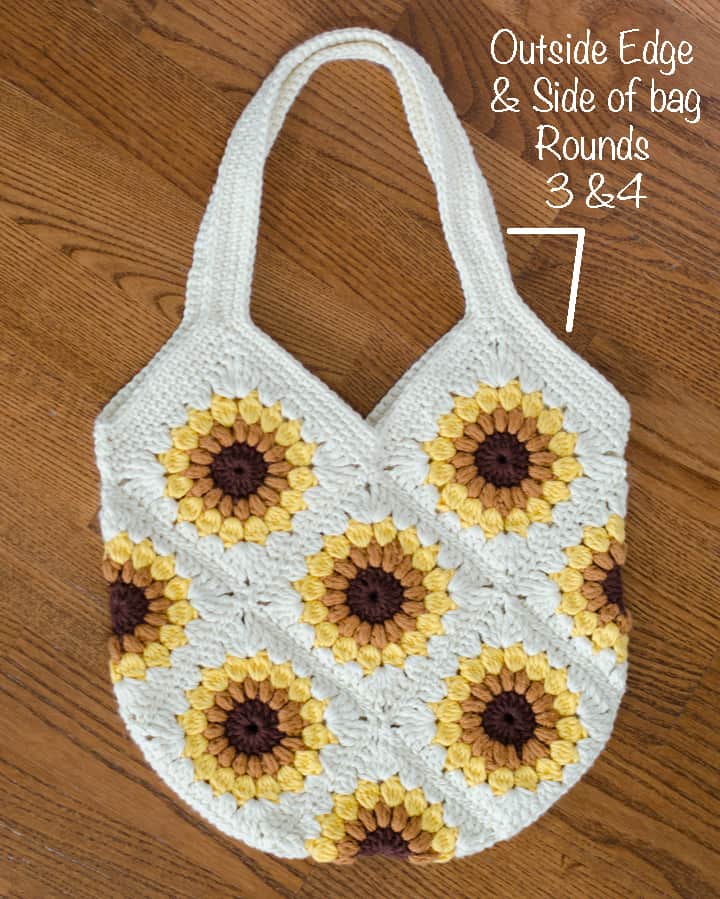
R3: Ch 1 and single crochet in same stitch. Single crochet around. When you get to the chain that forms the handle, single crochet across the chain to the opposite side of the bag, then continue to work a single crochet around. When you get to the valley on the side of the bag, work a single crochet decrease, just like you did in the previous round. You may work the decrease over 2 or 3 stitches. You may work the same type of decrease this round or different. Remember, the important thing is to be consistent in the round. Continue to work a single crochet around the outside of the handle and outside edge, working decreases in the opposite “valley”, until you come to the starting single crochet. Sl st to the top of the 1stst.
R4: Ch 1 and single crochet in same stitch as joining. Single crochet around. This time, skip a stitch over the valley at each side of the bag. When you come to the handle, continue working single crochet across the handle stitches (NO decreases needed here). At end of the round, join with a slip stitch to the first stitch. Fasten off yarn.
After this step you’ve worked 4 single crochet rows on the outside edge of the bag. There are 2 rows on the outside edge of each strap.
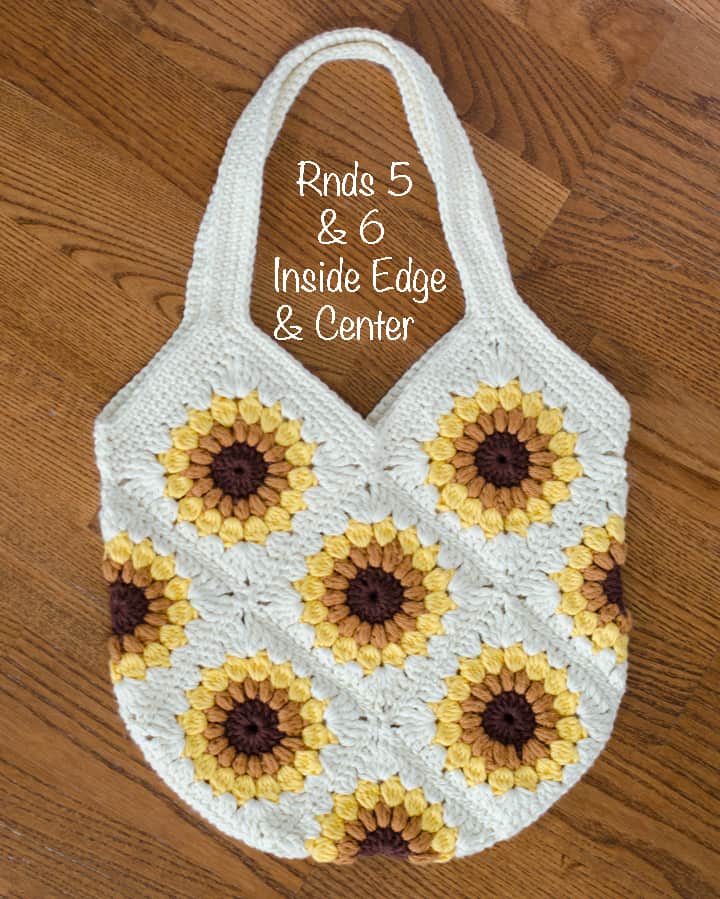
Rows 5 & 6 are worked on the inner edge of the handle and the center front and back of the bag. First you will work rows 5 & 6 on one side and then repeat the process on the opposite side.
R5: Attach ivory yarn to any single crochet on the front of the bag near a handle. Ch 1 and single crochet in same stitch as joining. Single crochet around.. When you come to the center front “valley”, skip the center stitch, and continue to single crochet around. At the end of the round, slip stitch to the 1st stitch.
R6: Ch 1 and single crochet in same stitch as joining. Single crochet around. When you come to the strap, single crochet into opposite side of the strap stitches. At the center front “valley”, sc 2 together and continue to single crochet around. At the end of the round, slip stitch to the 1st stitch. Fasten off yarn.
Repeat rows 5 and 6 on the opposite side, working over the center back and the inside edges of the strap on that side.
Fasten off and weave in the ends!
A final note: When the sunflower bag straps and border are complete, this is how the rows work out: The straps are just over an inch wide. There are 2 single crochet rows on either side of the chain, so 4 rows (total) of single crochet on each handle. The center front “valley” and back “valley” have 3 rows of single crochet. And the outside/side top edges have 4 rows of single crochet.
The Sweet Summer Sunflower bag is unlined. However, if you’d prefer a lined bag, be sure to read my post on How to Line a Crochet Bag.
Explore More Crochet Patterns
Do you love crochet as much as I do? I think you’re going to love these other free crochet patterns:
- Easy Crochet Hat
- Crochet Octopus
- Crochet Bee
- Crochet Candy Corn
- Crochet Pumpkin
- Crochet Wine Bag in Fall Plaid
- Easy Crochet Dishcloth
- Crochet Cat Sweater
- Men’s Crochet Beanie
This collection of crochet backpack pattern collection is pretty fun too !
I love seeing your finished projects! If you enjoyed making the Sunflower Granny Square Bag, I’d love to see yours on Instagram, be sure to tag me @crochet365knittoo. If you are on Facebook, stop over to the Crochet 365 Knit Too Facebook page or pop over to the Crochet365KnitToo Club and share a photo! I’d love to see your work!

Wow this is beautiful. I am a beginner crocheter and i loved this so much but was afraid to try it. But I decided to try and HOLY COW!!!!!!! I did it . Your pattern was so easy to follow and love the pictures (tutorials) I was so excited and showed it to a few of my friends.I had a lady ask me how much I would charge her to make a bag for her. I have no idea. How much would you charge someone?
Thank you so much for this beautiful pattern.
I’m so glad you tried it and made the bag! I really like this one. So cute!! As far as what to charge, that is always challenging. Sometimes people use a formula that is an hourly rate times the number of hours it took to make the item PLUS the cost of supplies. However, sometimes this makes the item more expensive than someone is willing to pay. I would look at other crocheted bags on Etsy and see what people are selling them for (remember a listing price and actually selling at that price are sometimes different). And then use that as a guide, if you are willing to make the bag at that price.
I am an absolute fan of this bag😍 I really love sunflowers and this bag is beautiful, amazing job.
I would like to ask the size of one granny square. I am working with smaller hook and different yarn and would like to know how much bigger it should be to reach your bag size, or how many smaller squares I would need to add, if possible to achieve the same shape. Thank you in advance 🥰
Thank you so much — I’m so glad you love the bag! Yarn weight and hook size will change the finished square size, which affects the overall bag dimensions. The easiest way to match my results is to use the same yarn weight, or hold two strands together if your yarn is thinner. Changing the number of squares will also change the bag’s shape and proportions. I’d suggest making one test square first and measuring it to see how close you are before making the full set of squares.
The pattern looks great and I am looking forward to crocheting it. I was wondering why it says free, but you have to pay to get a printed copy?
The pattern is free (in full) on the blog. At the request of my readers, I now offer an ad-free version that is formatted with smaller photos etc at a low cost. If a low-cost ad-free version is available, there are links in the post. But you are always free to just enjoy the free pattern I’ve provided in the post. Hope that helps.
YAAAAS!!! Arrow is one of the best shows! 🙂
Can’t wait to make this bag… I’ll re-watch Arrow. lol
Made it, love it, already making another
Sweet summer sunflwer bag
would it be okay with you if i sold the finished bags?
You are welcome to sell the finished bag! See my About Page for more information: https://www.crochet365knittoo.com/about/
Love this bag, thanks so much for sharing!
I made this bag for my hairdresser for Christmas because I would often crochet while waiting for my colour to set and one time she had mentioned that no one ever made her anything. She was so excited and said it was the best gift ever. I also included some Turtle chocolates inside the bag but it was definitely the bag that made her the happiest. Thanks so much for this pattern. I’m going to make some more for gifts when I get time. 🙂
What a great story! I love when we can pay it forward with our crochet!
Cheryl: You’re da bomb! Thanks for ALL your crochet patterns!
I have been working on this off and on ever since it was published. My squares are completed, but I had the bright idea of making the bag larger/wider to use when yarn shopping (gotta get as much as possible) I have no problems making it taller, but totally stumped at the width.
How did you come up with the layout you used? Can you “see” how it will come together or is there a magic spell that turns a 2D sketch into a 3D article? I’m totally stumped
You could always make larger squares and then it would just make the whole project bigger. You can also play with the square layout. There are many granny square style bags out there. A search on Pinterest might give you even more ideas!
Hey thanks for the pattern! Just started and given what a beginner I am it’s not bad. When you say to slip stitch to join to stitch 1 at the end of some of the flower rows does this mean just 1 sl stitch from last in row to first in row? Or do you actually slip stitch all around the row? Cheers
Yes you slip stitch to the beginning of the row (not all the way around). I try to be pretty clear in that (like “slip stitch to the first stitch in the round”), so if I missed that phrasing somewhere, I apologize.
Hello, first off wanted to say im so excited to make this bag it is BEAUTIFUL! I may be overthinking or under thinking lol, but for row 1 when making a circle you say to use ivory, wouldn’t that make the center of the flower white? Is it supposed to say brown?
Yup. That would be a big ole typo on my part. I revised the post to reflect that you should use the first color. Sorry about that!
I love your bag and look forward to making it for my sister, who is a huge sunflower fan. Thanks for making the pattern easy to understand!
I just made this beautiful Sunflower bag with yarn that my friend sent. It has turned out beautiful. Also made a pencil holder with 2 granny squares from the same pattern. Thank you so much. I wish I could send you the picture. I’ll email.
Great idea on the pencil holder! Glad you enjoyed the pattern!
Hi! I want to ask by the meaning “slip stitch to 1st stitch” in round 1, does it mean slip stitch to the top of chain 3 or to the 1st dc? Thank you in advance 🙂
It should be into the chain 3, which is considered your first stitch in that row. Hope that helps!
Hi Cheryl !!
I love the idea of this sunflower tote, but do you have any recommendations or substitutes for the Hobby Lobby “I Love Cotton” Yarn that you used? I live in Canada and don’t have access to this yarn, do you have any suggestions?
Thanks so much 🙂
– Serena (xox)
Cotton yarn holds up longer than regular acrylic yarn so I would recommend any cotton yarns you can find! Hope this helps! 🙂
Hi Cheryl,
First of all, thanks for making this pattern free! It’s so cute and I’m having fun making the squares. I’m a beginner and almost can’t believe how easy these cute flowers are.
In anticipation of the sewing part, I am a little worried because I have never sewn anything before. I don’t have access to a sewing machine so will be doing it by hand. Do you have any recommendations for what would be the most efficient method to sew the bag together? I am a little overwhelmed by the abundance of information on the internet, haha.
Thanks for your time!
I’m so glad you like it! I currently do not have tutorials on sewing the squares together, but I do have some in the works. You can sew the squares together a number of ways..and can even hold 2 squares together and work a slip stitch through one or both loops.
I’m currently making the bag and have chosen to single crochet my squares together as I love the raised join it creates between them! Can’t wait to see it finished ☺️
beautiful pattern, I have all my squares crocheted but i have a question, when you joined them together di you join with the tapestry needle ?
Yes, I joined with a tapestry needle and yarn.
Cheryl, I just subscribed and I am enjoying your emails and website content.
Thank you, thank you!!
I loved makings this bag! I’ve known how to crochet for a while, but I haven’t worked on many projects. I love using reusable bags when going shopping, rather than plastic, and this is such a pretty design! The pattern was very well written, and I am very happy with how my bag came out!
My Granddaughter saw your pattern on Pinterest well of course I had to make thank you for helping me make her day she absolutely loved it
Hi Cheryl, I just made sunflower bag…and it’s so pretty that my daughter is not leaving it at all.
Thank u so much for the pattern.
Thanks so much for this pattern – I’ve made 4 – 2 in sunflower colors and 2 in brighter colors. I kind of didn’t like all the sewing involved so on the last bag, I slip-stitched the squares together. Worked great!
Cheryl, Thank you for this fantastic pattern!! I am thrilled with my first bag!! Your instructions and photos kept me on track and I love my sunflower bag!! Hope you have a wonderful day!!?❤️???
This is a very cool pattern! I’m wondering if I could substitute other kinds of granny squares in for the sunflower ones? To make different pattern bags? Would that work?
That sounds like a great idea! If you make sure the squares you make are the same size as the one’s in Crochet 365 Knit Too’s pattern, it should still end up the same size. Best of luck!
To make thismore a fall/September bag What color can I replace the white with?
You can change up the colors in any way that is appealing to you! To see a lot of variations, head over to our Crochet 365 Knit Too Club on Facebook and do a search. There are many color combinations there!
Hi I’m in Spain and am really struggling to get the yarn needed for this pattern, can you recommend an alternative brand that can be ordered online. Thank you for your help
You can substitute any worsted weight cotton yarn. However.. you can substitute other yarns of different weights; just know that the pattern might turn out slightly smaller or bigger.
Hi, I would love to try this pattern, but as I don’t live in the US, I don’t have that exact yarn. What size exactly should I use if I’m making the same size as the pattern shows?
The pattern uses a worsted weight cotton yarn. You can substitute another worsted weight yarn. You also can make it slightly larger or smaller by changing the yarn and hook size (you just might need more or less yarn).
Hi there!
I am absolutely loving this pattern!! I just finished all the granny squares. Do you recommend blocking before stitching them together?
Thanks so much for your help!
I did not block the squares for this bag, but you certainly could block them if you’d like.
Love this pattern so cute! I alternated yellow and purple sun bursts. I needed 8 yellow and 5 purple.
It is a lovely pattern which worked very well for me. Very clever how it is put together! I’m thinking of trying it with different kinds of squares also. Thank you so much for sharing it.
Jackie
Thank you for this great pattern. I’m just wondering how I can make it into a larger bag? Thanks in advance.
Glad you like the pattern. To retain the shape and look of the bag, your best bet is to use a thicker yarn and a larger hook. You could also add another row (granny style), but then that will create more white space and you might not like the look. Another alternative is to use the same squares with the layout for the Boho Boss Bag. That bag is larger, but it won’t have the same shape as The Sunflower Bag.
I’m completely stumped on the final border & handle row (6). What does “When you come to the strap, work single crochets into opposite side of the starting chain.” mean? My inclination is just work the handle border row6 just like I did row5. I’m at a standstill trying to figure out what the instructions mean. Help! 😬
Sorry for the confusion. Rows 5 & 6 are worked on the inside edge of the handle (on the opposite side of the chain part of the handle). You are correct in that row 6 should be worked similar to row 5. I will take a look at this part of the pattern to see if I can word that in a way that’s not so confusing.
Turned out beautiful! Thank you so much for this beautiful pattern. 🌼
Hi, I came to find comments about this same stage, which I am stuck on trying to understand now. I’m going to assume that “work single crochets into opposite side of starting chain” is meant for R5 rather than R6, otherwise there would be no “around” to work in R5 if I didn’t.
I re-worded that bit to make it more clear. Both row 5 & 6 are worked on the inner edge of the handle.
This is an awesome pattern! Thank you for sharing!!! I am all done with the 13 squares & feel a bit overwhelmed with putting it together but I am sure I can do it ! your instructions are very understandable!! If all goes well I will be making 4 bags!! I have several people that love sunflowers! & the other possibilities are endless!! yay!! thanks again ! you are truly a gifted teacher!!
Thank you for this tutorial, it looks like a great summer project! I was wondering if I could combine this pattern with the daisy granny square bag pattern? Or are they different sizes?
You can follow the directions for this pattern using any square pattern. Just know that the size will change if the square size is different. Most patterns will indicate the size of the finished square and then you would just do some math to figure out the finished bag size.
Hope this helps!
Thank you so much for your pattern. I absolutely love my new bag. I am re-learning crochet as a retiree and this was really so satisfying. I will share the pic in the Crochet 365 Knit Too club 😊
I am confused about how to do row 2 – do you have a video? I don’t uderstand how to go around the entire bag when you need to chain 70 and jump to the next peak. When does the part between the peaks get done?
First you chain to form the handles and work the outer part of the handles/border. Then you come back and work rows 5 & 6 to work the inner part of the handle. Hope that helps clarify.
My daughter absolutely loved this bag that I made for her birthday! Thank you so much for the pattern! 🙂
I love this bag, Thanks so much for the pattern.
So glad you’re enjoying it!
Hello there, a kind person gave me your link for the Sunflower bag. Does your pattern including instructions for the actual stitches? I’m VERY rusty with crochet and honestly forgot the proper names and details since the 1970’s! lol.
Thank you.
You can search my blog for any unfamiliar stitches in the pattern. Often times I link them right in the pattern, but if not, you can use the search feature to find a tutorial on whatever is unfamiliar.
I did not make the bag but I did make the sunflower blanket. I made all different colors of the pattern and It was beautiful. Thank you so much for the pattern.
Thank you for this pattern! I just finished it and I’m so proud. It was easy without the finished project looking “easy” if that makes sense. This was my second crochet project ever and now I’m hooked 🙂 on crocheting!
I’m so happy to hear this! It is a very fun pattern!
Can I use a 5mm crochet hook in stead of the 4mm
You can change hook size, but it may also change the size of the square and finished bag.
Aww.. thanks for the kind words! And yes.. the squares can be configured all different kinds of ways for different sized bags!
Hello!
First off thanks for this beautiful pattern!
I am a bit stuck though…
When beginning the handle part, the instructions say to attach yarn 4-5 sc before a side ‘valley’ but I kind of don’t really get where that is supposed to be.. I tried to just attach it somewhere and now on round 3 don’t know how I am supposed to get to the side of the bag because my rounds start on the inside of the handles basically.
Hope it is understandable where I struggle lol help would be much appreciated!!!
A valley is the lower joining point of 2 squares. Round 1 of the bag directs you to attach the yarn near a valley on the side of the bag. That way you are working the area on the outside of the handles first. Hope that helps!
Thankyou for your email and the beautiful pictures of bags to make. All I need is the time!!
Really enjoy the emails, many thanks, you brighten my day.
Thank you so much for this pattern. I made this bag for my mom and she loves it. The only difference that I made is that I crocheted a blue round then a off white round, it looks like the sunflowers are framed by the sky. Again thank you for the wonderful pattern.
Sounds beautiful! Glad you enjoyed the pattern!
Hi Cheryl. I am finally about to start my first Sweet Sunflower Bag. So excited as it’s been on my radar for so long. I wanted to know whether you have started the sunburst granny with a magic ring rather than 5ch, and how it worked out.
I prefer the chained ring. With a joined ring, it pulls in the stitches for that first round and makes it curl up instead of lying flat. Plus I think the look of the small hole in the center is part of the granny square vibe.
I received this beautiful bag from someone who loves crocheting.
I love it. Thank you for sharing the pattern. I would like to make one too to pass on the love.