
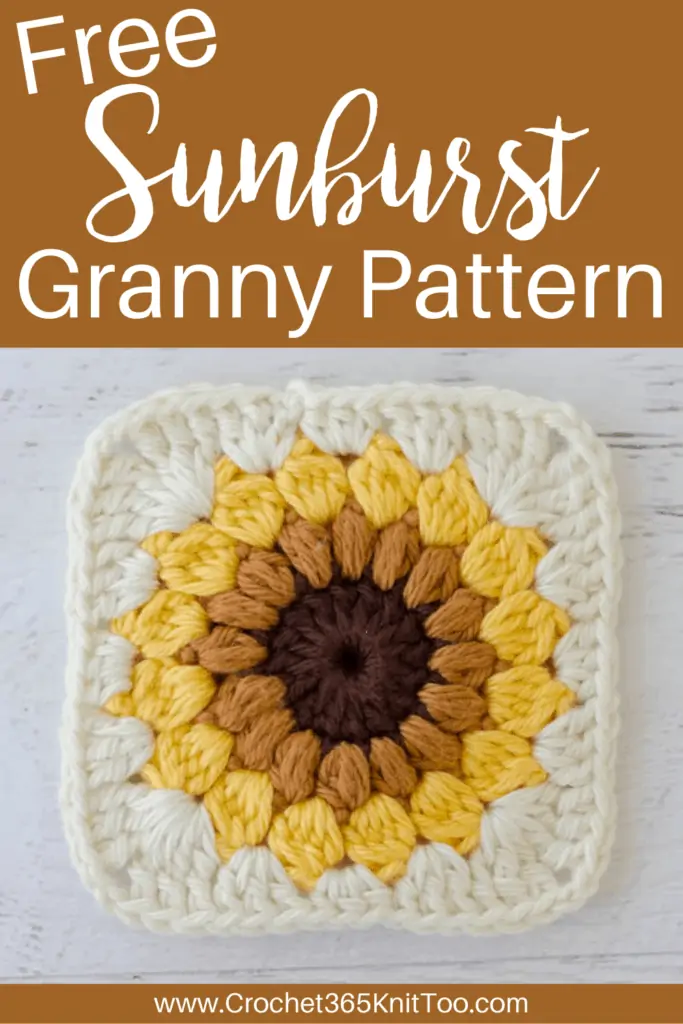
Sunburst Granny Square
This post may contain referral/affiliate links. Please read my disclosure for more info.
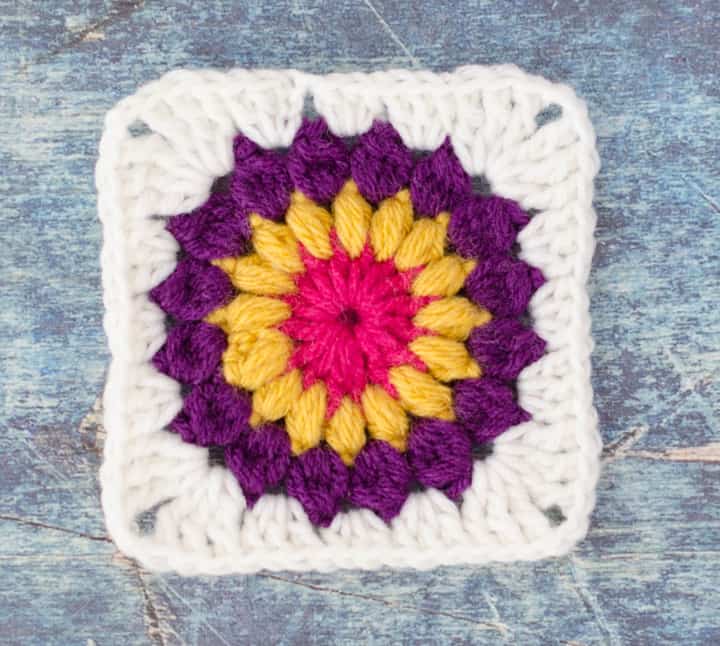
This might be my all time favorite granny square. She’s pretty. A little sassy. And 100% put together. My friends: Meet the Sunburst Granny Square.
I love a good granny square. And so do a lot of you. They are pretty, easy to learn and pack a visual punch. You can use them in so many ways. An afghan. A bag. Really just about anything and everything can have a granny square component.
And I love a design that builds on an old favorite. We’ve covered a basic granny square pattern and an easy baby blanket. And we used a fun Daisy Square in the very popular Daisy Mae bag. And of course a simpler solid granny square in the Boho Boss Bag.
I’ve been drooling over this Sunburst Granny Square…well…just about forever. I love it made in bright, bold colors like the first photo and used in a pillow or afghan. With the flat braid join? Swoon. Can you imagine it? Be still my heart!
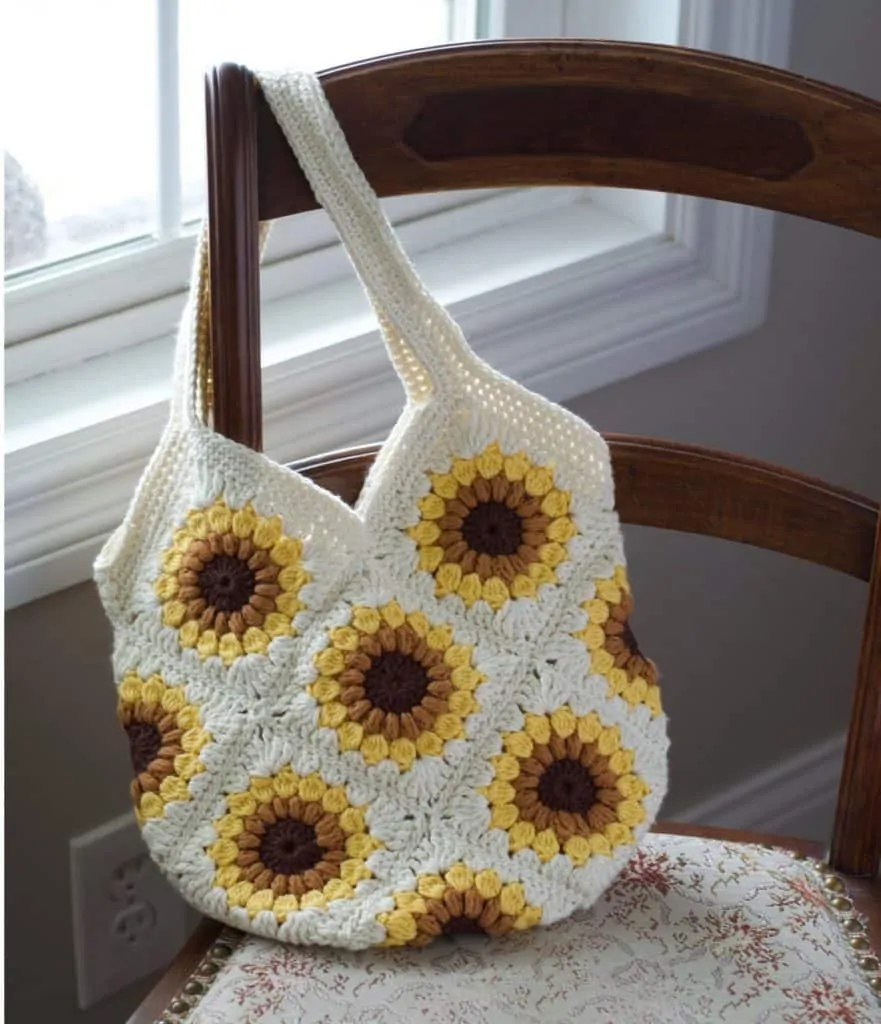
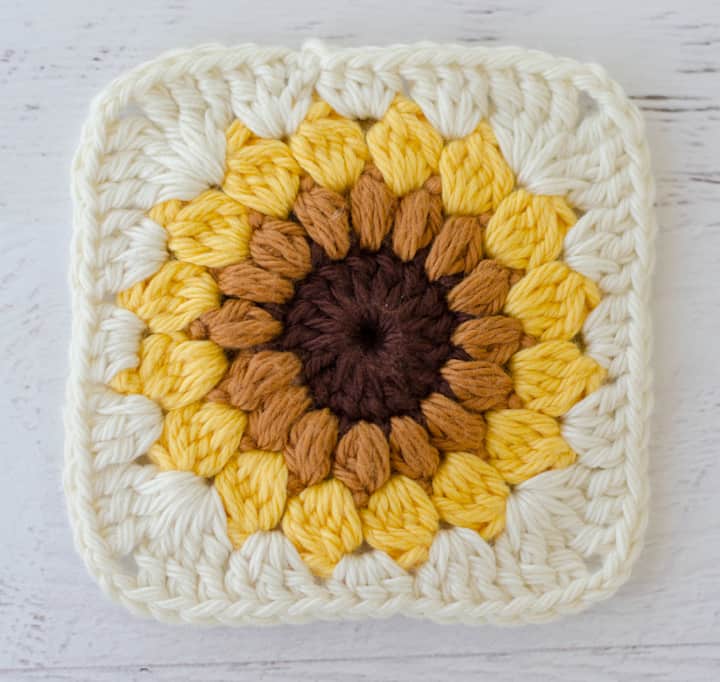
Or how about changing up the color scheme to make a cute sunflower! You’ll find this little beauty the feature square in the Sunflower Granny Square Bag!
Frequently Asked Granny Questions
I get a lot of questions on the beloved granny square, so I thought I’d take a quick minute to answer some basic granny square questions before we dive into this gorgeous Sunburst Granny Square…
Are Granny Squares in Style? This is such a great question because a granny square is so fun to crochet, but modern crocheters often like modern makes. The granny square has stood the test of time. Color choice makes a big difference in “dating” a crochet granny square to a particular era in time. And there are a slew of variations that modernize the basic granny square pattern. This Sunburst Granny Square is the perfect example of that. So yes, granny squares are still in style!
What is a Granny Square Used For? A granny square is really versatile. Many people like to join several for a crochetblanket. Others will use a crochet granny square for a pillow, bag or purse. The possibilities are really endless!
How Do You Add A Row To A Granny Square? Maybe you’re wondering how you can make this larger or how big is a typical granny square. There are two things that affect the size of a granny square. The first is gauge which is dependent upon hook size and yarn weight. You can read more about crochet gauge here. The second is to continue the established basic granny square pattern into additional rows. Simply work sets of 3 double crochets: a set in each space on the side and in each corner work 3 double crochet, chain 2, 3 double crochet.
How Do You End A Granny Square? There are two choices for ending a classic granny square. After the last stitch, simply slip stitch to the top of the starting chain of the prior row. Or if you prefer a more seamless finish, instead of a sl st, use an invisible join.
How Many Granny Squares Does It Take to Make a Blanket? Many, many crocheters want to know how to make a granny square blanket. It really depends on the size of the finished crochet granny square and the desired size of the finished blanket. Whether you’re crocheting a traditional granny square, a solid granny square or any other crochet square, the first step is to measure the finished square. Either look to the information in the crochet pattern or measure the afghan square itself. You can get more information in this great post on how much yarn to crochet a blanket.
Sunburst Granny Square
Here is What You’ll Need:
- US G6/4mm crochet hook (these are my absolute favorite hooks I recommend to everyone!)
- Worsted Weight yarn scrap yarn in 4 colors
- Tapestry needle and scissors
Resources and tutorials you may find helpful in following this pattern: Crochet Abbreviations, US to UK Crochet Conversion Chart. Find links to stitches on the “Tutorial” menu: Getting Started will show basic stitches used in many patterns and Crochet Stitch Dictionary shows our growing collection of crochet stitch tutorials. I really like to use the invisible seamless join when finishing pieces that get sewn together (in this project this is an optional step).
Size:
Each square is approximately 4″ x 4″. Your gauge may vary.
Sunburst Granny
Row 1: Using first color and a G hook, ch 5 and join with a slip stitch to the 1st chain to form a loop. Ch 3 (counts as first dc), make 15 dc into the loop. Join to top of 1st stitch in the row. (16 st) Fasten off 1st color.
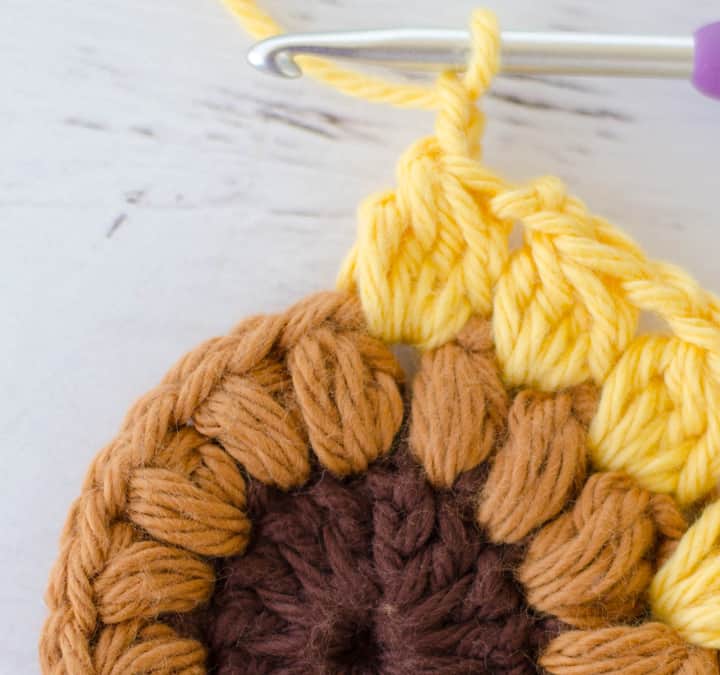
Row 2 is made with puff stitches. First, attach the 2nd color and chain 2. *Yarn over, insert hook into same stitch as joining and and pull up a loop to the height of a double crochet (3 loops on hook). Then yarn over again and insert hook into the same stitch and pull up another loop ( 5 loops on hook). Yarn over again, insert hook into the same space and pull up another loop. (7 loops on hook). Pull yarn through all loops. Chain 1 to lock in the stitch. First puff stitch made.
Continue to make puff stitches in all the stitches in the previous row as follows: Yarn over, insert hook into next stitch and pull up a loop to the height of a double crochet (3 loops on hook). Then yarn over again and insert hook into the same stitch and pull up another loop ( 5 loops on hook). Yarn over again, insert hook into the same space and pull up another loop. (7 loops on hook). Pull yarn through all loops. Chain 1 to lock in the stitch. At end of row 2, there will be 16 puff stitches. Join to the top of the first stitch. Fasten off Color 2. (16 puff stitches).
Row 3: This row is worked with bobbles. For a detailed tutorial on bobbles, click here. You can start the row in one of 2 ways. Either attach color 3 in between 2 stitches and chain 3. Or start with a standing stitch. I started with a slip stitch of the new color on my hook, carefully held a yarn over and got going with a bobble as follows:
Bobble: Yarn over, insert hook into space between 2 puff stitches and pull up a loop. Yarn over and pull through 2 loops (this leaves 2 loops on hook). Make 3 more incomplete double crochet stitches. There are now 5 loops on the hook.

Yarn over and pull through all 5 loops. Chain 2 to lock in the bobble stitch. Continue to work bobbles in every space in the previous row.
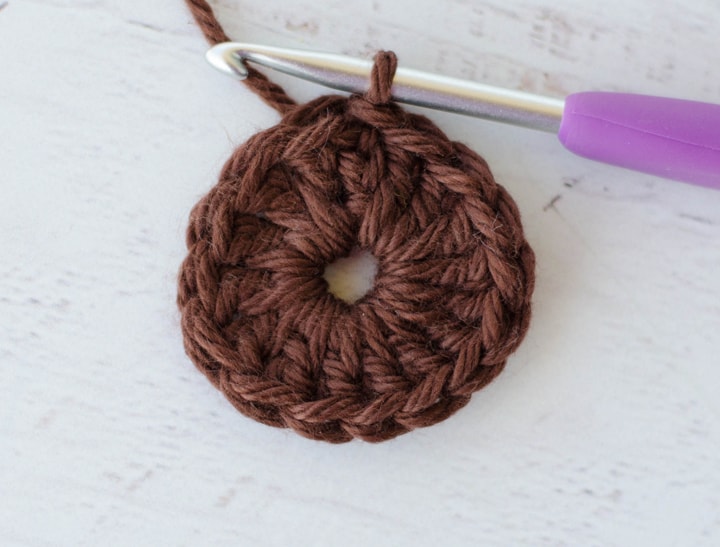
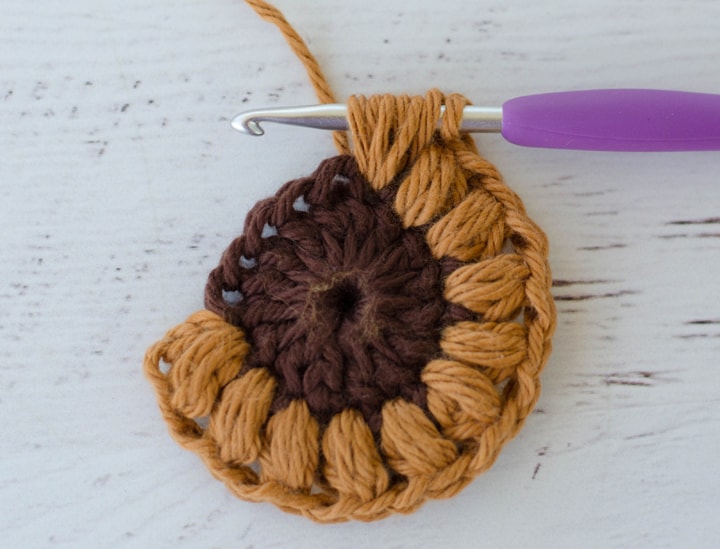
At the end of the row there are 16 bobble stitches. Fasten off color 3.
Completed bobble stitch:
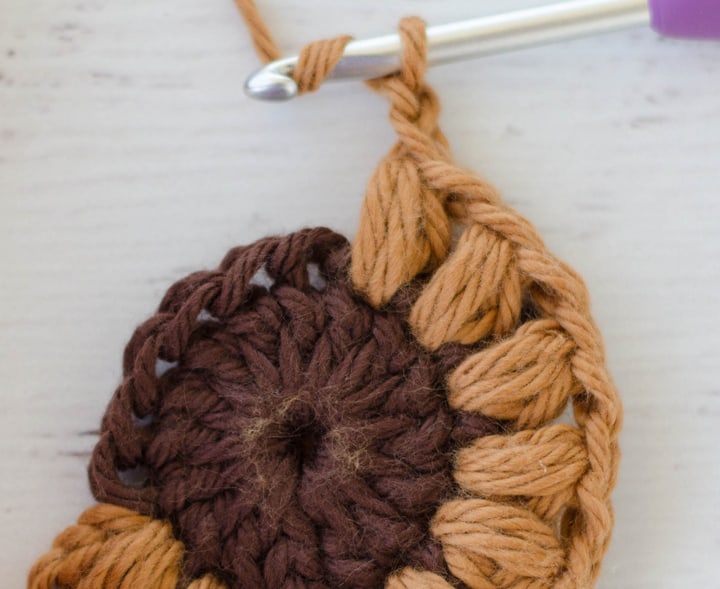
Round Flower to Sunburst Square
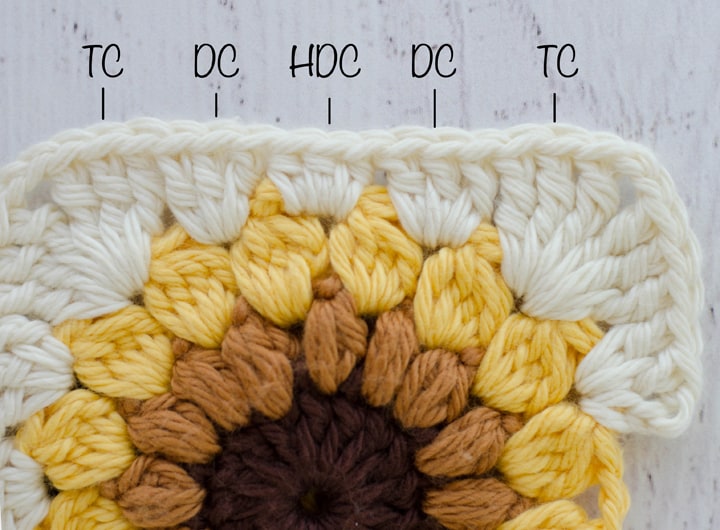
The 4th (and final) round turns the round flower into a Sunburst Granny Square! To do this we work varying heights of stitches which makes the final square. Let’s get started!

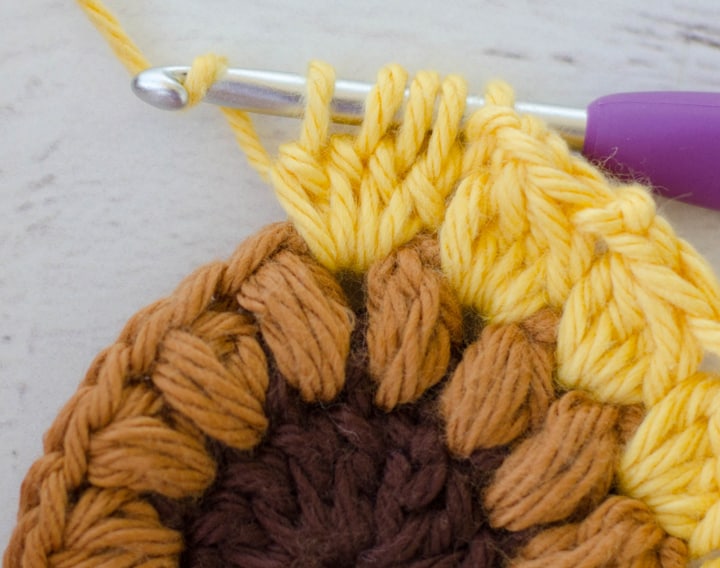
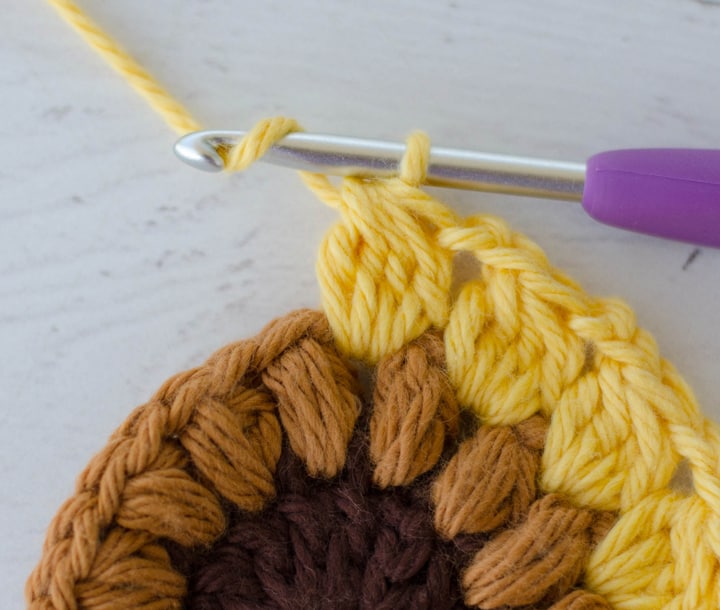
Row 4: Join color 4 in any space in previous round. Chain 3 (counts as 1st dc). 2 dc in same space. *In next space, work all of the following: (3 tc, ch 2, 3 tc). Corner made. 3dc in next space, 3 hdc in next space, 3 dc in next space*. Repeat from * to * . Repeat from * 3 more times. Then work 3 dc in next space, 3 hdc in last space and join to 1st dc in row. I like to use an invisible join for a nice finish.
Ta-da! Isn’t she a beauty? I just love this Sunburst Granny Square. Don’t you?
More Free Granny Square Patterns
If you love the Sunburst Granny Square pattern be sure to check out the Daisy Granny Square pattern. ,You might also like to check out these other granny squares. You can find all our Granny Square Patterns here.

1. Solid Granny Square // 2. Daisy Bag Square // 3. Basic Granny Square Pattern
Explore More Crochet Patterns
Do you love crochet as much as I do? I think you’re going to love these other free crochet patterns:
- Easy Crochet Hat
- Daisy Granny Square Blanket
- Crochet Octopus
- Crochet Bee
- Crochet Stitches (perfect for your next project)
- Crochet Star
- Christmas Crochet Stocking
I love seeing your finished projects! If you are enjoyed this Sunburst Granny Square, I’d love to see your granny square and finished projects on Instagram, be sure to tag me @crochet365knittoo. If you are on Facebook, stop over to the Crochet 365 Knit Too Facebook page or pop over to the Crochet365KnitToo Club and share a photo! I’d love to see your work!
Hi! I really love your sunflower granny square! Would you be able to tell me what brand yarn you used? I love these colors and I can’t find anything close to it! Thank you
I just used little bits of scrap from my stash, so I’m not sure which colors/brands they were. Glad you like the pattern!
Can you just keep going for a blanket size like one giant square?
Sure can! Or make many squares and join them to form an afghan!
I am doing that now. I’m connecting the squares into long strips and then will connect the strips. I made about 100 squares.
What size blanket did that make and how much yarn was used in your project?
I have not made the Sunburst Granny Square into an afghan.. yet.. but I am certainly thinking about doing so! I love this square! To calculate an afghan, read my post on the Happily Ever Afghan which goes over how to calculate yarn for an afghan.
Thank you I want to make lapgan for My Sis she
Loves sunflowers.
So is this your typical granny square using just four colors? How many rolls of yarn would I need?
I love this!
Thanks!
Patty
This is a fun variation to your typical granny square! We have a pattern for the original granny square here: https://www.crochet365knittoo.com/crochet-granny-square/
Both squares are quick and don’t take up very much yarn at all. 🙂
Your sunflower pattern would have to have the best instructions I have ever had the pleasure to read. Thank you for giving my crochet confidence such boost!
Glad you enjoyed it!
Hi, thank you so much for this lovely pattern! I’m going to make it in the sunflower colors you suggested, but this is my first big project. If I wanted to join the squares in an afghan using the flat braid stitch, would I need to add a foundation row around each square? Thanks!
Yes, you would need a foundation row around it. Just follow the directions for the flat braid join here: https://www.crochet365knittoo.com/happily-ever-afghan-crochet-flat-braid-join/
Hi! Thank you for the amazing pattern ? if I want to make the square bigger, add one more row with bobbles. How do I increase in the second row of bobbles so it flattens out? Thank you so much ❤️
I haven’t tried adding on to the square in that way. Designing and working out those details is often a bit of trial and error…adding or decreasing chain stitches as need be to make more space. If you come up with something wonderful, be sure to let me know!
I am making a small quilt with this pattern. Thank you for your easy diy instructions. I am truly grateful.
Hi Cheryl. I purchased this pattern from Etsy. Just letting you know the pattern uses Ivory as the centre colour. May need to amend ?? Love this bag. Thank you!
I love when I make typos like that. NOT! Thanks for the heads up. I will take a look!
How much yarn did you use? Maybe in yards so I can compare to the balls of yarn? I love this pattern!!!
For a single square it’s not a lot of yarn. The square is about 4″ x 4″. I can just use some old scraps to make it. Hope this helps!
Hi!!! I’m a beginner at this and your instructions were so easy to follow. Thank you!!! I had so much fun making squares. LOL. Do you have a beginner way to attach all the squares for an afghan?
Aren’t they so fun? Crochet 365 Knit Too has so many fun ways to attach squares. Here’s her Zig Zag Slip Stitch Join tutorial! https://www.crochet365knittoo.com/zig-zag-slip-stitch-join/
Hello,
My mum would like to do this bag for md but she can’t speak or read English, she’s French actually. Don’t you have a video so she can follow the steps?
Thank you 🙂
I do not have a video for the pattern. Perhaps she can follow the labeled diagram close up photo for the square.
hello! is it possible to start off with a magic ring instead of the chain 5 or would that mess up the pattern?
I think it would have a similar result. I would try it out. Good luck!
Hey I actually did a magic circle for mine and it worked great!
Is there anywhere here that I am just missing, with a link to a printable version of the pattern to keep in my crochet bag? Then I’ll always have it with me to dash off a fre more squares. No matter which color I happen to have with me. (I think that would be a great way to mix up the colors, a lot!)
Crochet 365 Knit Too has an ad-free printable pattern of her Sweet Summer Sunflower Bag which uses these Sunburst Granny Squares! https://www.ravelry.com/patterns/library/sweet-summer-sunflower-bag
I followed your exact step by step. My turned out to be more circle than square. I’m trying to figure out what I did wrong. Was I supposed to add a chain after hdc then extra chain after dc and extra chain after tc? Help please?! Lol thank you so much for your time.
The only extra chains in row 4 are in the corners. The heights of the stitches are what enable the round shape to become square. I would make sure that your taller stitches really are taller than the shorter stitches. You also could block your work when done. Or, depending on your project, you could work another round similar to a traditional granny square after round 4 and that might help it look more square for you.
Hi, thank you so much for this pattern! It was so clear and all the links were super helpful too! Learnt more than just making these beautiful squares. Much love❤️
Love love the sunflower square, could you please tell me how many I would need for Afghan and how much yarn I will need please. I am fairly new to crochet but am going to try this as I love it so much.
So glad you love the square as much as I do! I haven’t made the square into an afghan yet (but hope to soon). Yarn needs will depend on the size you want to make and the number of colors you wish to use. This Post talks walks you through my process of designing an afghan and planning for yarn. Hope that helps!
Hi, love the pattern! Just starting with it, had a question with probably an obvious answer..In the 4th colour, is (tc) supposed to be triple crochet? I wasn’t sure because I’ve seen it abbreviated as (tr), and your US/UK chart didn’t clarify.
It is Treble Crochet. And yes, you’re right, it should be TR. I have no idea why in the world we’d abbreviate sc, hdc, and dc with a “c” but change the convention for treble crochet. I will think about how to correct this going forward as I too often default to “tc”. Thanks for the question!
Loved this so much! I made it using Christmas Colors (red, deep green, white, touch of yellow for center). Went over so well, that I made one for each sister. Definitely the hit of the show!!
I love this pattern so much! I’ve been trying to complete the whole thing in just one color, and something is just not right moving from row 3 to row 4. From the bobble to the “squared” row. Do you have any suggestions? I love how beautiful it looks with just one color. Thank you!
You need to get your work to the same starting spot as in row 4, so slip stitch into the space where you would normally start row 4 and start your chain for the row there. Hope that helps!
Hello! Thank you! I am a beginner and the instructions are great, One question – my squares are not laying as flat as other patterns that I have tried. Please let me know what may be causing the issue and how to correct it.
Sometimes, as crocheters we work a bit tighter or looser than one another. That could be it. It also can just be the result of working from a circle to a square. You can block the finished square to help it lie flatter. If it is curling, you could also try adding an extra chain stitch in the corners and see if that helps.
Thanks for showing me how to do this, but as someone who is following this pattern wouldn’t they need to know how to weave in the ends? (This is me asking how to weave in the ends). Looking forward to your reply!
Yes weaving in ends is a basic crochet skill for sure! Just like learning each stitch. I don’t currently have a post on weaving in ends, but it’s a great topic for one!
Hi! I love this square. Thank you for the pattern!
Do you have any tips/suggestions for how to make a triangular half square?
That is not something I’ve attempted yet and it would require some experimentation, especially at the corners.
Hi! I really love this pattern and very easy to follow.
I do seem to have very big holes in the yellow were the white is added and I can’t seem to figure out what im doing wrong.
It is likely the tension on the chains in the corner. You could try tightening up your chain stitches as you work them or chain 1 less stitch.
Your bag is lovely. After completing the squares, do you have instructions how to assemble the bag. Thank you. Ivy
Yes, there are instructions for the bag on this post: Sweet Summer Sunflower Bag.
Very good instructions
I have just made a sample square, love it! Thanks
A friend of mine found your purse made with this pattern over on pinterest and she sent me the picture screaming that she needs this in a blanket. I will be doing that for her this fall when all my other projects on the list are done. Thank you so much for this!
You can find my blanket in this square here: Bloom Anyway Sunburst Granny Afghan
Great pattern. This was my first crochet project and it was easy to follow with very clear instructions. The photos also helped a lot! Thank you!
Beautiful! I happened to have colors that look almost identical to yours and it looks amazing, definitely will be adding to my random crochet square baby blanket!
Is there a way to purchase this pattern so I can print it?
This is component of a few other patterns on the blog that you can purchase like the Sweet Sunflower Bag or the Sunflower Crossbody. It’s also part of the Bloom Anyway Afghan which is a free pattern in my library/vault for newsletter subscribers… which means you can get it for free! Just sign up on any form on my website and you’ll get the instructions on how to access the vault.
Have just used your granny square to create a gorgeous cardi for my daughter. She loves it. Thank you for the inspiration.
How do I make These into a handbag?
Pop over to my Sweet Summer Sunflower post. It explains exactly how to do that!
Wonderful job! This is a great description of all the steps to do. I definitely had to brush off some skills, since this piece requires all different ones. But it comes out so nice after all the hard work!
Any chance you can buy this pattern on Etsy? I’m a little slow with the crotchet hook and using a phone to follow the pattern….drives my old eyes crazy, lol.
You can get the Sunburst Granny square as part of the Sweet Summer Sunflower Bag pattern (which IS on Etsy). Alternatively, I just created some free printables of all my granny squares. They are in my library/vault. Simply sign up for my email list and you’ll receive the password for the vault.
For the life of e I cannot find out how to get the free Sunburst Daisy Pattern. Can you help?
You can either read the instructions on this page for the pattern. Or, if you are a subscriber to my newsletter, you have access to my free library which includes many free printables like a crochet journal, stitch dictionary pages and granny square pages. To access the library, simply look at the bottom of any newsletter from me to get the information on how to access the library. If you’re not on my email list yet, then just fill out your name and email address at the top of the post and you’ll receive that information in your first email. Hope that helps!