
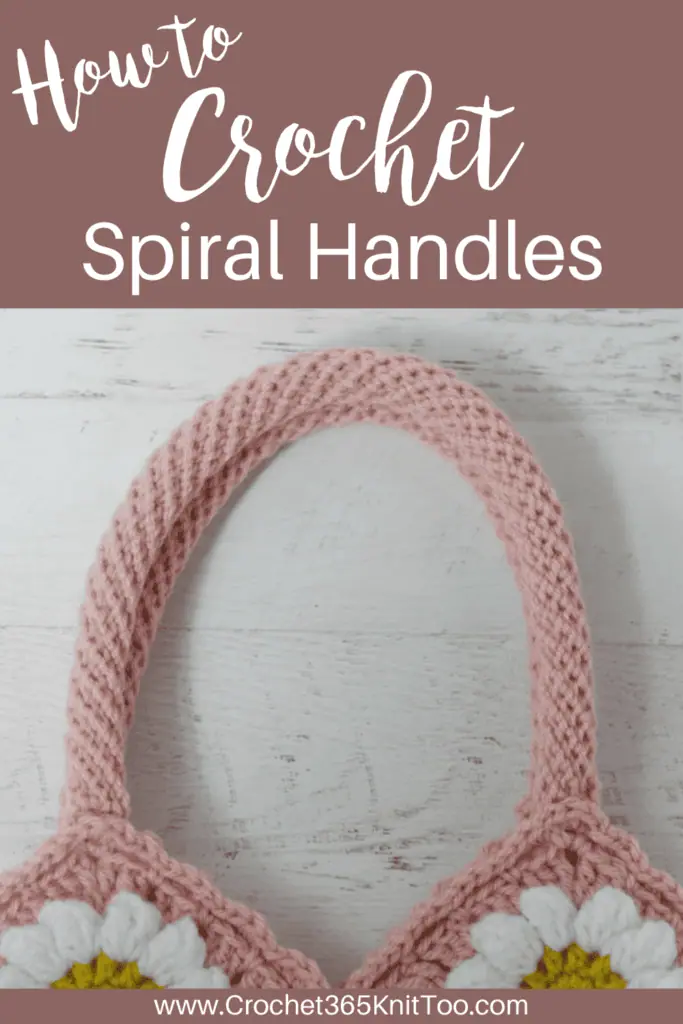
Crochet Spiral Handle
This post may contain referral/affiliate links. Please read my disclosure for more info.
A crochet spiral handle is like nothing you’ve ever seen before in crochet. It’s intricate and stunning.

And truthfully a tad bit challenging. But I’m going to break it all down for you in this tutorial complete with many labeled photos and a great video of the entire process!
This crochet spiral handle. For years I looked at it and marveled that it was crocheted and yet, I just could not figure it out. It remained elusive and just out of reach. This thing of beauty. The perfect crochet bag handle.
But finally I’ve got it figured out and have broken down all the confusing bits. And I’m going to teach you exactly how it’s done so you can have a crochet victory too! My friends, meet the crochet spiral cord!
In case you missed it, I spent years trying to “get” how in the world to achieve that amazing spiral. YEARS. I mean.. it’s a single crochet worked in a spiral. Should be easy, right?
Only its not. Not at all.
The secret to this spiral handle is in the unique and completely unusual and untraditional placement of the single crochet stitches.
The crochet spiral handle is very easy. And at the same time, unlike anything you’ve ever done before. It sort of breaks all the crochet rules.
So for now, put aside what you know about crochet (ok.. you do need to remember the single crochet part). Take a deep breath and relax. This is a new ball game.
Overview of the Crochet Spiral Process
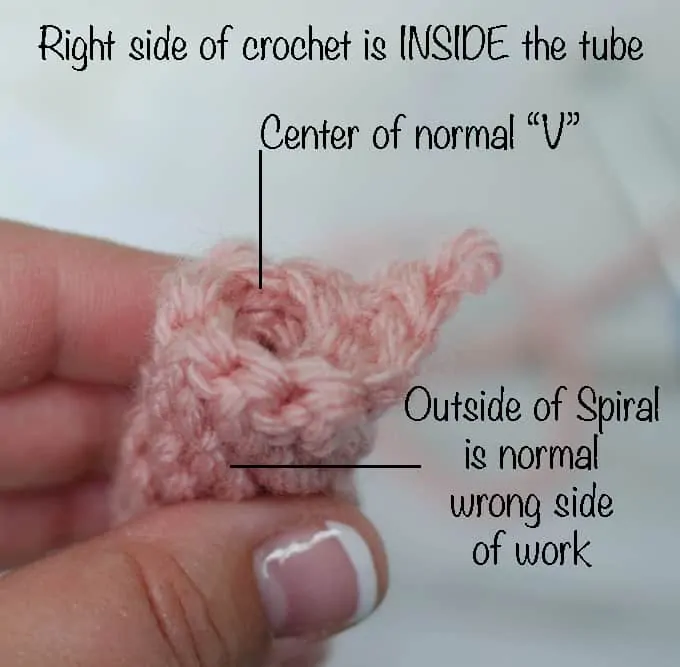
So talk about completely different. Yes, we are working single crochet in the round. However, the normal “right” side of the work will stay on the inside of the tube. And the normal “wrong” side of the work goes to the outside. And what really makes things fun is that you work the single crochet into a completely different area that you never knew existed. Bear with me. You will get this.
Materials and Note
For this tutorial, we’re making handles for the Daisy Mae Crochet Bag. Please be sure to read through this picture tutorial first and then at the bottom of this post, watch the video.
One handle takes about 1/2 oz of yarn. So give yourself a little over 1 ounce for both handles.
Crochet Spiral Cord Instructions
Ch 6. Without joining, return to the the first chain and make the first single crochet. This sets the work up for crocheting in a spiral.
R1: sc in the remaining chains. (6 sc)
R2: continuing to work in a spiral, sc in each st (6 sc).
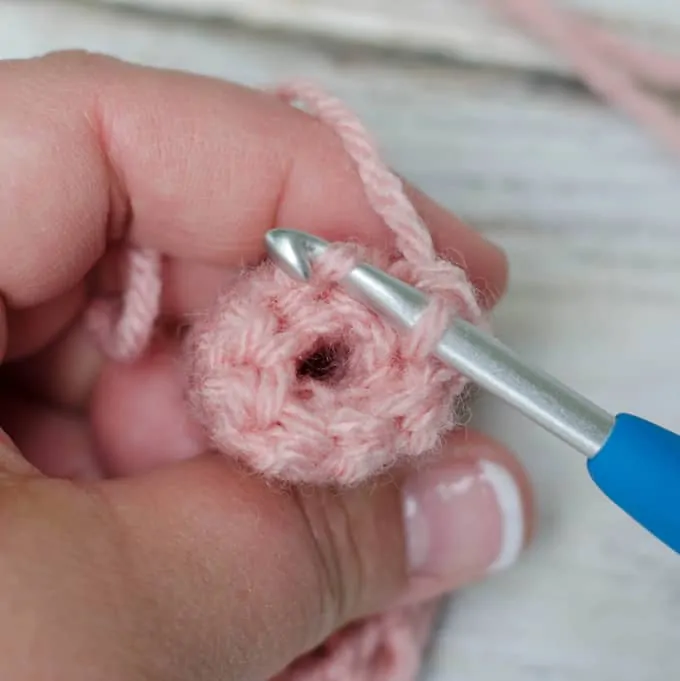
Now TURN your work so that the inside of the tube leans towards you. Here’s where we change things up.
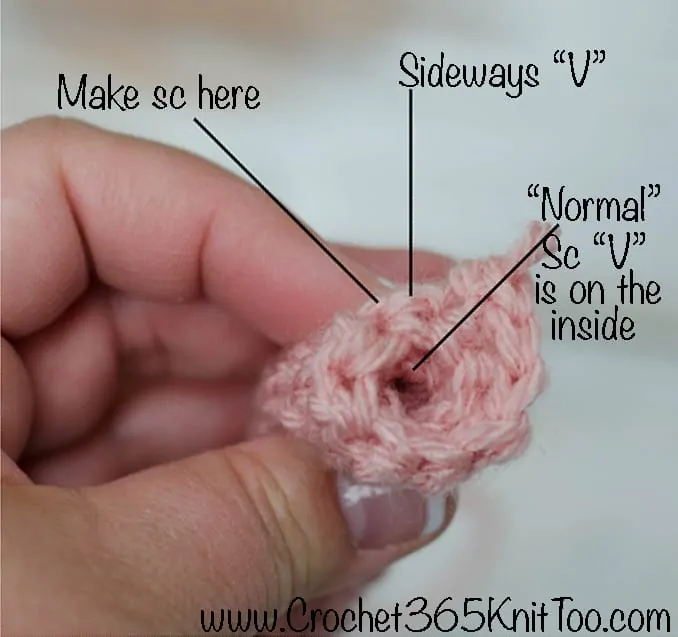
Forget about everything you know about what crochet looks like and where you work your stitch. Look for the sideways “V” and then identify the loop above that “V”. (See above photo). Work your single crochet into that strand of yarn.
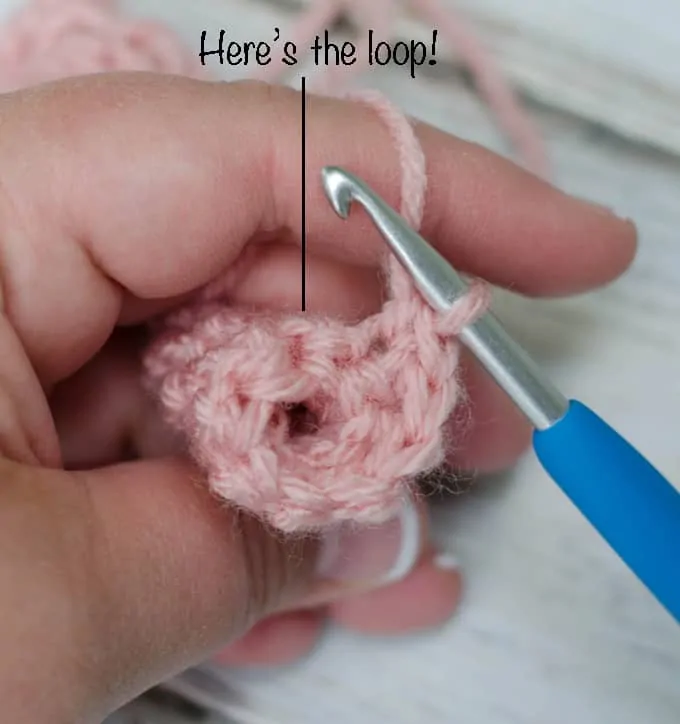
The first row is a bit tight. Just continue to move along, identifying the sideways “V” and working a sc in the strand above the “V”. You will feel like everything is wrong. It’s not. Just go stitch by stitch and carefully work a sc in each little strand. Around and around.
Here’s another view with the strand raised up a bit.
Just wiggle your hook in and work a normal single crochet into the strand.
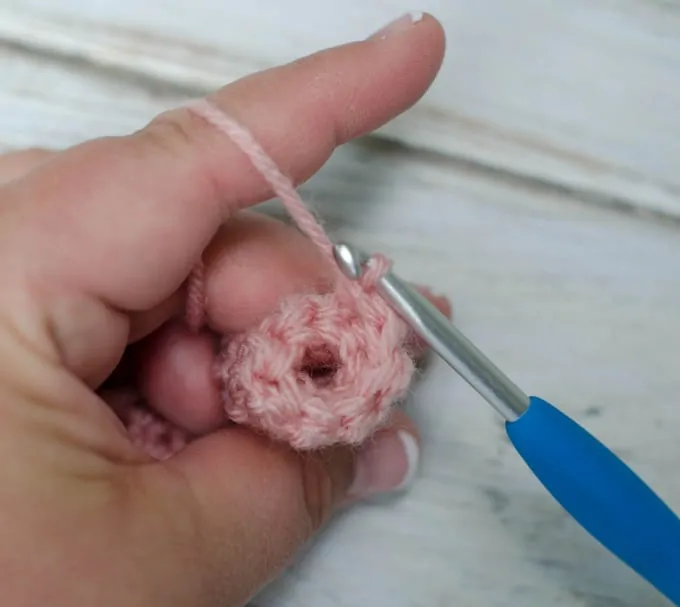
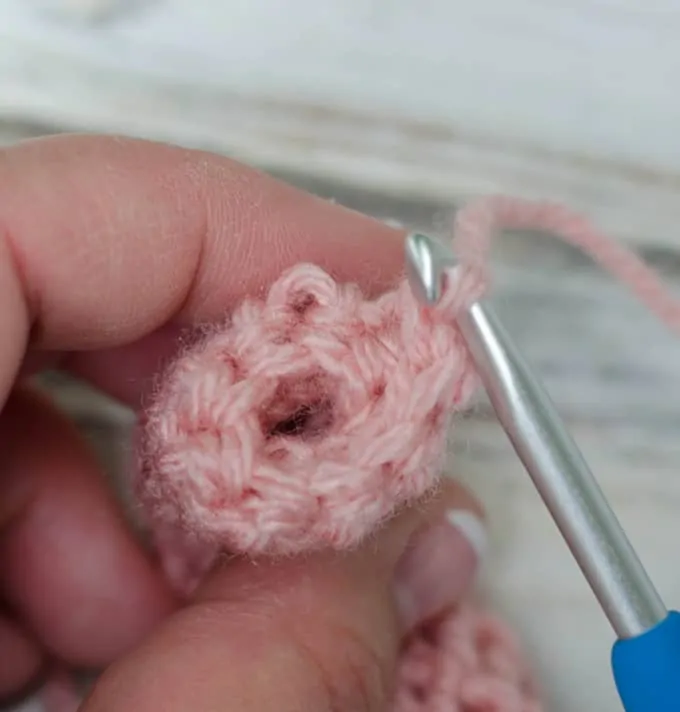
As you work, a spiral ridge will form on the outside of the crochet spiral.
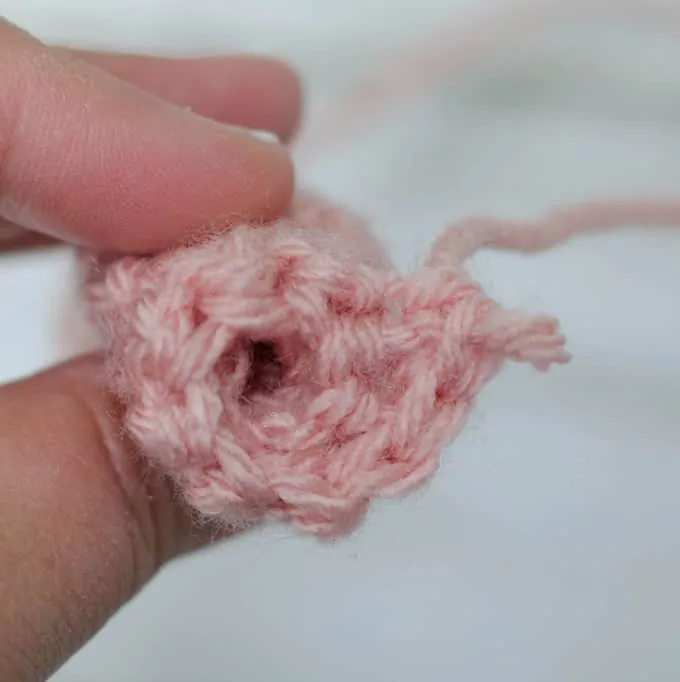
And here’s another view. See if you can identify the “V” and the strand. Then look at your own work and find the same points.
A Deeper Understanding
If this is still confusing, here is another perspective. The below photo shows a row of single crochet, from the back (wrong) side.
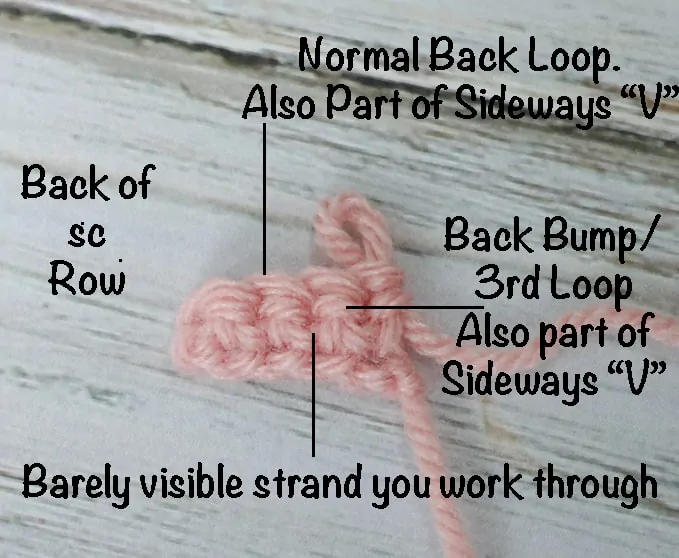
The Sideways “V” is actually two strands: the Back loop and the Back Bump (also called the 3rd loop). The strand you work into is actually the somewhat hidden strand of yarn that is between the stitches.
How Long To Make Purse Handles
For the Daisy Crochet Bag, I made each handle 16 inches long. They do stretch a bit when in use, so that allows them to stretch a bit and still look very nice on the bag. You can, of course, make the handles any length you desire.
Crochet Spiral Handle Video
I thought it would be helpful to see this technique in a video. So I made one for you. Please be patient with me as I learn “all the ways” of video.
Here’s a photo of the completed Daisy Mae Bag with the gorgeous crochet spiral handle:
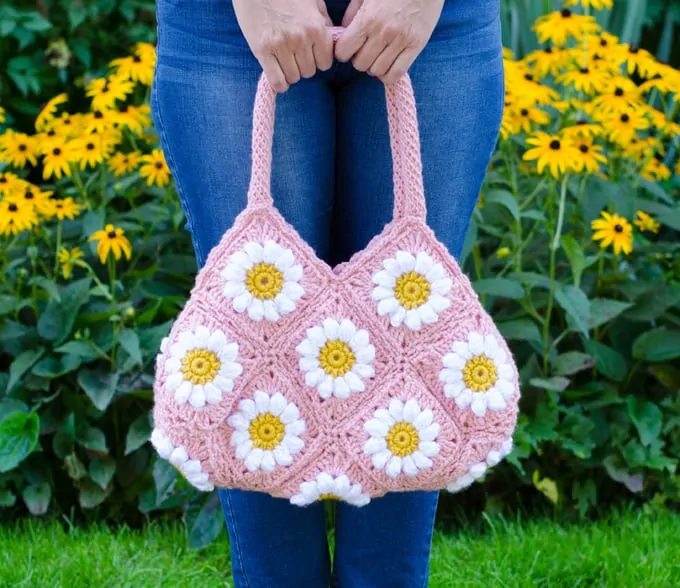
Daisy Mae Bag
The ad-free version of the Daisy Mae Bag includes photo tutorials for the handles, the lining and the faux braid join.
print & stitch
Purchase the Beautifully Crafted AD-FREE PDF Download Today
Do you just want to relax and crochet? This nicely formatted pattern features clear instructions and perfectly sized photos for a more enjoyable crochet experience.
Get the free pattern here or purchase an ad-free pattern on Etsy or Ravelry
I love seeing your finished projects! If you enjoyed making one of my patterns I’d love to see yours on Instagram, be sure to tag me @crochet365knittoo. If you are on Facebook, stop over to the Crochet 365 Knit Too Facebook page or pop over to the Crochet365KnitToo Club and share a photo! I’d love to see your work!
This video was well done. I had no problem understanding it. Looking forward to more like it.
I am so glad it was useful!
Even after watching Nicki’s excellent video and reading her written instructions, I was still stumped. I followed her recommendation to your page, and your illustrations clicked with me. The “view-from-the-top” photos you included are what did the trick. It’s interesting how a slight change in perspective can often clear things up. I’m sure many folks caught on with Nicki’s tutorial right away. I’m grateful to both of you for working so hard to help the rest of us learn this technique. Thank you!
Sometimes teamwork makes the dream work! This is a tough technique to “get” and it helps to see more than one point of view. Glad we were both able to help you!
Thanks for being so easy to understand. You give me hope as a new chrocher?
i have tried and looked several times but still can not find your video on here? please help
The video is near the bottom above “A Final Word” section. Hope this helps!
I know I am 3 years late to the party but, do you still have the video somewhere? It isn’t visible to me.
The video is midway in the post under “Meet My Very First Video” section. Hope this helps!
Thanks. Oh my thanks. At last I could make it. Your explanations are great.
I make all sorts of handles for bags but couldn’t get this one. Once again thanks.
It’s like you read my mind! So glad you posted this! Thanks!
Thank you for this lovely bag to make. I have done the squares and joined them – easy. But this crochet spiral handle I cannot get. Maybe because I am left handed!!!! Are you able to show how to find the right loop for left handers because I have tried and tried but cannot get this to work? I have looked on the net but there is nothing like this spiral handle that I can find for left handed people. Any help you can give would be gratefully appreciated. Thanks
My best suggestion would be to find the photo that shows what you are looking for and then put a mirror to it and see if that makes it easier to find. The spiral handle is a very challenging crochet project. If you find it too difficult you could work a handle similar to the Sweet Summer Sunflower Bag instead.
I’m not what I would call accomplished as a crocheter but DO understand your video – and *that* makes me quite happy.
Thank you!!
I’m so glad it helped!
I can’t find anything that says “A Final Word” anywhere on this page!! Also can’t find the video – and I’ve read every single word of this page 5 times. Every. Single. Word. Where is it? You said it was near “A Final Word” but if I can’t find that, and don’t see any video anywhere – what do I do? I can’t make it appear no matter how hard I try to blink my way to it. 🙂 Help! I’d love to learn this technique but can’t seem to make the pictures make sense. I was hoping the video would help me to understand it much better than I am so far. Help!!
The video is under the heading “Meet My First Video”. As far as the ‘final word’ reference, this post has been revised over the years and so my response to an earlier comment isn’t accurate in the revised layout.
I know this a very old post, but the video looked very straightforward. I can’t wait to make a pair of these handles. I was wondering if anyone has tried this with a self striping yarn and what the results looked like?
I must be a little stupid, I can’t find the video even under the my first video heading… I’m using dark yarn for this so I’m having some real trouble finding the loops without the video.
Do you have an ad blocker turned on your browser? That could be why. As a work around, you could disable the blocker, or try going into the post through a different browser, or try going in through Google Chrome Incognito mode. Hope that helps.
Never mind, I think I figured it out!
Great video. Really helpful.
So glad it helped!
What happened to the video of the spiral handle?
It’s down the page a bit (where I talk about it being my first video)
I’m late to the party, but I LOVE this technique and am using it for a bag right now! Your instructions are very clear and helpful.
How do you finish the handle? Just fasten off?
Thank you for sharing your talents 😃
The handle is so fun! A bit tricky, but worth the effort. Yes, just slip stitch to the next stitch to fasten off and then sew on to your project.
I have attempted this technique several times and never could figure it out until I stumbled on your website. Thank you so much for the clear instructions. My ADVISE for anyone that is struggling to perfect this technique is to crochet LOOSLY throughout….it really helps to see the stitch. I practiced using bulky yarn and a large hook until I became a pro spiral handle maker 🙂
Practicing with bulky yarn and a large hook is a fantastic idea!