
Titan Tapestry Crochet Bag
This post may contain referral/affiliate links. Please read my disclosure for more info.
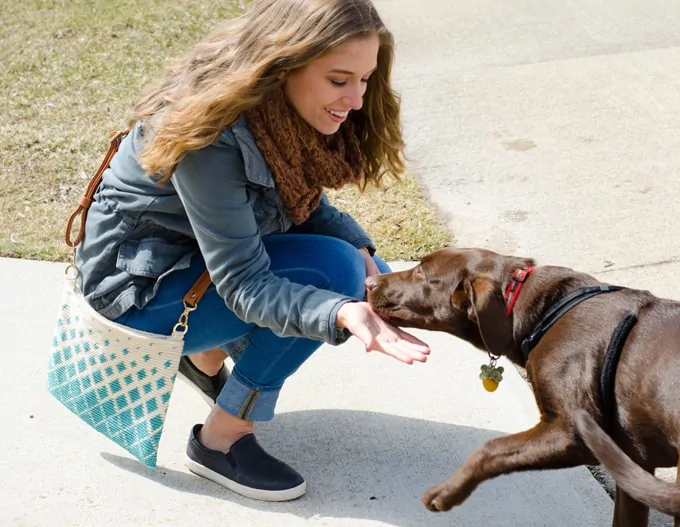
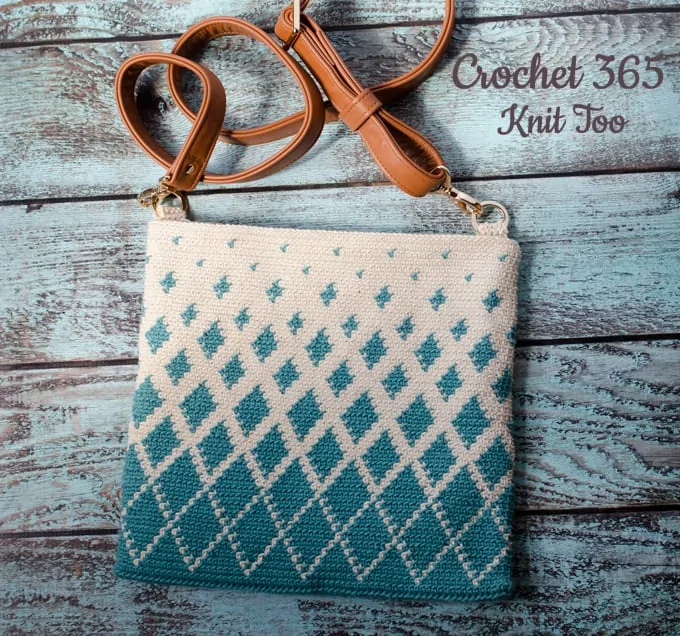
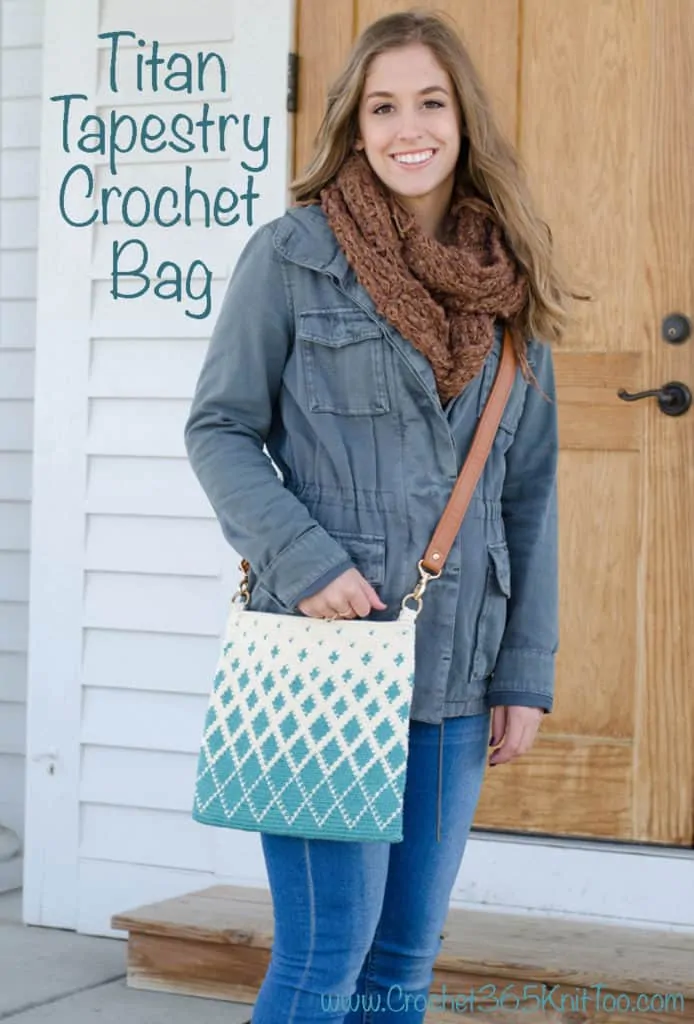
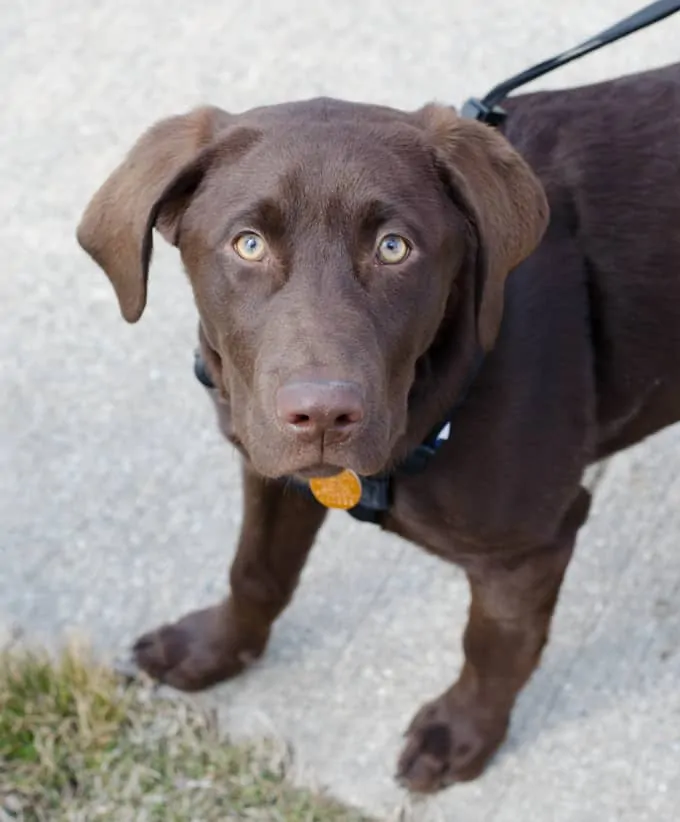
What happens when you haven’t named your latest project and an adorable puppy crashes your photo shoot? Well.. you name your latest design after the pup! Everyone… meet the Titan Tapestry Crochet Bag!
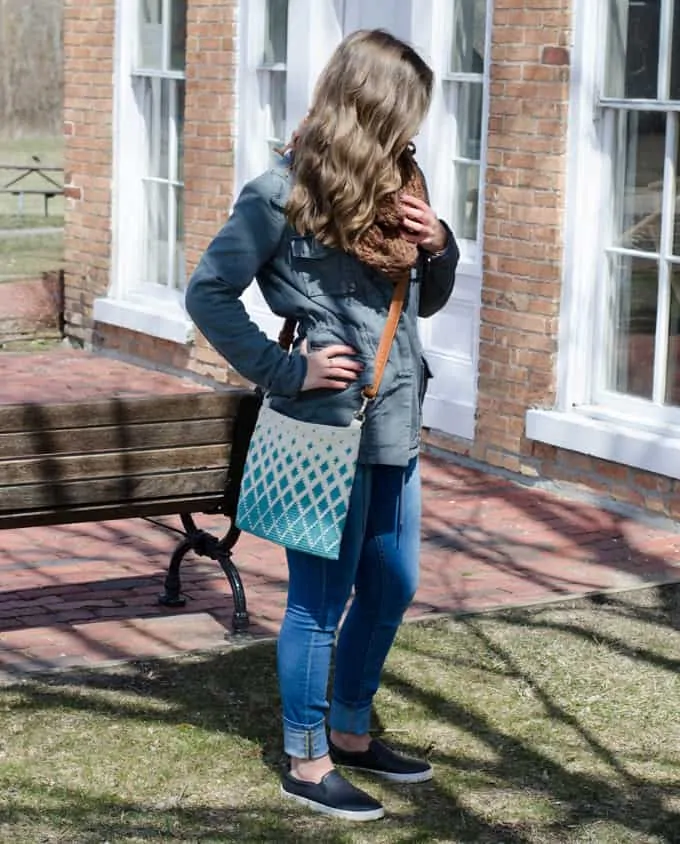
I am so excited to show you this great crossbody bag! I had so much fun taking photos with my lovely niece and I can’t wait to show you everything! Let’s get a better look, shall we?
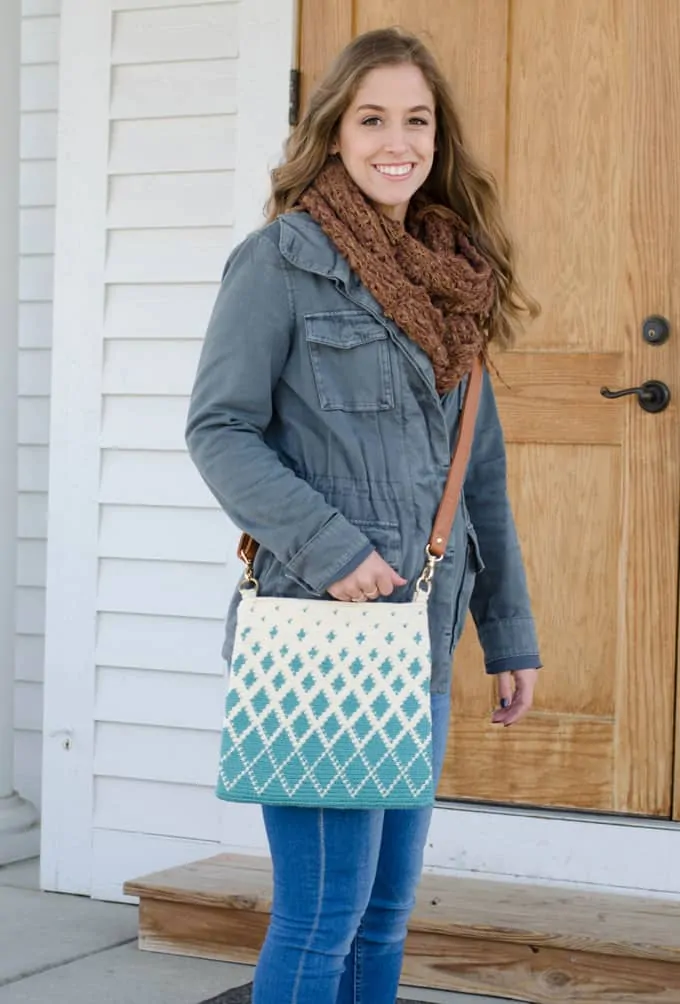
I am completely in LOVE with this Titan Tapestry Crochet Bag! Fun, stylish and it uses a relatively small amount of yarn. It is definitely going to be my go-to purse!
The Titan Tapestry Crochet Bag is made with Lion Brand 24/7 Cotton yarn in Ecru and Jade. The jade is just such a rich color that I can’t even fully capture in a photograph. I love crocheting with 24/7 Cotton and I’m so grateful to Lion Brand for providing the yarn for this project. It crochets up beautifully.
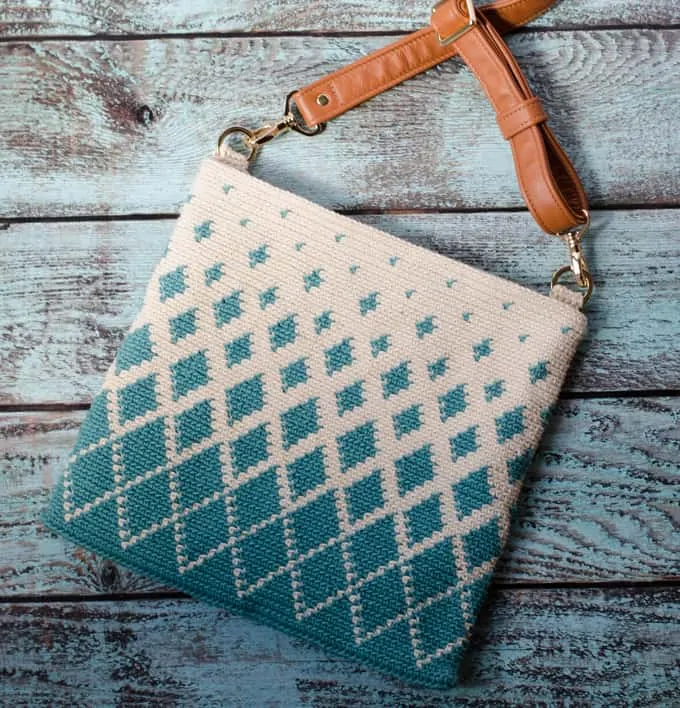
And the final result is just a very high end crochet bag that I think you will love as much as I do. One of my best kept secrets is that the finishing touches MAKE the project and this Titan Tapestry Crochet Bag is a perfect example. When you spend all that time and effort to create something beautiful, it deserves the best hardware and the perfect strap to finish it off right. I was so lucky to find the absolutely perfect leather strap.

I worked exclusively with Lynette at Mautto Handbags to create an adjustable leather crossbody strap with gorgeous gold hardware. Lynette offers some of the best customer service on the planet. Over many emails, she helped me design the perfect strap and hardware for this project. And she set up a special listing on Etsy just for my readers to purchase the exact leather strap and hardware I used for the Titan Tapestry Crochet Bag!
I’m going to be honest with you. The strap is not cheap. And if that is way out of your price range, I have some other options for you at the bottom of this post. But hear me out on why this strap is something you really should consider. First of all it is absolutely high quality. The leather is exquisite both in quality and color for this bag. I am a sewer as well and have sewn many bags. I can tell you that the workmanship on this strap is phenomenal.
Second, sometimes I think we get so caught up in “making something for cheap” because we are makers, that we don’t splurge a little. And I think now and then we need to do that. And third, I designed this bag so that the strap is removable. So you can use the strap on other purses you design or maybe on a store-bought purse you already own. What’s not to love about that!
Purchase an ad-free printable version of this pattern
Titan Tapestry Crochet Bag
Here is what you will need:
- Lion Brand 24/7 Cotton Yarn: Jade and Ecru, 3.5 oz each. Important note: I used every bit of the Ecru and almost all of the Jade. I suggest buying a 2nd skein, especially of the Ecru just in case you use slightly more. Also if you decide to crochet a strap instead, you will need more yarn.
- US C2/2.75 mm crochet hook (here are my favorite crochet hooks)
- Stitch Markers (this is the kind I use)
- Leather 1″ adjustable 34″-55″ Crossbody strap with clips (I bought mine from Mautto Handbags)
- (2) 1″ O-Rings, if buying separately. (The O-rings are included in the kit from Mautto Handbags)
- Tapestry needle and scissors)
Resources and tutorials you may find helpful in following this pattern: Crochet Abbreviations, US to UK Crochet Conversion Chart and How to Count Crochet Stitches. Find links to stitches on the “Tutorial” menu: Getting Started will show basic stitches used in many patterns and Crochet Stitch Dictionary shows our growing collection of crochet stitch tutorials. Be sure to read how to tapestry crochet so you understand how to change colors with this technique. Size: 11” wide by 10-1/2” tall (excluding strap and strap tabs)
Special Notes:
This pattern works a bit differently than my usual patterns. After we set up for the bottom of the purse, there are no row-by-row directions. Instead, I will direct you to follow the tapestry crochet chart. When you are done working the chart, I will provide directions on finishing off the bag as well as how to make and attach the tabs to hold the rings.
Then I will give you options for closures and an overview of how to add a lining, if you desire. Finally, I will give you some strap options if you choose not to go with the gorgeous leather strap from Mautto Handbags. This is a tapestry crochet project. You can read about how to tapestry crochet in this post. Here are important things to remember for this project:
- The unworked yarn is carried along the row. This unworked yarn is encapsulated within the working stitches. Even on solid color rows, carry the unworked strand of yarn and work OVER that strand of yarn while working the current color stitch
- Tapestry crochet is always worked with the right side of the work facing you
- All stitches are single crochet and are worked through the back loop only
- Work in the round. (Do NOT join and chain 1)
- Use a stitch marker to mark each round. I mark the LAST stitch in each round.
- The pattern repeat is 10 stitches. The chart shows 30 stitches, so it just shows a portion of the bag. The bag has 140 stitches in a round. Simply repeat the 10 stitch pattern across each row. I find it easiest to make sure that my starting color sequence and ending color sequence is the same as the indicated row on the chart.
Base of Bag
Chain 70 R1: 2 sc in 2nd ch from hook and sc across to last chain. Work 3 sc in last chain, then rotate work to work single crochet on the opposite side of the starting chain. Single crochet across to the last stitch, then work 1 sc in the 1st chain. At the end of this row there are 140 stitches, with 3 stitches at either end. Be sure to count your stitches to make sure you have 140 exactly. Do NOT join, work in round, using a marker in the last stitch of each round.
Titan Tapestry Bag Crochet Chart
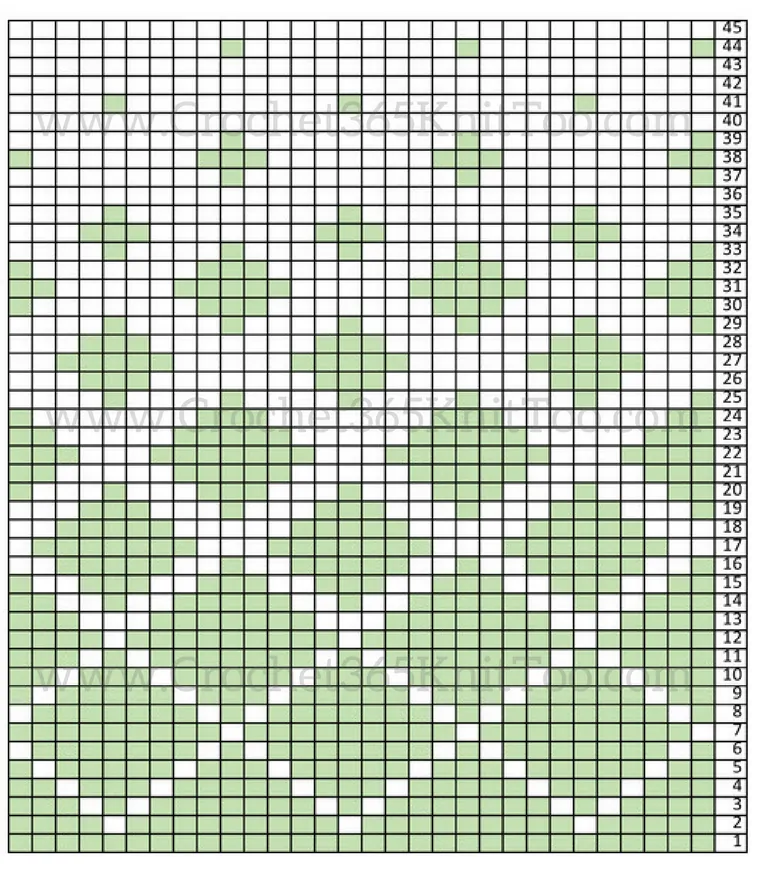
Follow the chart, starting at the bottom right of the chart (line 1), working in back loops only, in continuous rounds. Every round starts on the right side and on the right side of the chart. Note that the chart is watermarked. (An ad-free pattern is available that includes a non-water marked chart that you can print out.)
After completing round 45 continue to use ecru yarn, and working over the unused jade yarn, work 1 more round of single crochet. At the end of the round, slip stitch into the next stitch and then use an invisible seamless join to finish off the body of the purse.
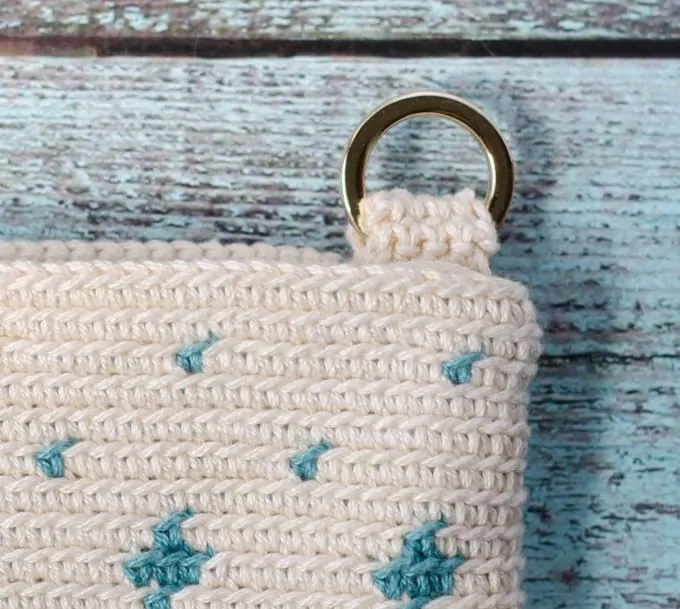
Handle Tabs (Make 2)
Ch 5 R1: sc in the 2nd chain from hook and in next 3 ch (4 st) R2-10: Turn work and Ch 1, sc across (4 st) Fasten off, leaving a long strand for sewing to the bag. Slip each handle tab into an O-ring and fold over. To position the tabs on the bag, place the bag with the right side facing you on a flat surface. The tabs are attached inside the bag to the back of the bag about 1/4″ from each folded end. Sew down securely. Be careful the stitches stay to the inside of the bag.
Closure Options
The Titan Tapestry Crochet bag is very sturdy and does not need a lining, though you may choose to make one if so you desire. You may leave the bag open and not use a closure at all. You could choose a pretty button and close with a chained loop. To do this, in the last round of single crochet, in the center of the back side of the bag, chain enough chains to go over the bag to the front and around a button, then sl st into the last sc made on the bag to close the loop and then continue to work the remainder of stitches in that last round, finishing as previously described.
You could attach a zipper to the bag without a lining, by carefully hand sewing the zipper in place with a sewing needle and thread. I highly recommend a purse zipper, like these available from Zipit on Etsy. A purse zipper has a long pull and the tape area of the zipper is wider and easier to sew in to a handbag.
Lining
A lining is completely optional. Option 1: Sew a lining and close bag with a magnetic closure. To do this, you will need fabric, medium weight iron on interfacing and a magnetic closure. Iron the interfacing to the back of the fabric. Measure your bag (as yours might be slightly bigger or smaller than mine). Add 1/2″ to all sides and cut out 2 pieces to this new size. Sew around on 3 sides with a 1/2″ seam allowance.
You will need to fold over the top edge and the best way to figure out the spot to fold is to put the lining into the bag. The top of the lining should be below the top of the bag by about 1 row. Mark the spot for the fold. Then pull the lining out and iron the fabric over in the spot you have marked all around the top of the bag (probably 1/2 to 1 inch).
Hand sew the lining to the inside of the bag. Follow the directions on the package to secure the magnetic closure. Option 2: For the bag shown, I made a lining, similar to Option 1 and attached a purse zipper. I like to buy a purse zipper because it has a longer tab and is heavy duty. Online, I buy them from Zipit. But I can often find them at my local quilt shop. I then sewed the lining into the purse.
Strap Options
Of course, I think the Leather strap by Mautto Bags is the perfect compliment to this Titan Tapestry Crochet Bag. But if it is not in your budget here are a few other options:
- Purchase different strap(s) out of a different material available at your local craft store. You may need to purchase different hardware or attach to your bag slightly differently
- Crochet a strap. Using the same tapestry crochet technique, crochet a strap approximately 1″ wide to the length you desire. You will need to purchase O-rings and attach one end to the handle tabs and the other to the strap.
- Sew a strap out of coordinating fabric. I love Swoon Patterns and if you like to sew, I encourage you to pick a pattern with a similar strap you like and follow the directions.
If you need to buy hardware for a different strap option, my favorite supplier is Bagmaker Supply on Etsy. I’ve ordered from them numerous times and have been very happy with their service.
Another Strap Alternative
If you love the leather look and here’s another option for you: Go for a shorter 23″ straps instead. This set of 23″ leather-look straps on Amazon are also lovely. Keep in mind, because it is shorter, it will be a slightly different look. You can use 1 strap and place it in the same position as the cross body strap for a cute shoulder bag.
Or use both straps and add a couple more handle tabs, placing 2 on each side, for a traditional 2-strap handbag. Be sure to buy matching “O-RIngs” or “D-Rings” to connect your straps to. These D rings by Bagmaker Supply would be a great choice!
Remember, you can purchase an ad-free version of this pattern complete with a full page chart, if you would like.
Explore More Crochet Patterns
Do you love crochet as much as I do? I think you’re going to love these other free crochet patterns:
- Sweet Summer Sunflower Bag
- Crochet Octopus
- Crochet Heart
- Easy Crochet Dishcloth
- Crochet Christmas Stocking
- Crochet Crown Pattern
If you’re planning on gifting this bag for someone special, you also might enjoy this great collection of Crochet Gifts for Mom too!
I love seeing your finished projects! If you enjoyed making one of my patterns I’d love to see yours on Instagram, be sure to tag me @crochet365knittoo. If you are on Facebook, stop over to the Crochet 365 Knit Too Facebook page or pop over to the Crochet365KnitToo Club and share a photo! I’d love to see your work! And.. in case you needed another look at the adorable chocolate lab puppy we met on our photo shoot, here is a photo of the ‘real’ Titan. Thanks for being our inspiration, buddy!
I LOVE this bag! Seriously. This is getting started soon!
I am so glad you like it! I’d love to see your finished bag!
Its very nice, i love this bag. You are wonderful.
So glad you like it!
A gorgeous creation!
Aww.. Thank you!
Beautiful project.
Thank you for the pattern.
Laura
You are so welcome! Glad you like it!
Stunning bag! Love the design and also the colors you chose.
Thank you for the kind words!
Oh, its so very pretty, i like this bag.
I would love to try this. I have carried yarn along and followed a design pattern. The directions for the base of the purse has me very confused! I get the chain 70 and then 2 sc in the 2nd stitch and each stitch until the end, which will have 3 sc’s. But wait, that makes 141 stitches. . Right? Then turn to work single crochets in each stitch of the “opposite side” of the starting chain… Could you provide a picture please? I do not know what you mean by the opposite side of the chain. And are we putting 2 sc in each stitch, or just one this time? And then 1 sc in the first chain and this is somehow supposed to add up to 140? Your purse is beautiful. I’d love to try it. Can you please clarify the instructions for the base for me? Maybe a couple more pictures? I think I can follow all the rest! Thank you.
Hi there. So let me see if I can word this a bit better. You work 2 sc in the 2nd chain from hook. Then you work ONE sc in each chain until the last chain. In that last chain you work 3 sc. Then you rotate the work so you are working on the opposite side of the chain. You do this so you can get to the point of working in the round. So now you are working on the opposite side of the starting chains. Work a single crochet into the opposite side of each chain. The last chain will have 3 sc in it also, just like the other end: the 1st 2 sc at the beginning of the row plus the last sc of the row = 3 sc on that end. I hope that helps! I did re-word that first bit of instructions to make it a little clearer.
Yes, that helps! But my math is still fuzzy, When you rotate, do you start with one of the 3sc from the other side, or do you leave that little tail of 3 for some reason? Because if you count the 3 extra on each end, you would not have 140 stitches. Skipping the first chain, then one chain with 2 sc, you would have 69 until the last chain where you add 3. Now you have 72. If you do the same on the other side, you will end up with 147 stitches in the round. What am I missing? I apologize for being dense about this. Without the priper base, I wouldn’t be able to work the pattern of 10 later!
Another verification question remains for me – when you crochet along the foundation chain, You are working in the back loops,only, which is how you are able to turn it and then work in the back loops along the other side, correct?
I’m sorry, my Math is faulty there as well. You can delete that last one.
Chain foundation =70
1st row has 2 sc in second chain, then a sc in each u til the last, which has 3 sc. That equals 72, I think!
Then I turn and sc in 69 of the chains stiches, but put 3sc in the last chain, plus one in the starting chain. 73, I think?
Still doesn’t add up to 140. Help and thank you for your patience! Am really hoping I can figure out this base!
I’ve checked this numerous times and it is correct. So you start in the 2nd ch from hook and put 2 there and then across to the last chain (69 sc at this point), plus 3 for the corner, then a sc all the way back to the start (so 68 more sc) which totals 140. When you’re done there ends up being 3 sc in each end ch. I think the fact that you start with 2 of the eventual 3 stitches on that end is what is throwing you.
You can try drawing it on a piece of paper using a smaller number of stitches. So draw 5 dashes and then tick into them as if you were stitching. At the end you have 10 stitches. Kind of a way to visualize the process.
Hopefully that helps you.
Hi Cheryl,
I’m also confused how you end up with 140 (you wrote 170 but I think you meant 140). Anyway, you say “So you start in the 2nd ch from hook and put 2 there and then across to the last chain (69 sc at this point)”
How is that 69?
If you have 70 chain links and skip the first one but you put two in the second one that’s 70 sc, no?
So I’m already lost at the very beginning. I don’t get 69 but 70. Can you explain how you end up with 69?
Let me word the another way. You are going to end up working on both sides of the chain with 3 stitches on either end. To start you place 2 sc in the 2nd chain from hook. Then you work a single crochet all the way until you get to the last stitch. In that last stitch you work 3 stitches. Then flip the work around so that you are working on the opposite side of the chain. Work a sc in each chain across until you get to the last stitch (which is really the original spot where you put the starting 2 sc). In THAT space you put 1 sc. So then you’ll have 3sc in the very last stitch of either end of the chain and a stitch on the front and the back. That works out to 140.
Regarding the 170 you mentioned, I see that in an early comment I made a typographical error and that even though I gave the figures adding up to 140, I actually typed 170 as the sum. I’ve corrected that in the comments. My apologies for the typographical error.
Hope that helps.
I don’t understand this: “Work a sc in each chain across until you get to the last stitch (which is really the original spot where you put the starting 2 sc). In THAT space you put 1 sc. So then you’ll have 3sc in the very last stitch of eithr end of the chain and a stitch on the front and the back.”
What doesn’t make sense in the count is that when you say to put 2sc in the second chain from the hook, when you return on the other side of the chain what happens to the very first chain that we skipped on the other side of the chain? Do we not use it? The instructions say “Single crochet across to the last stitch, then work 1 sc in the 1st chain.”
Whenever you start a row with sc, you ch 1 and then start working the single crochet. That’s because the chain 1 is needed to get the sc to the proper stitch level. In single crochet, this chain does NOT count as a stitch. Similarly when you start a project with a chain and work single crochets into the first row, you start the stitches in the 2nd chain from the hook. The very first chain does not count as a stitch. So when you work back on the opposite side, the last stitch will be the stitch you worked the original single crochets (the 2nd chain from the hook when you started).
I shortened your original comment for clarity for future readers. Also, I did spot a typo in an earlier comment and fixed that; sorry for any confusion.
I hope that helps.
Thanks again! I’ll work on this until my brain lightbulb goes on. : ) I trust you. The purse is beautiful!
Back loop – with the right side facing me, the back loop would be the one closest to the INSIDE of the purse, correct?
That is correct. If you follow the links in the post to the “how to tapestry crochet” post, that might help! 🙂
Yes, I’ve got it now. I just wanted to be certain I was getting the foundation started correctly. Thank you for your help! Drawing out the base helped me to see what you meant by the three stitches at each end (makes a turn) and then I did one row of back loops incorrectly (did front loops because I had turned it upside down!) I am doing well now. The tapestry pattern is starting to show up. So pretty! Thank you!
This is going onto my to-do list. It’s a beautiful bag. 🙂
I’m glad you like it!
I just wanted to say that another option for finding a strap is to go to a secondhand shop or garage sales. Look at purses there keeping in mind they can just cut away the rest of the purse and keep only the strap, sometimes truly hideous purses have great hardware or straps. This is also how I sometimes get hardware to make my own purses: magnetic snaps, clips and even zippers.
Excellent idea! Thrift shops are great for that! Thanks for sharing!
I LOVE this pattern. I have a question about attaching the handles. Am I attaching the handles only to one side of the bag (on the inside) or is it attached to the insides of both the back and front of the bag? I was thinking if it’s only attached to the back side, the front would sag.
Yes, it’s attached to the inside of the back side towards either end. Since the bag is flat (like an envelope), this is the best place to attach them and it will not make the front sag at all. Hope that helps!
Cheryl, Mahalo for your quick response! These bags make beautiful Christmas presents! Thank you so much for sharing this pattern!
Hello Cheryl! Thanks so much for sharing this lovely pattern! I am wondering when you pick up the second strand. I tend to have a tighter tension and am thinking it will be too difficult to have an extra strand on round 1, working into the foundation chain. Do you pick up the second strand on round 2?
Thanks so much for the help!
Carrying the strand helps the thickness of the fabric be the same as you go into the section where you change colors.
Thank you for sharing the pattern for such a lovely bag! I am a beginner at crochet but very ambitious 🙂 I want to give this bag a try, but I got stumped at the very beginning! I could not follow ‘Do NOT join, work in round’. So you don’t close the chain with a slip stitch, is it? How to do that and still work in a round? If possible, would you mind directing me to some tutorial that would explain? Thanks in advance!
When you work in a continuous round, you do not join with a slip stitch and a chain one for the next row. You simply continue to sc in the 1st stitch of the next row and continue around.
Hi Cheryl, I actually managed to finish the bag! I had to add a few extra rows to get the height as I was using a different crochet thread, but am quite happy with the end product. One question – do you add the tabs for the handle before adding the lining or after? I crocheted a handle.
Thanks in advance for answering!
I made the tabs and sewed them in before adding the lining.
Hi Cheryl, I’m trying to make this bag and for some reason after I get to row 8 that first diamond starts skewing to the right… I’ve frogged a couple times now…. what am I doing wrong??
Hmm… Is it the natural shift that happens when you crochet in the round? Did you modify anything on the pattern? Also.. maybe check your stitch count? Maybe you’ve somehow lost or gained a stitch in a previous round that is messing things up?
Absolutely love this bag!!! Now that we’re all in quarantine, I though this would be a great time to get working on some projects! My question is- how can I make this bag a little smaller? It just seems a bit to big for the person I have in mind.
I think you best bet would be to go with a smaller weight yarn to get an overall smaller bag. The pattern is not easily adjusted in height and while you could eliminate a repeat for the width, it would change the proportions of the bag.
I got the 140 stiches and everything right, but when I get to the the 6 row, insted of getting 2 white stiches with 1 blue in the midle, at the last diamond, I get 2 white stiches with 2 blues in the midle (this is the only diamond that gets the count wrong). I have done it 3 times, recount it, and I this always happens. Can you help me, please?
If I had to guess maybe you made an error in the previous row? You could also join our Crochet 365 Knit Too Club on Facebook. There you can get feedback and help from the community!
Hi! This is a lovely bag and I’m looking forward to making it but …. one question. Is the bag only one sided or do I repeat the graph more than once? I don’t see either piece of information in your pattern. Help!
The graph gets repeated around the bag. Hope that helps clarify!
Will this pattern work if I only use one color of yarn?
The tapestry pattern is dependent on two yarn colors. If you want a solid color bag, and are willing to work over a 2nd strand of the same color for the entire bag, you could do so and just work through the back loops for the entire pattern.
So it’s dependent on having a second strand of yarn? Will it work if I just use one strand?
It may turn out smaller because working over the 2nd strand of yarn changes the gauge.
Thank you Cheryl for this wonderful pattern. I very much enjoyed making this bag. I’m a lefty and had no problems with this pattern.
Question: I went to make a sample of this bag with fewer stitches to try out the pattern before my real project yarn gets here. I chained 30 so I should end up with 60 st after the first round (which I did count that I had 60 st). I have crocheted in the round before so this wasn’t new to me, but when I started the pattern, I was somehow short the amount of stitches I needed. I managed to get 5 full sections of the 10st pattern, then 7 stitches of the last section (if that makes sense). Did I do something wrong? I did mark my last stitch in the first round before I continued into the pattern.
The repeat is 10 stitches. So if you had 60 stitches after you worked around the foundation chain (with the corner stitches in the 1st and last chain), you should get the repeat 6 times. I would rip back and count the stitches to make sure you actually did have 60 stitches and mark both the 1st and the last stitch. It sounds to me like you either mis-counted the first row or somehow missed some stitches when you started the pattern.
I have restarted the pattern three times and my diamonds are not symmetrical. The left side is skewed where as the right side lines up nicely with each row. I have checked and rechecked my count and it is accurate. Any thoughts?
If you’re referring to the slight jog you get where one row ends and another begins, that is normal since we’re working in the round. If it’s something else, it might be helpful to post a photo in our Crochet 365 Knit Too Club on Facebook and the members can jump in and help you trouble shoot.
Do you think it would work if I crocheted an extra 3 inches of solid color at the bottom and made a box bottom with a liner that has a couple of pockets?
The key is to keep the stitch count the same in the design area. You could add extra rows before that start of the pattern and you might be able to do as you describe.
Hi!
Sorry for this little bit of stupid question maybe, but im from Sweden and trying to figure out if you have been using 24/7 cotton or 24/7 cotton DK in this pattern?
I cant se anywhere it says 24/7 cotton DK so i think i know.
But when it was a couple of years ago since you posted this pattern and maybe that have produces more yarn sorts or something like that so thats why i wanted to check with you first 🙂
And now i have spent too many hours (instead at Google to try to look after a similar yarn that i can find here in Sweden, and just wanted to be absolutely sure before get yarn 😊
Its a really beutiful bag you have created. Wow!
Thank you so much for the pattern and everything!!
And sorry for my very bad english 🙈
God bless you 🙏🏼
It is 24/7 cotton. They did not have the DK version when I designed the pattern.
Hi Cheryl! I hope you are encouraged that some of us have followed this bag post for a long time! I’m finally ready to try it, having taught myself to crochet at my advanced age (always been a knitter).
I also do leather work, so I would like to crochet this onto a leather base. If I crochet it to the leather base as a starting point, could I just crochet the 140 stiches into 140 holes? Then follow the pattern as written since the 3 stiches at the ends are to make it “round” but are part of the pattern? That way the stitch count would be correct for the pattern. What do you think?
What you’re describing sounds like it would work, but it’s not something I’ve ever tried so it will be an experiment for you. Keep in mind that this particular bag is designed to be worked off the starting chain so that the bottom is essentially flat with one side of the chain becoming the front side and the opposite side becoming the back side of the bag. That may or may not work with whatever you’re envisioning, but it sounds like a fun experiment.
Hi Cheryl,
I’m starting on the bag you’ve designed…. I’ve made the foundation chain wiring on both sides getting 140sc…. My question is, the graph shows 30 squares…. Do we repeat it till we reach the end of the round? If so when we repeat row 1 of the 30 little squares from the graph and do it 4 times in 120 sc…. We are then left with 20sc…. Do we do the last 20sc of the pattern from the beginning of the graph counting twenty stitches and then proceed to row 2? Don’t know if it makes sense… this is my first tapestry crochet project…. Thanks in advance…
The pattern repeat is actually 10 stitches but I’ve shown 30 stitches of the row so you can better see the pattern. So yes, you would repeat the 10-stitch pattern around the bag for each row. Once you are done with row 1, you are working in a spiral so you start the first stitch of row 2. I always mark the end of the round with a stitch marker which helps keep me on track with my rows (and makes it easier to spot a mistake if I make one). Hope that helps!