
Franklin: A Crochet Christmas Gnome
This post may contain referral/affiliate links. Please read my disclosure for more info.
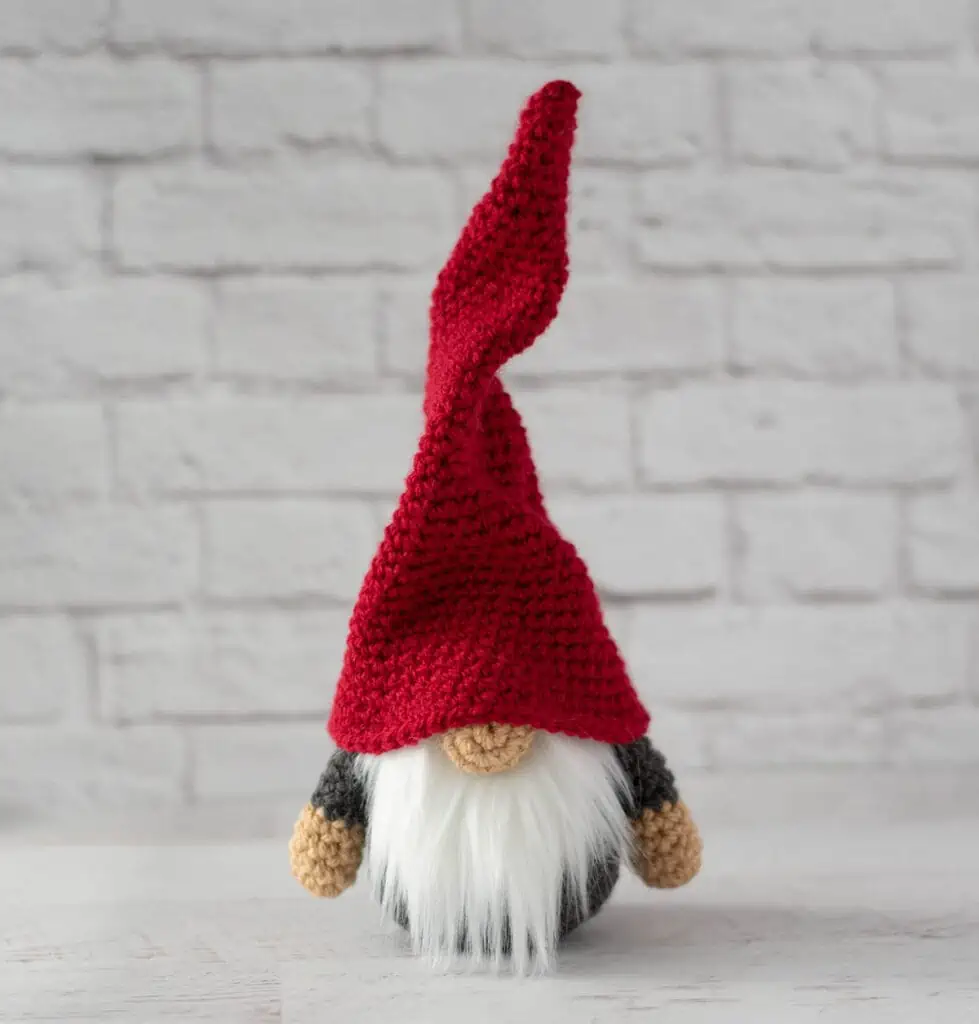
Be still my little Christmas crochet heart because this darling little crochet Christmas gnome just entered my life.

Meet Franklin. Quite possibly the cutest thing you’ll have on your hook this season.
There is so much to love about this cute crochet gnome. He’s oh so fun to make. He’s got no facial features to mess around with. Well, other than that adorable crochet ball of a nose.
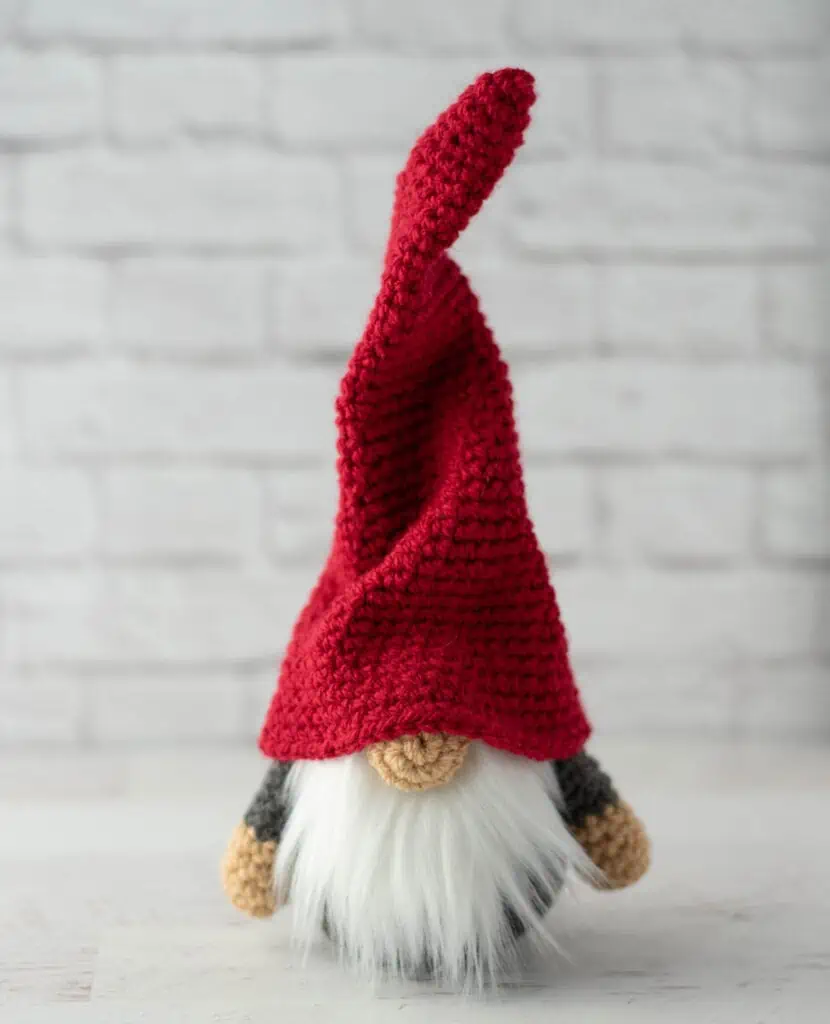
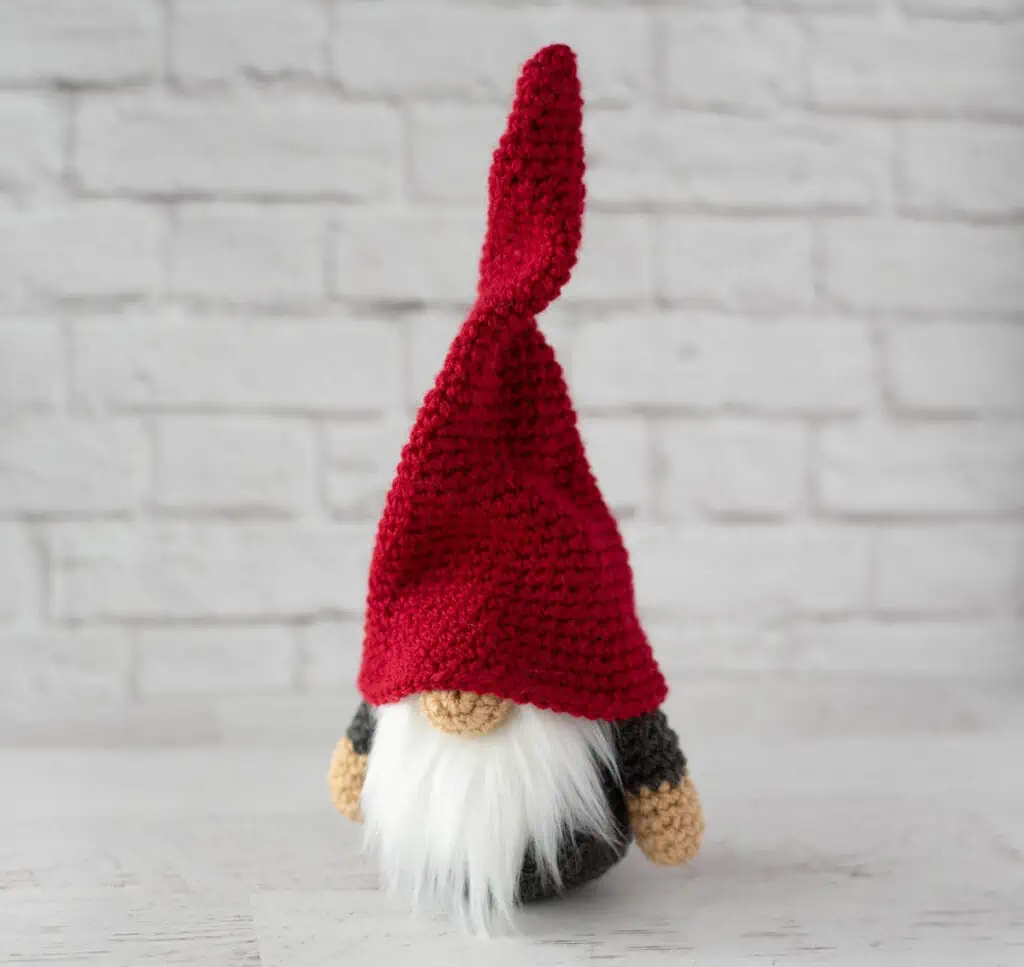
He’s perfectly proportioned for your favorite shelf. And can we just talk about that adorable hat snuggled down over everything? Is it not just the cutest?
I’m loving that the worsted weight yarn combined with a slightly smaller hook than I normally use for amigurumi gives the hat just the right amount of stiffness that it can bend and hold it’s shape.
In fact, if you look carefully at the photos in this post, you can tell that I took Franklin’s little hat off mid photo shoot and repositioned it a bit. And it still is just as adorable, right?
Gosh he’s so cute… isn’t he? Tell me I’m not the only one who gets a little skip in my heart at a super cute crochet project? Sigh. I love him.
Let’s talk how this darling Christmas Crochet Gnome comes together. First you crochet his body which is basically like a giant crochet egg because crochet gnomes don’t have a traditional head. I used a contrasting gray body color but you could go with the same color as his hat for a more traditional look.
Then you crochet 2 easy arms that have just a wee bit of stuffing in the hands, making the arms super easy to attach to the top of the body. The nose is just a simple small crochet ball.
For the beard, I chose to work with fur fabric purchased from the pre-cut craft area at Joann. You only need a small 4 inch square of fur and an easy to make template out of paper. The trick to working with fur is to only snip the backing fabric, which then keeps the luxurious fur bits intact.
The beard itself is an easy template and then we have another piece for what I’m calling a mustache that actually goes over the nose to add a bit more fur. I like sewing this all down with needle and thread, but you could probably hot glue it instead if you like.
And then it’s time to crochet that gloriously tall hat! The crowning jewel on this darling crochet Christmas gnome.
Then just assemble your bit of cuteness, put it on your favorite shelf and prepare for all the compliments. Or simply just enjoy a smile every time you pass by because this cuddly crochet gnome is just adorable.

Purchase the Beautifully Formatted AD-FREE PDF DOWNLOAD
MORE HOLIDAY PATTERNS
If you love the Crochet Christmas Gnome Pattern, you might also like to check out these other quick projects for the season:


Let’s dive into this fun Christmas Crochet Gnome!
Crochet Christmas Gnome Pattern
Materials
- US F 5/3.75 mm for crochet hook (these are my absolute favorite crochet hooks I recommend to everyone!).
- Worsted weight #4 yarn, sample used Paintbox Aran:
- Body: 1.25 oz, Granite Grey (Col 206)
- Hat: 1 oz, Red Wine (Col 215)
- Skin Tone: 8.5 yards, Light Caramel (Col 208)
- 4″ x 4″ piece of white fur (and white paper, pen and paper scissors for template)
- Fiberfill
- Stitch Marker to keep track of rows
- Tapestry needle and scissors
- Sewing Needle and White Thread (to sew beard in place)
Gauge:
Gauge is not important in this pattern. You may use other weights of yarn. Adjust hook size to fit your needs. With the yarn and hook size given, my gauge is about 9 single crochet stitches to 2 inches.
Resources and crochet tutorials you may find helpful in following this pattern: Crochet Abbreviations, US to UK Crochet Conversion Chart. Find links to stitches and basic crochet skills on the “Tutorial” menu: Getting Started will show basic stitches such as the slip stitch, single crochet, double crochet stitch and chain stitch used in many patterns and Crochet Stitch Dictionary shows our growing collection of crochet stitch tutorials.
Crochet Abbreviations:
- sc = single crochet
- sl st = slip stitch
- st = stitch(es)
- sc2tog = single crochet 2 together (I recommend the invisible decrease)
Finished Crochet Gnome Size
Approximately 11” tall (depending on hat placement). Gnome without hat is 3.75” tall.

Crochet Gnome Body
With Grey yarn, make a magic ring. Use stitch markers to keep track of rows as you go.
R1: 6 sc into ring (6 sts). (Do not join, worked in rounds)
R2: 2 sc in ea st (12 st)
R3: *sc in next st, 2 sc in next. Repeat from * around. (18 st)
R4: *sc in next 2 st, 2 sc in next. Repeat from * around. (24 st)
R5: *sc in next 3 st, 2 sc in next. Repeat from * around. (30 st)
R6: sc in next 2 st, 2 sc in next st, *sc in next 4 st, 2 sc in next. Repeat from * around, ending with sc in each of the last 2 st. (36 st)
R7: *sc in next 5 st, 2 sc in next. Repeat from * around. (42 st)
R8-10: sc around (42 st)
R11: *sc in next 19 st, sc2tog. Repeat from * once. (40 st)
R12: sc around (40 st)
R13: sc in next 9 st, sc2tog, sc in next 18 st, sc2tog, sc in next 9 st. (38 st)
R14: sc around (38 st)
R15: *sc in next 17 st, sc2tog. Repeat from * once. (36 st)
R16: sc around (36 st)
R17: sc next 8 st, sc2tog, sc in next 16 st, sc2tog, sc next 8 st. (34 st)
R18: *sc in next 15 st, sc2tog. Repeat from * once. (32 st)
R19: sc next 7 st, sc2tog, sc in next 14 st, sc2tog, sc next 7 st. (30 st)
Start stuffing gnome body and continue stuffing as you go.
R20: *sc in next 13 st, sc2tog. Repeat from * once. (28 st)
R21: sc next 6 st, sc2tog, sc in next 12 st, sc2tog, sc next 6 st. (26 st)
R22: *sc in next 11 st, sc2tog. Repeat from * once. (24 st)
R23: *sc next 2 st, sc2tog. Repeat from * around. (18 st)
R24: *sc in next st, sc2tog. Repeat from * around (12 st)
R25: *sc2tog. Repeat from * around. (6 st) Fasten off, weave end through last stitches and pull tight.
Gnome Arms (Make 2)
With skin tone yarn, make a magic ring
R1: 6 sc into ring (6 sts). (Do not join, worked in rounds)
R2: *sc in next st, 2 sc in next. Repeat from * around. (9 st)
R3: *sc in next 2 st, 2 sc in next. Repeat from * around. (12 st)
R4: *sc next 2 st, sc2tog. Repeat from * around. (9 st)
R5: sc around, changing to grey yarn in last stitch (9 st)
R6: with grey yarn, sc around (9 st)
Stuff the hands now, leaving the rest of the arm unstuffed as you work.
R7-14: sc around (9 st)
Sl st to next stitch, then fasten off, leaving a long strand for joining.
Crochet Nose
With skin tone yarn, make a magic ring
R1: 6 sc into ring (6 sts). (Do not join, worked in rounds)
R2: 2 sc in ea st (12 st)
R3: *sc in next 3 st, 2 sc in next. Repeat from * around (15 st)
R4: *sc in next 3 st, sc2tog. Repeat from * around (12 st) Begin stuffing nose.
R5: *sc2tog. Repeat from * around. (6 st) Fasten off, leaving a long strand. Then weave end through last stitches and pull tight and secure. Do not cut yarn; leave end for sewing on to gnome.
Crochet Gnome Hat
With red yarn, make a magic ring
R1: 6 sc into ring (6 sts). (Do not join, worked in rounds)
R2: *sc in next 2 st, 2 sc in next. Repeat from * once. (8 st)
R3-4: sc around (8 st)
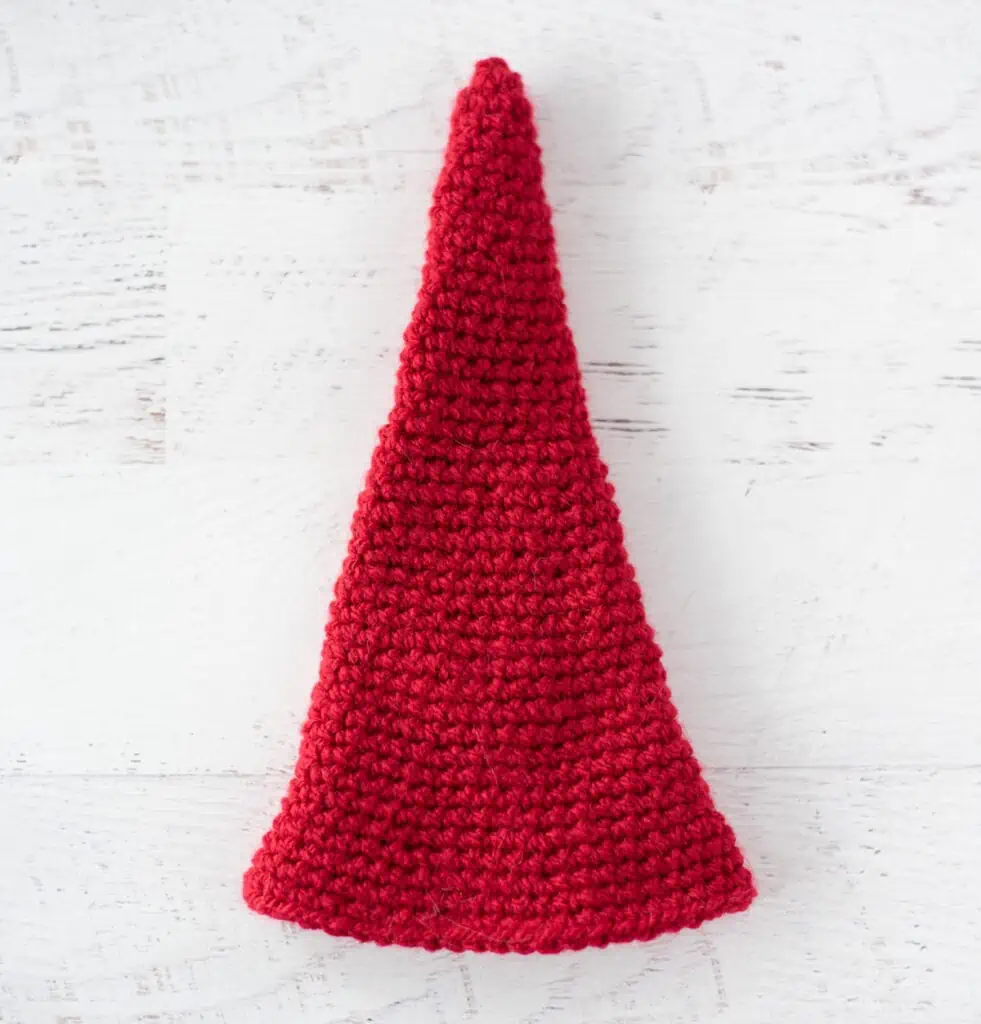
R5: *sc in next 3 st, 2 sc in next. Repeat from * once. (10 st)
R6-7: sc around (10 st)
R8: sc in next 2 st, 2 sc in next st, sc in next 4 st, 2 sc in next st, sc in next 2 st. (12 st)
R9-10: sc around (12 st)
R11: *sc in next 5 st, 2 sc in next. Repeat from * once. (14 st)
R12-13: sc around (14 st)
R14: sc in next 3 st, 2 sc in next st, sc in next 6 st, 2 sc in next st, sc in next 3 st. (16 st)
R15-16: sc around (16 st)
R17: *sc in next 7 st, 2 sc in next. Repeat from * once. (18 st)
R18-19: sc around (18 st)
R20: *sc in next 5 st, 2 sc in next. Repeat from * around. (21 st)
R21-22: sc around (21 st)
R23: *sc in next 6 st, 2 sc in next. Repeat from * around. (24 st)
R24-25: sc around (24 st)
R26: *sc in next 7 st, 2 sc in next. Repeat from * around. (27 st)
R27-28: sc around (27 st)
R29: sc in next 4 st, 2 sc in next st, *sc in next 8 st, 2 sc in next, repeat from * once, then sc in last 4 st. (30 st)
R30-31: sc around (30 st)
R32: *sc in next 9 st, 2 sc in next. Repeat from * around (33 st)
R33: sc around (33 st)
R34: sc in next 5 st, 2 sc in next st, *sc in next 10 st, 2 sc in next, repeat from * once, then sc in last 5 st. (36 st)
R35-37: sc around (36 st)
R38: *sc in next 11 st, 2 sc in next. Repeat from * around (39 st)
R39: sc in next 6 st, 2 sc in next st, *sc in next 12 st, 2 sc in next, repeat from * once, then sc in last 6 st. (42 st)
R40: *sc in next 13 st, 2 sc in next. Repeat from * around (45 st)
R41-42: sc around (45 st).
Slip stitch to next stitch and fasten off, weaving in end. (Alternatively, you can finish off with an invisible join before fastening off.)
Gnome Beard
The beard is cut out of fur and sewn on to the front of the gnome body, following the finishing steps in the next section.
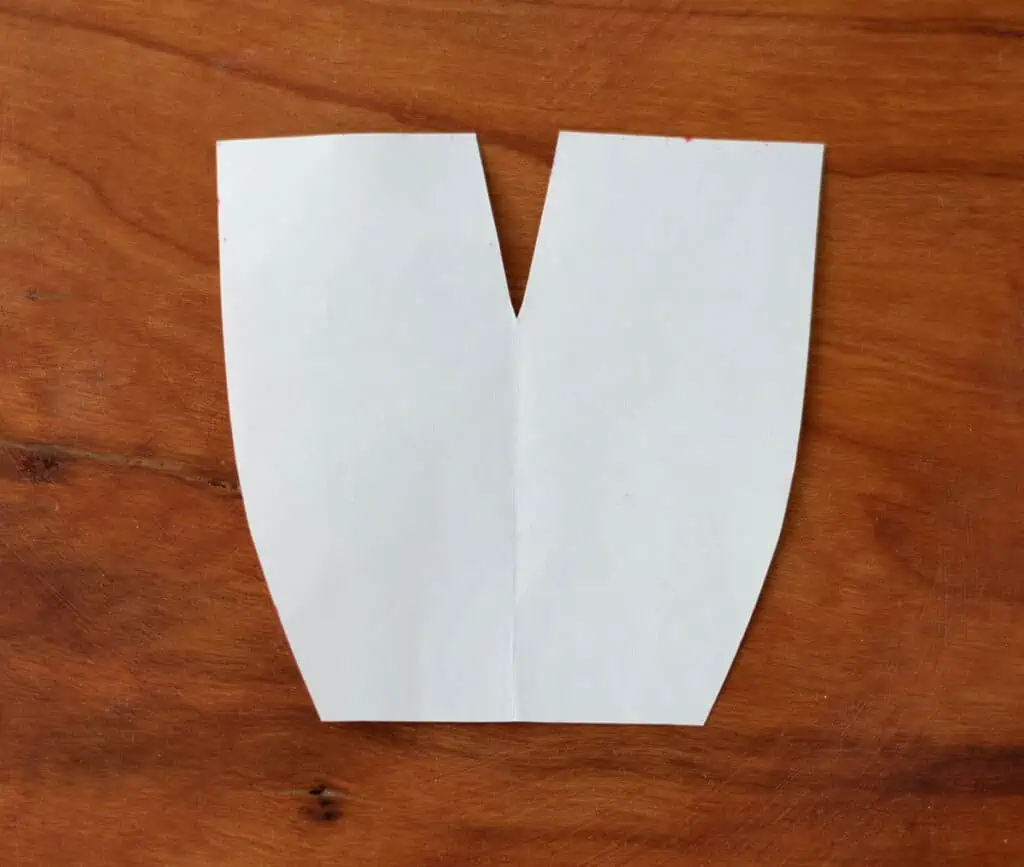
Start by making a paper template
- Cut a 2.5” square out of a piece of paper
- Fold the paper in half (so that both halves of the template will be equal)
- At the bottom, use a pencil to mark a spot that is ¾” from the fold.
- From the top, use a pencil to mark a spot on the side that is 7/8” down.
- Using scissors, cut a gentle curve from one mark to the other, forming the slope on the sides of the beard.
- Cut a small “V” shape from the top center over the fold. This will allow the nose to sit better in the beard. Leaving the paper folded, the bottom of the “V” shape is about ¾” from the top edge.
- Open the paper template and confirm that your shape looks similar to the photo
- Use the template to cut a piece of fur. To do this, first trace around the template on the back of the fur. Use scissors to cut out, snipping only the backing fabric, taking care not to cut the furry portion. This works best by making small snips, just catching the backing fabric.
- Cut another piece of fur 1/2” tall by 2-3/4” wide to use as a “mustache”. Then cut a slit at the top of this piece almost in half to form 2 sides that will go over the nose
Crochet Gnome Assembly
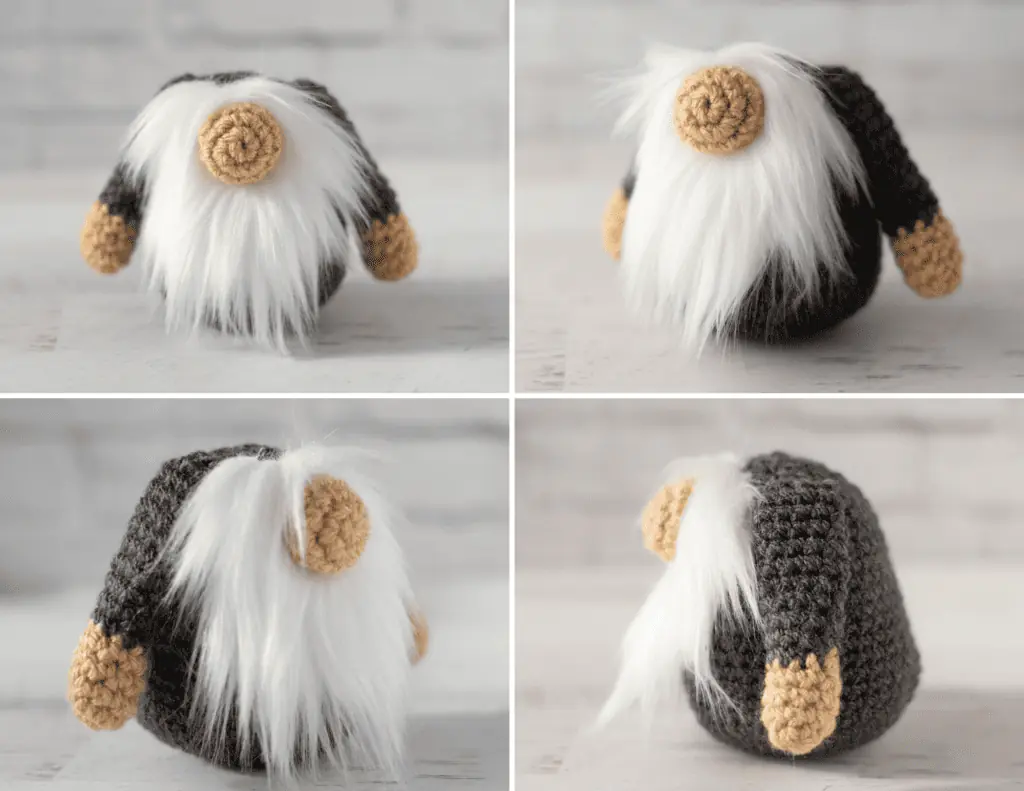
Fold each arm in half and sew at the top of the body between rows 22 and 23 on each side of the body.
Test the placement of the beard and nose. The top of the beard will rest between rows 22 and 23 on the body. At first it will overlap the arms. For now, we are just checking the length. Set your gnome on a table and make sure that bottom of the fur just grazes the surface of the table. If it does not, then move the beard piece slightly higher or lower until you are satisfied with the placement.
Holding the fur beard in place, determine the location of the nose. It should fit into the “V” shape in the top of the beard and be centered in between the arms. Remove the beard for now and carefully sew the nose in place, using the remaining yarn left on the nose.
Place the beard back on the gnome and use white thread and a sewing needle to stitch down the beard. Use running stitches to gather the top edge and cinch the top of the beard away from the arms. The top side edge of the beard should meet the side of the arm, but not overlap it; use the running stitches to achieve this.
Then continue around the beard making small stitches with the needle and thread in the backing fabric to secure the beard to the gnome.
Take the “mustache” piece and place OVER the TOP of the nose to fill in any gaps and to give the beard a little more fullness. Use a needle and sewing thread to secure them down.
Place the gnome hat on top of the head, pulling it down over the nose. Use your hands to bend and shape the hat as desired. The small hook size and worsted weight yarn enable the stiffness of the hat to hold its shape.
If desired, you can use red yarn to tack the hat to the gnome body. Or leave the hat removable to change out for the season, as desired.
Explore More Crochet Patterns
Do you love crochet projects as much as I do? I think you’re going to love these other crochet patterns:
- Easy Crochet Star uses basic crochet stitches
- Classic Crochet Stocking is perfect for every mantle
- Crochet Santa Claus if you love cute amigurumi crochet
- Vintage Vibe Crochet Ornament features unique, but easy crochet techniques
- Crochet Gnome Collection if you love crochet gnome patterns
I love seeing your finished projects! If you enjoyed making this Crochet Christmas Gnome or any of my crochet patterns, I’d love to see yours on Instagram, be sure to tag me @crochet365knittoo. If you are on Facebook, stop over to the Crochet 365 Knit Too Facebook page or pop over to the Crochet365KnitToo Club and share a photo! I’d love to see your work!

Hi Cheryl, the gnome pattern is really cute! But I am not familiar with paintbox yarns. Is this a cotton yarn? And what could be a substitution? My stash includes other cottons such as from hobby lobby, lily, etc. Would like to try this without running to the store. 🙂 Thank you!
Paintbox is a brand. Their aran (which is used in this pattern) is an acrylic. You could substitute any other worsted weight acrylic yarn such as Hobby Lobby’s I Love This Yarn or Lion Brand’s Vanna’s Choice.