
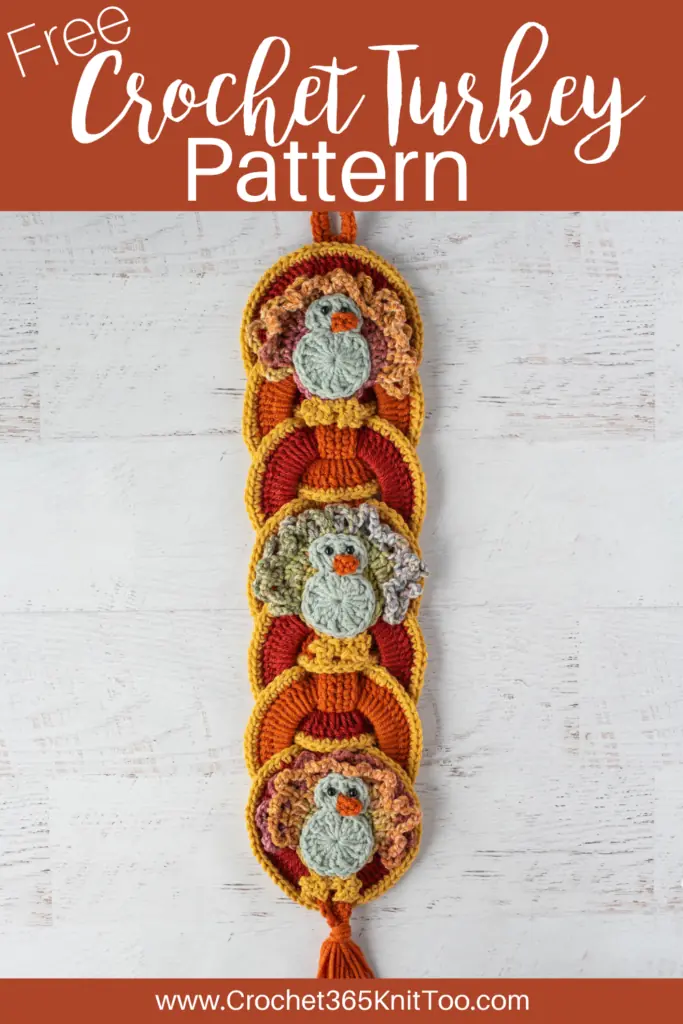
Crochet Turkey Wallhanging
This post may contain referral/affiliate links. Please read my disclosure for more info.
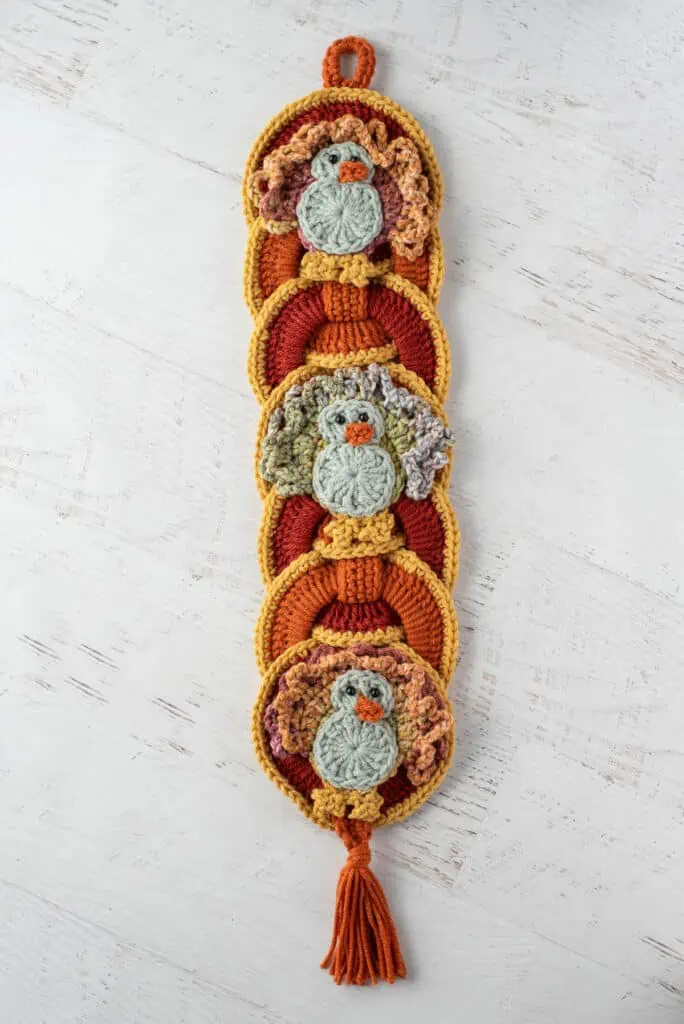
Nothing quite says fall and Thanksgiving like this adorable Crochet Turkey Wallhanging.
Grab some scrap yarn in your favorite fall colors and get ready to crochet the cutest little turkey wall decor in one evening!
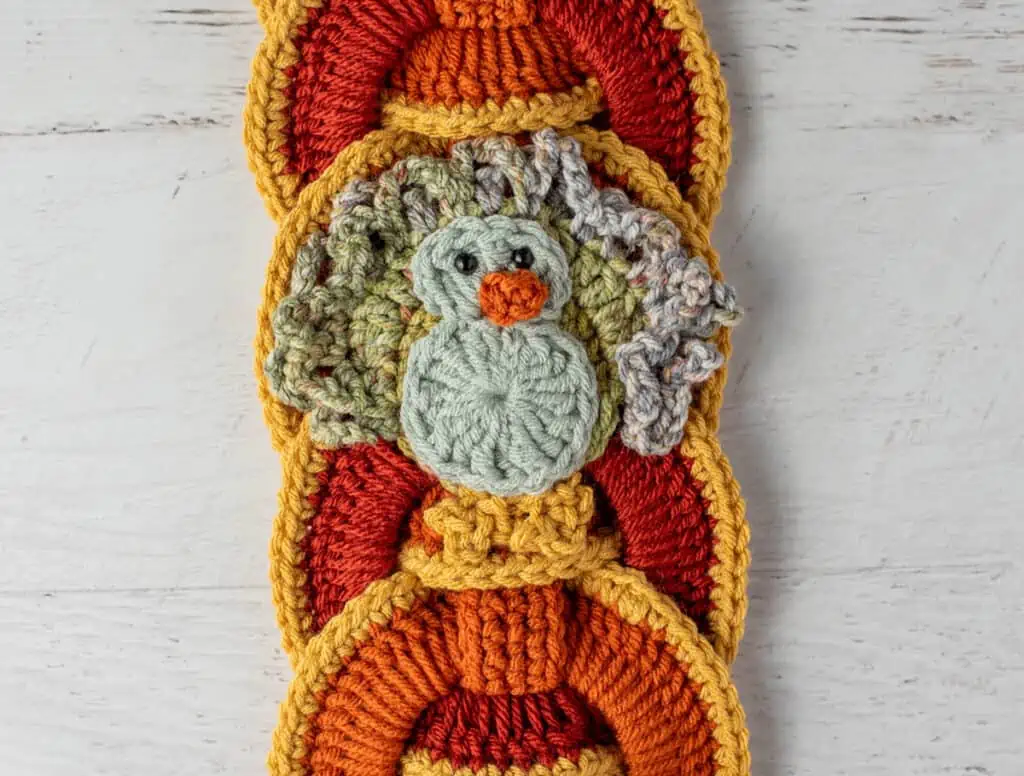
I’m completely enamored with this cutie pie crochet turkey. Let’s take a closer look:
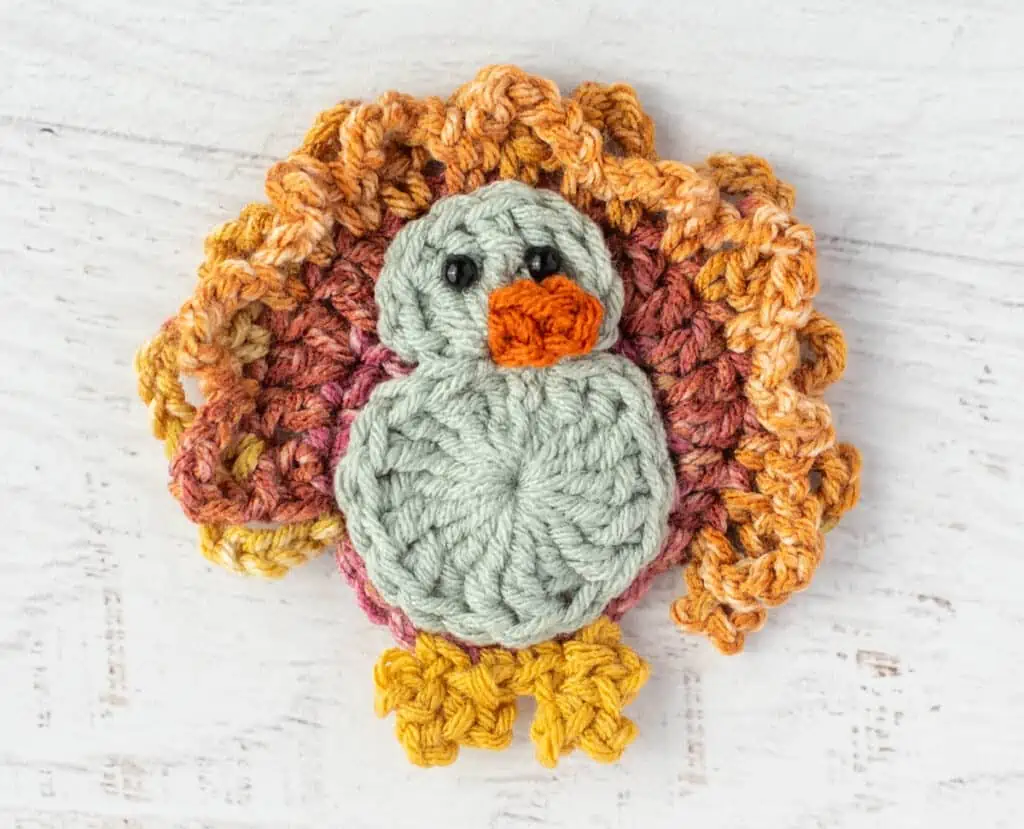
Seriously. Isn’t this just about the cutest little crochet turkey appliqué you’ve seen?
I love him so much!
In fact, this Thanksgiving turkey pattern is an entire remake of one of my early designs that has been residing in my premium pattern shops. But now I thought I would take all my crochet wisdom, tweak the crochet pattern to make it even better and change up the colors.
Along the way I also took more detailed photos so you can see exactly how it all comes together. And.. this might be the best part… I moved it over, in its entirety to read as a free crochet pattern here on the blog!
Yayness. Cheering ensues!
In the past I struggled to bring out those fall orange and red tones without ‘losing’ the cute little turkey appliqué detail. Originally I “solved” this by making the rings purple and orange, but honestly I never really loved the dark purple. Maybe it just didn’t feel Thanksgiving enough or maybe the purple just clashed with my home decor.
Inspired by the blues in my newly remodeled kitchen and dining space, I found a lovely blue gray yarn for the turkey appliqué body along with a more subtle fall variegated yarn for the turkey feather base layer. I love how the variegated yarn gives the sense of multi color feathers and the ruffle of the chain spaces complete the adorable turkey look.
The more cohesive yarn colors really make this autumn turkey crochet pattern come together and I’m totally loving this beautiful decoration in my home right now! I have mine hanging on the front door, kind of like a turkey wreath.
This is a fun crochet project to get yourself into the holiday spirit but it also makes a beautiful autumn gift for someone special this holiday season. In fact, I made an extra one for my son and daughter in law.
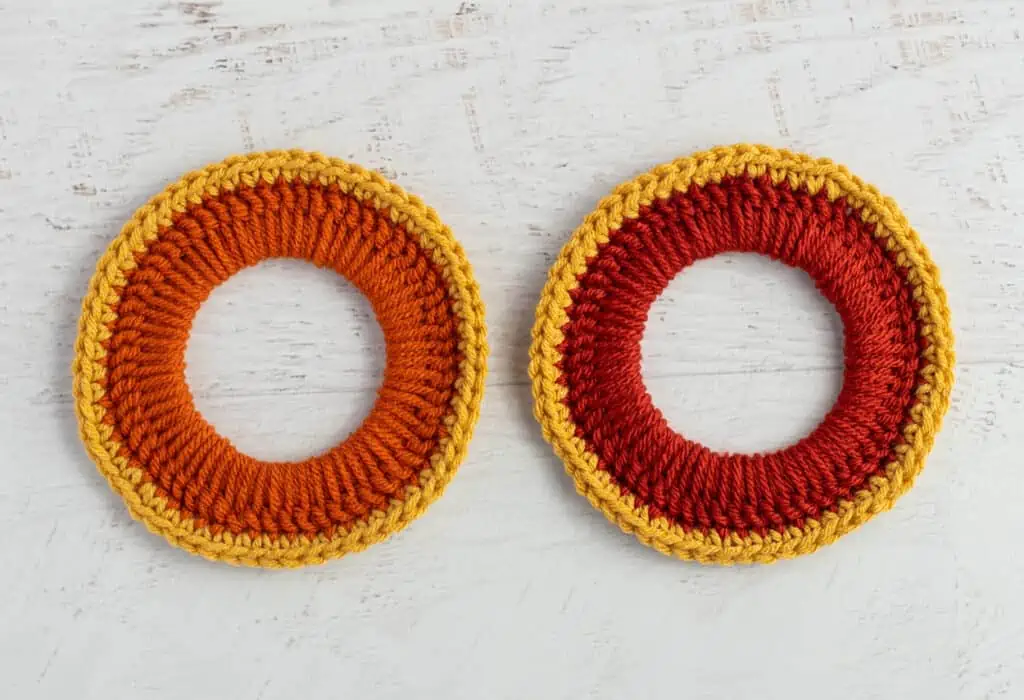
The rings themselves are worked around silicone canning jar gasket rings. In my grandmother’s Santa version, she used the old style rubber canning jar gaskets. Unfortunately the rubber did not hold up to the test of time and there’s nothing sadder than seeing your grandmother’s work fall apart like that!

The easiest place to find the silicone canning jar gaskets is on Amazon although I purchased mine locally. My local store no longer carries them, but you might find some in a store that has a good canning section.
Look for wide-mouth rings for a mason jar. Typically gaskets come in ‘regular’ which is smaller and ‘wide-mouth’ which is larger. Go for the wide mouth gaskets for this project! The ring measures 3.5 inches across from edge to edge. You might need to go with this measurement since I’ve found that Amazon isn’t always labeling them correctly.
If your gaskets have the little tab on them, like mine do, use a pair of scissors to snip them off so you have a continuous ring to crochet around.
More Fall Crochet Patterns
If you love this Crochet Turkey pattern, you might also like to check out these cute crochet patterns:
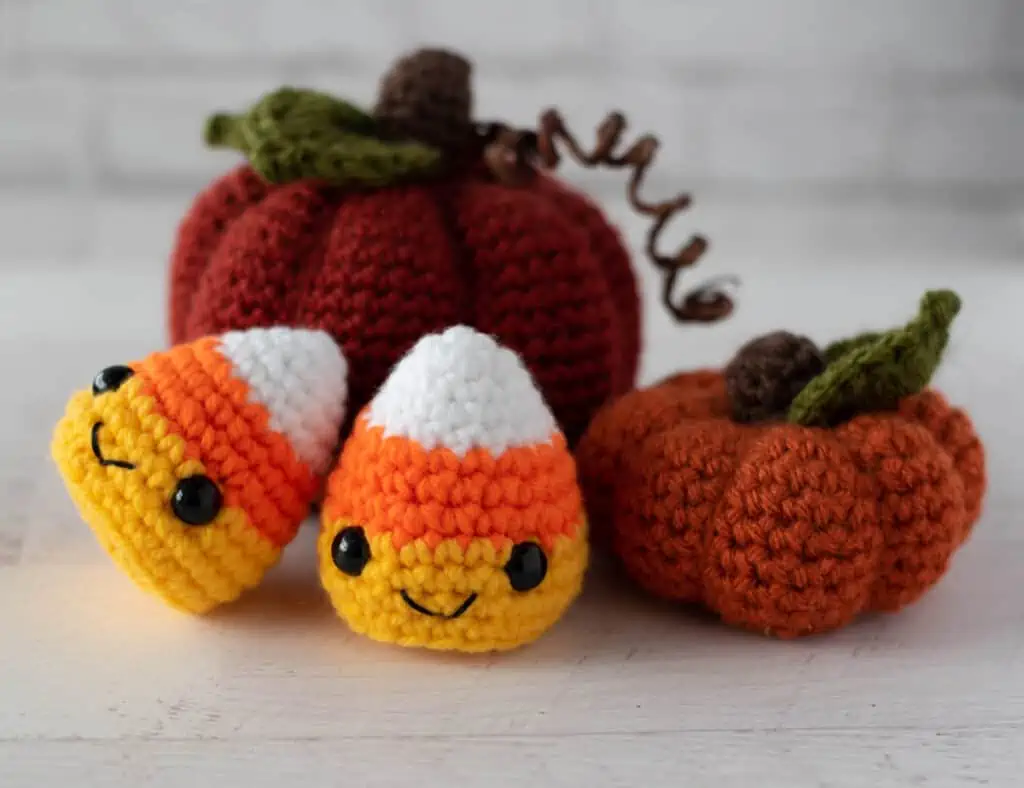
Crochet Candy Corn // Medium Crochet Pumpkin // Small Pumpkin
Grab some medium weight yarn (#4) and your crochet hook, and let’s crochet this fun free pattern – The Crochet Turkey Wallhanging!
Purchase an ad free version of the Crochet Turkey Pattern Here
Turkey Crochet Wall Hanging Pattern
Materials
- US H/5.0 mm for crochet hook (these are my absolute favorite crochet hooks I recommend to everyone!).
- Worsted weight yarn; Sample used Hobby Lobby ‘I Love This Yarn’ and Yarn Bee Soft & Sleek as follows:
- 1 oz Dark Orange (‘I Love This Yarn’ in Terra Cotta)
- 1-1/4 oz Medium Orange (‘I Love This Yarn’ in Burnt Pumpkin)
- 1 oz Variegated (‘I Love This Yarn’ in Cinnamon Cedar)
- 1 oz Gold (‘Yarn Bee’ in Mustard)
- 1/2 oz Gray-Blue (‘Yarn Bee’ in Viridescent)
- 7 Large Mouth Canning Jar Gasket Rings*
- Small round, shank type buttons for eyes (or embroider instead with black yarn)
- Tapestry needle and scissors
*Sample used wide mouth size canning jar gaskets made of silicone. They can be purchased on Amazon or you might find them locally, as I did. Be sure to select the correct size: these are WIDE mouth canning jar gaskets designed to fit on standard sized mason jars with a wide opening (NOT regular). The outside dimensions of the jar ring are 3.5″ across by 3.5″ high.
Gauge:
Gauge is not important in this pattern.
Resources and crochet tutorials you may find helpful in following this pattern: Crochet Abbreviations, US to UK Crochet Conversion Chart. Find links to stitches and basic crochet skills on the “Tutorial” menu: Getting Started will show basic stitches such as the slip stitch, single crochet, double crochet stitch and chain stitch used in many patterns and Crochet Stitch Dictionary shows our growing collection of crochet stitch tutorials.
Crochet Abbreviations:
- ch = chain
- dc = double crochet
- tr = treble crochet
- sc = single crochet
- sl st = slip stitch
- st = stitch(es)
Finished Crochet Turkey Wallhanging Size
Wall hanging is approximately 25” from top of loop to bottom of tassel.
If there are tabs on the jar gaskets, cut them off with a pair of scissors so that the ring is truly a ring.
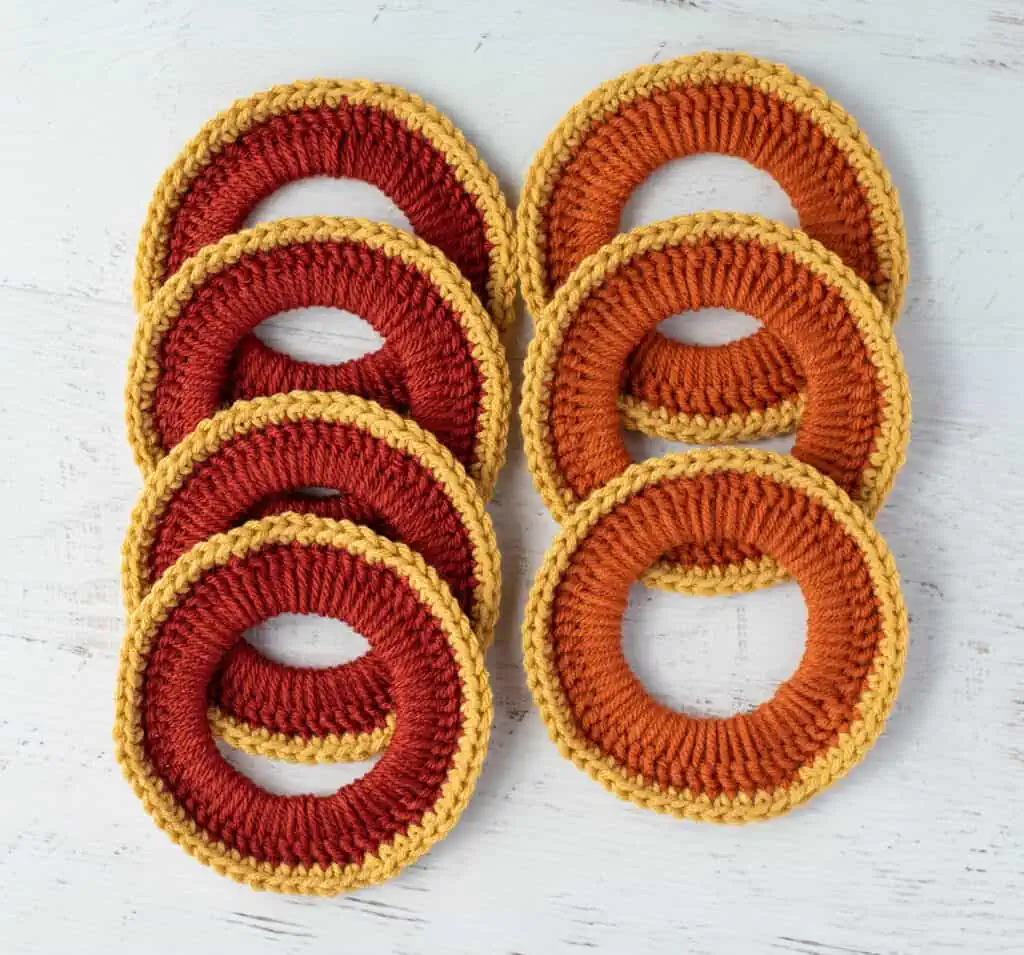
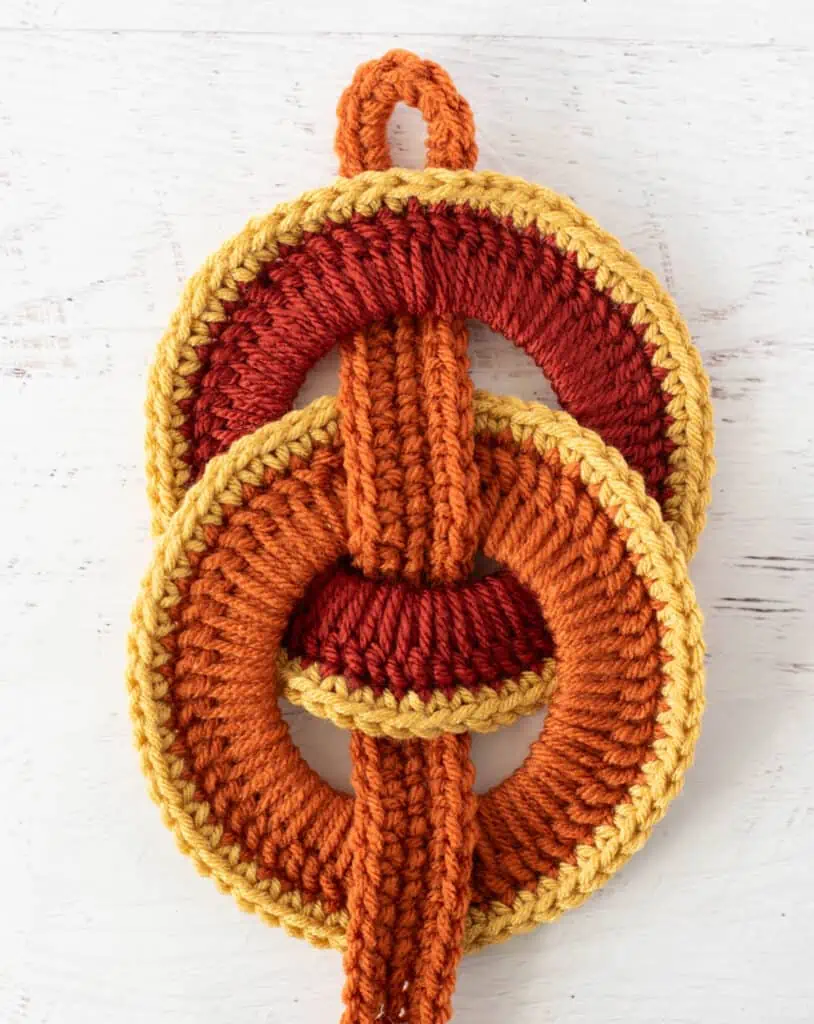
Crocheted Rings (Make 7)
Sample has 4 dark orange rings and 3 medium orange rings.
R1: With Main Color, make 60 dc into and around the jar ring. Join with sl st to 1st dc. Fasten off.
R2: Attach Gold to any dc and sc around. Fasten off and weave in ends.

Hanging Strip
With Medium Orange, ch 90.
R1: Sc in 10th chain and across to last chain. Slip stitch in last chain.
R2: Rotate work. Working in opposite side of chain, sl st in 1st chain (which is the opposite side of the last stitch worked in round 1). Sc across to the point where the loop begins, make 10 sc in loop. Continue working around the opposite side of the strip and sc across the end, ending with a slip stitch in the last st at the bottom.
Fasten off yarn and work in all loose ends. Take several strands of yarn (approx 10” long), fold in half and attach as a tassel at the bottom with a giant sl st. The smooth end of the sl st should be on the right side of work. Trim tassel to an eye pleasing length.
Crochet Turkey Applique
The turkey appliqués are crocheted in pieces. First crochet the turkey feather base layer. Then crochet the legs to the bottom of the base layer. Then crochet the turkey body and turkey beak. Then all the pieces are sewn together along with the button eyes:

Crochet Turkey Feather Layer (Make 3)
With variegated yarn, make a magic ring
R1: Ch 3 and 11 dc into ring, sl st to top of starting ch 3 (12 st)
R2: Ch 3, dc in same stitch as joining, 2 dc in ea st, sl st to top of starting ch 3 (24 st)
R3: Ch 1, sc in same st as joining, hdc in next st, *2 dc in next st, 1 dc in next st, repeat from * 4 times, hdc in next st, sc in next st. (19 st).
R4: Turn work, ch 7, skip next st, sc in next. Repeat from * around. (9 loops).
R5: Turn work and work behind 1st row of feathers. Ch 7, sc in skipped st from prior row. Repeat from * 8 times, ch 7, sl st to joining point of prior row. Fasten off yarn, leaving a long yarn tail for joining.
Turkey Feet
Flip turkey feathers so bottom of bird is at the top. Attach gold yarn with sl st to 3rd stitch from end of feathers on right side. *Ch 3 and sl st into 1st ch (toe 1 made), ch 3 and sl st into the same ch as in toe 1 (toe 2 made), ch 3 and sl st into the same ch as in toe 1 (toe 3 made).** Skip 1 sc on body and sc in next 2 st. Repeat from * to ** for 2nd foot. Skip 1 sc and sl st to next sc. Fasten off.
Turkey Body
With Blue-Gray yarn, make a magic ring.
R1: Ch 4, 17 tr in ring. Sl st to top of starting ch 4 (18 st)
The next row forms head:
R2: In next stich work ALL of the following: (sl st, ch 2, dc, 5 tr, dc, ch 2, sl st). Fasten off
Turkey Beak
With orange, ch 4, sl st in 3rd ch from hook, sc in last ch. Fasten off.
Turkey Appliqué Finishing
For each turkey, sew beak to head. Sew buttons for eyes to head. Sew body to feathers.

Crochet Turkey Wallhanging Assembly
Refer to picture and weave hanging strip over and under rings (see next page for photo tutorial). Tack down with yarn at the top and bottom of the strip and anywhere else as needed to hold in place. Arrange the Turkey motifs along the strip and sew down.
Detailed Tutorial for Weaving Strap Between Rings
The strap is woven over and under the rings. Each ring is placed on top of the prior ring. Start with the darker orange ring and alternate colors, ending with a dark orange ring.
Note that you will be able to adjust the strap when you are finished, so don’t worry if isn’t perfectly centered vertically or if pulls here and there; we will fix that at the end.
Step 1: Place the strap under the first ring so that the loop is behind and above the first ring as follows:
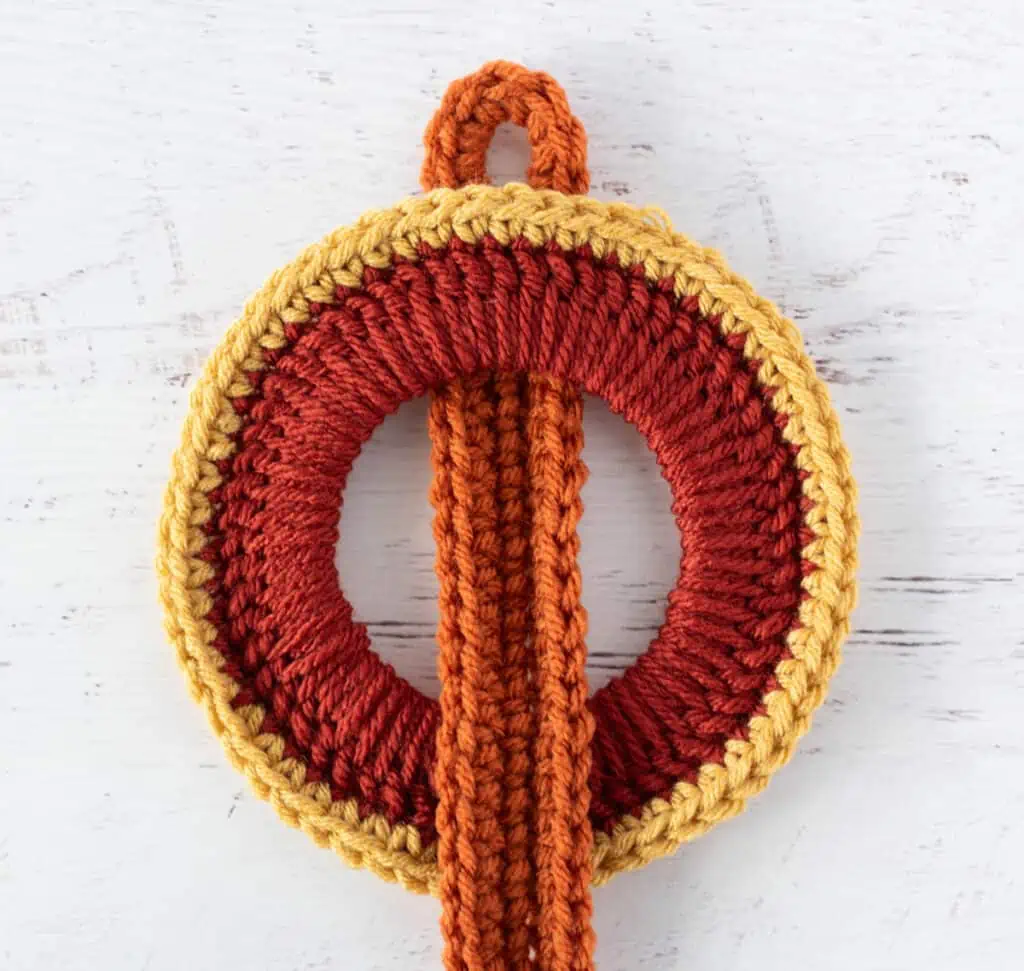
Step 2: Lift strap up, place ring #2 on top of ring #1 and weave strap to back like this:
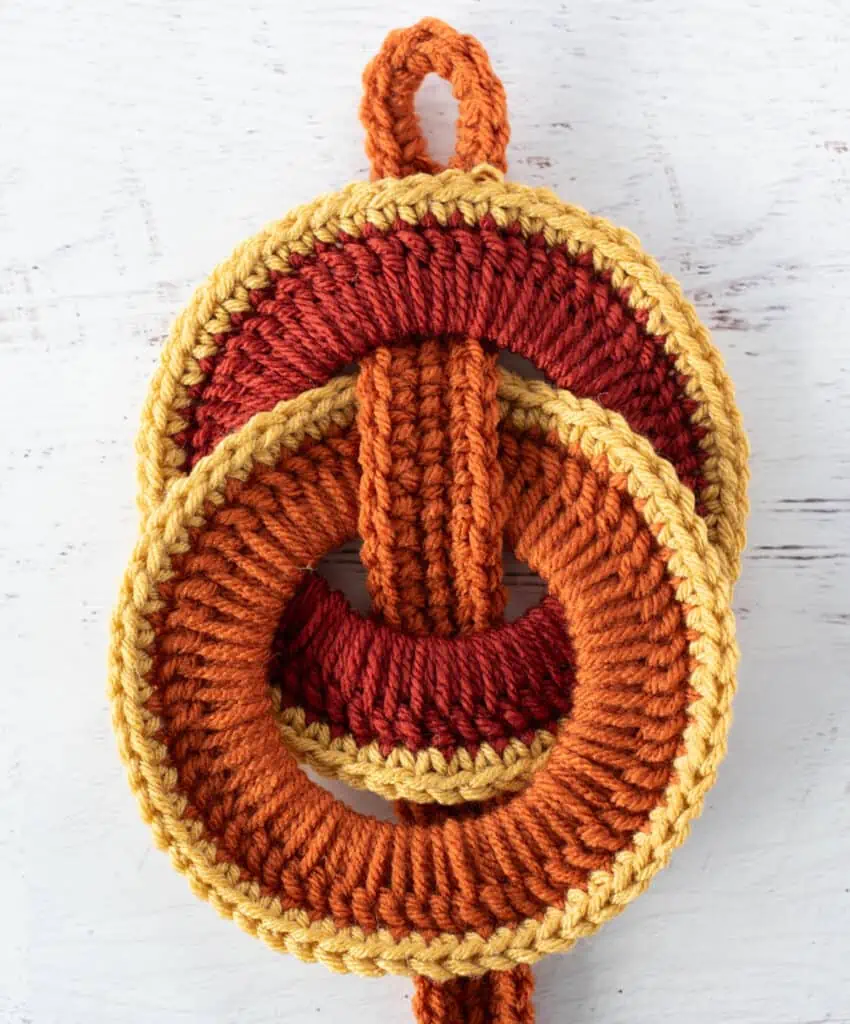
Step 3: Weave strap back under the bottom of ring one and over the bottom of ring 2, so it looks like this:
Step 4: Lift up the strap, then add the next ring and weave strap under the bottom of the prior ring and back to the top:
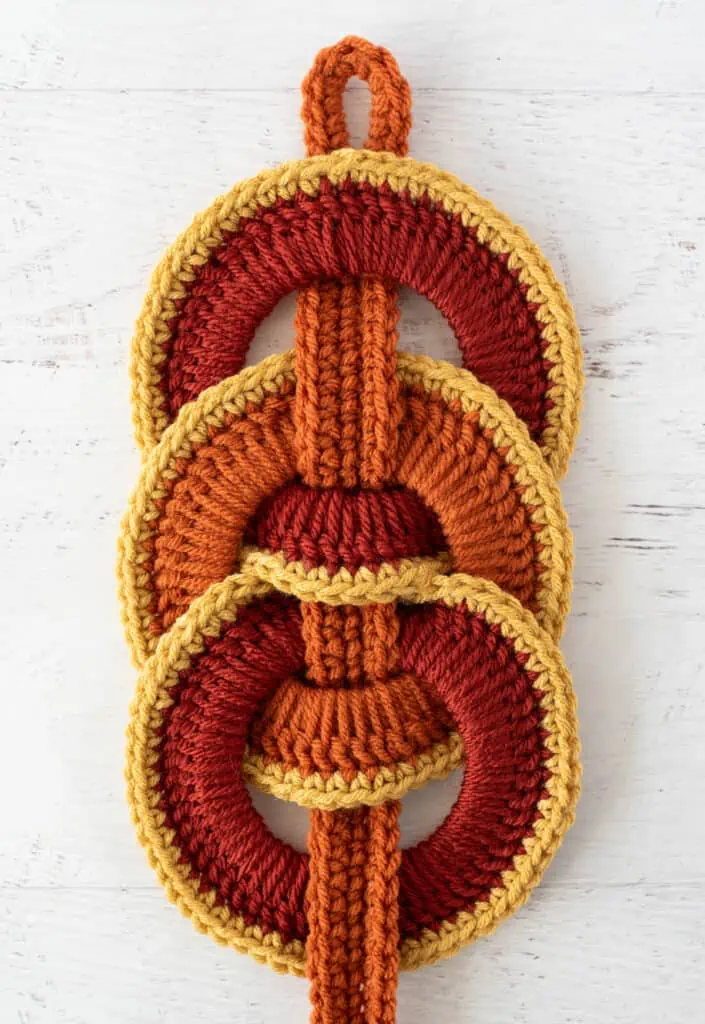
Repeat the above steps, continuing to weave the strap around the top and bottom of each ring as you place it on the top of the previous ring:
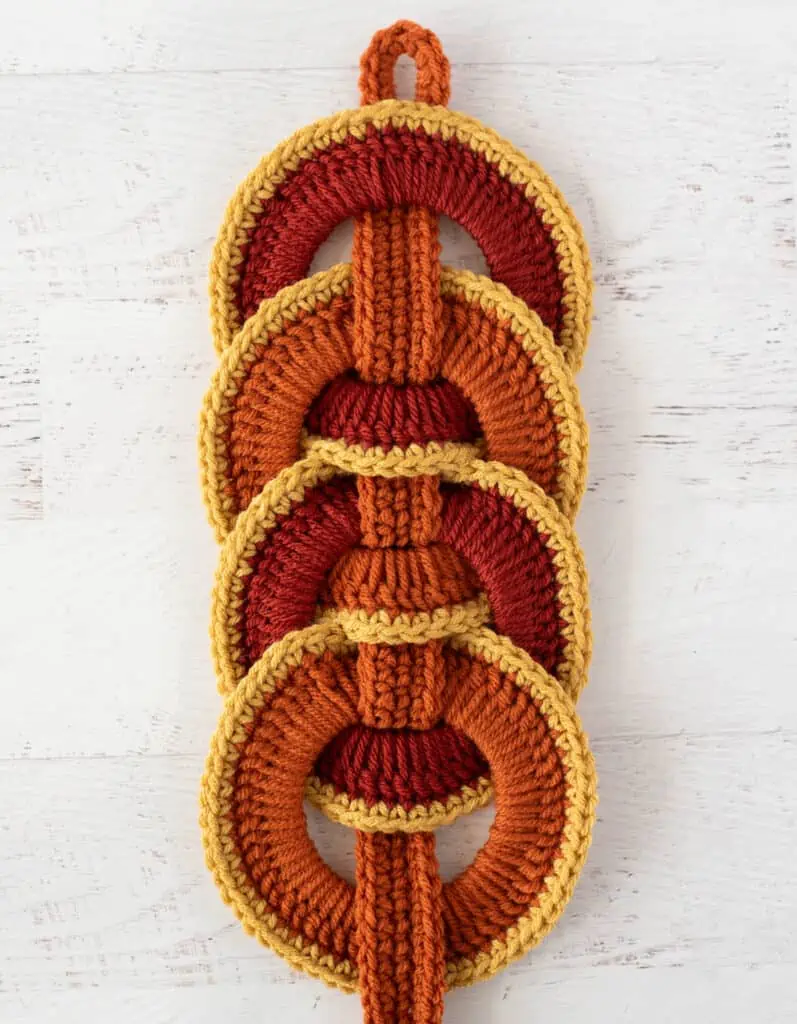
When you are done, the base of the wall hanging looks like this:
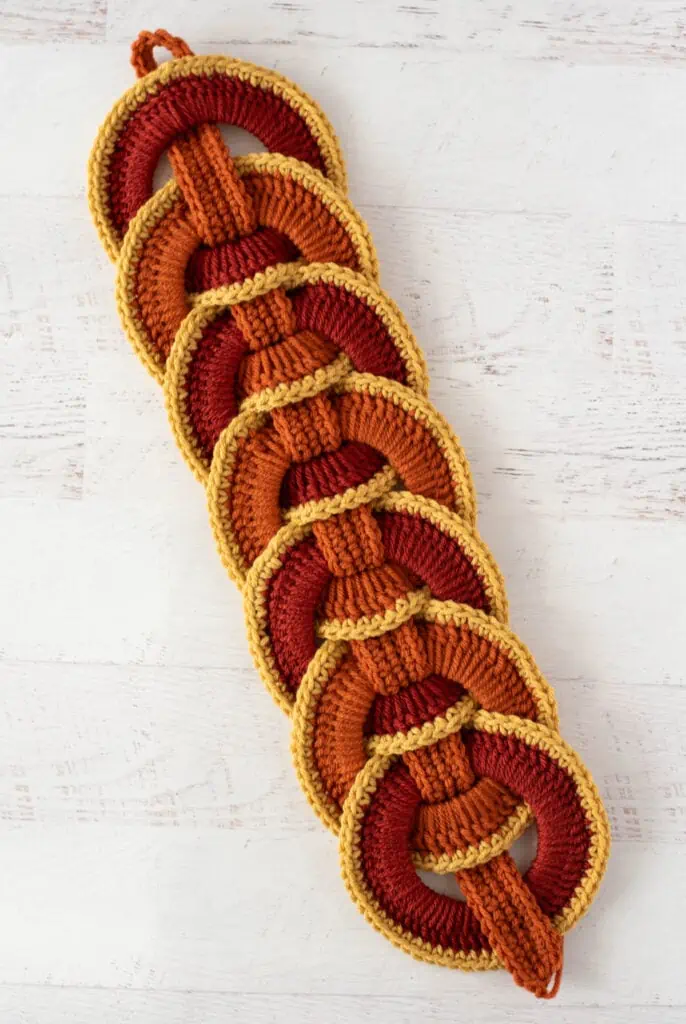
You may need to adjust the strap so it does not pull or pucker and so that the loop at the top and the very bottom of the strap look even. Remember to follow the finishing instructions to tack down the strap at the top and bottom, to make the tassel at the end and to attach the turkey appliques.

Purchase an ad free version of the Crochet Turkey Pattern Here
Explore More Crochet Patterns
Do you love autumn crocheting as much as I do? I think you’re going to love these patterns for beautiful pumpkins:
And for a similar wallhanging for St Patrick’s Day check out my Crochet Leprechaun Pattern!
I love seeing your finished projects! If you enjoyed making this Crochet Turkey or any of my crochet patterns, I’d love to see yours on Instagram, be sure to tag me @crochet365knittoo. If you are on Facebook, stop over to the Crochet 365 Knit Too Facebook page or pop over to the Crochet365KnitToo Club and share a photo! I’d love to see your work!
Silicone canning rings!!! who’s have thunk it. LOL I remember many many years ago.. back in the late 70’s or early 80’s my grandmother making hats from the 6 pack rings that came on soda cans. It is so amazing the things that can be made from “Trash” Not that the silicone rings are trash. I love this design of yours. the turkeys are adorable!!
I agree! I love the “make do” and “use it up” of days gone by too! Thanks for the kind words! I love those cute little turkeys too!
I love your patterns! I especially enjoyed making the Thanksgiving Turkey wall/doorknob hanging. Years ago I had made a similar hanging for Christmas, and I was thrilled when I came across this pattern. YOU INSPIRED ME. One of my Christmas gifts to my granddaughter was a year’s worth of hangings, one for each major holiday. She loves them. I have given her Thanksgiving (your pattern), Valentine’s Day, and Mardi Gras. and Valentine’s Day. I have almost finished St. Patrick’s Day and Easter. I have purchased all of the supplies for July 4th (and all other patriotic holidays), Hallowe’en, and Christmas. Thank you for sharing your talent and wisdom (re AI patterns) with us! :^)