
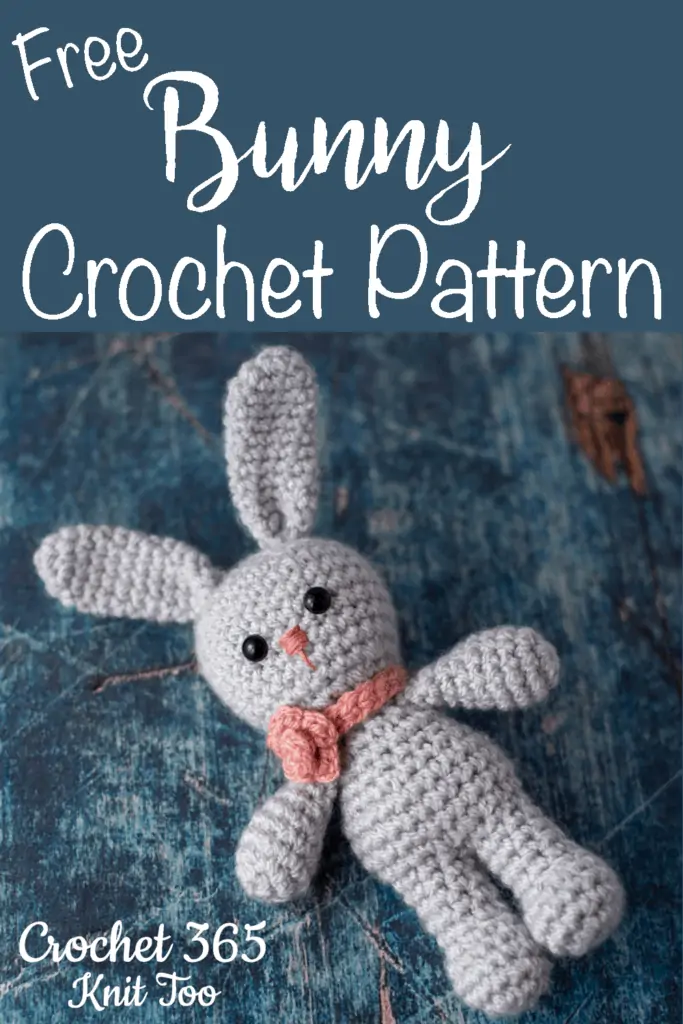
Meet Bernadette: An Adorable Crochet Bunny To Love
This post may contain referral/affiliate links. Please read my disclosure for more info.
Prepare yourself for cuteness because this adorable is hopping right into your life!
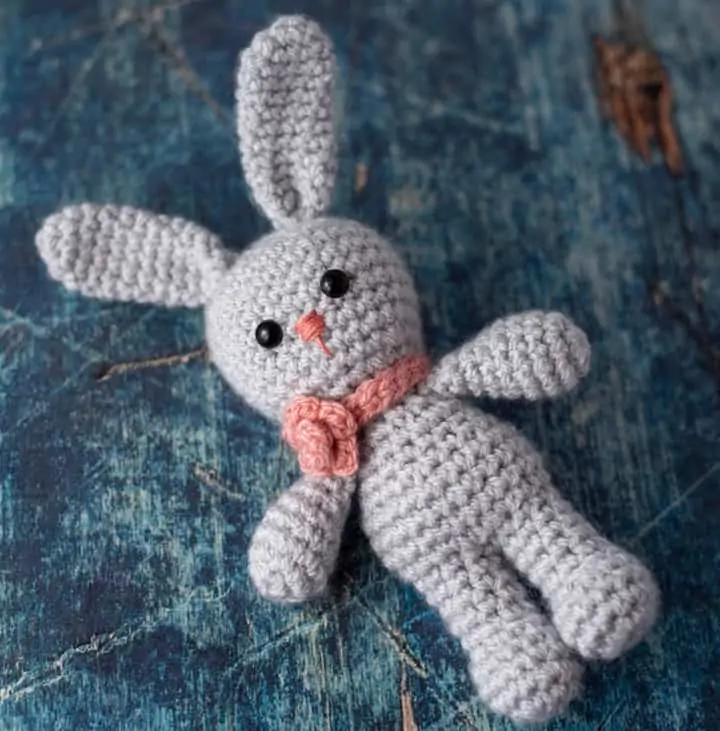
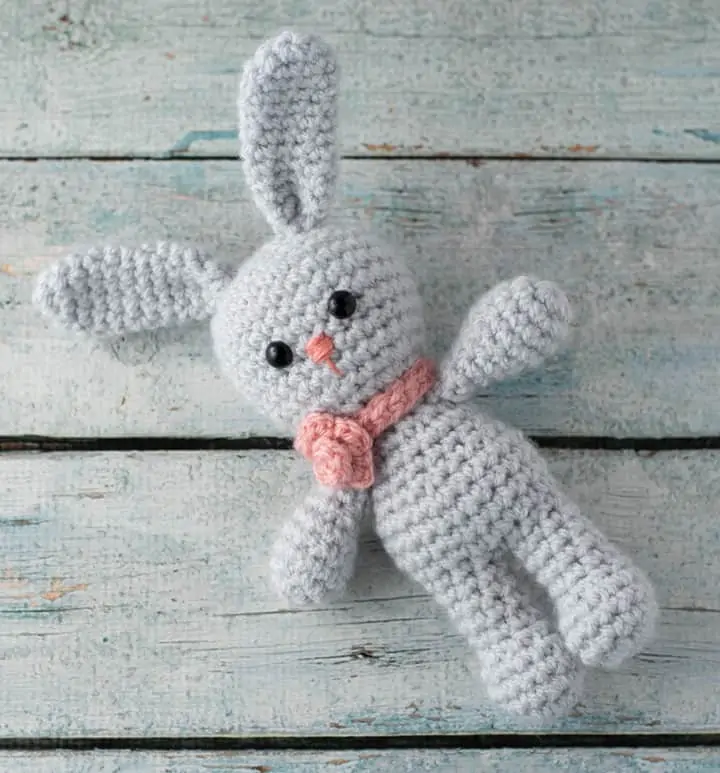
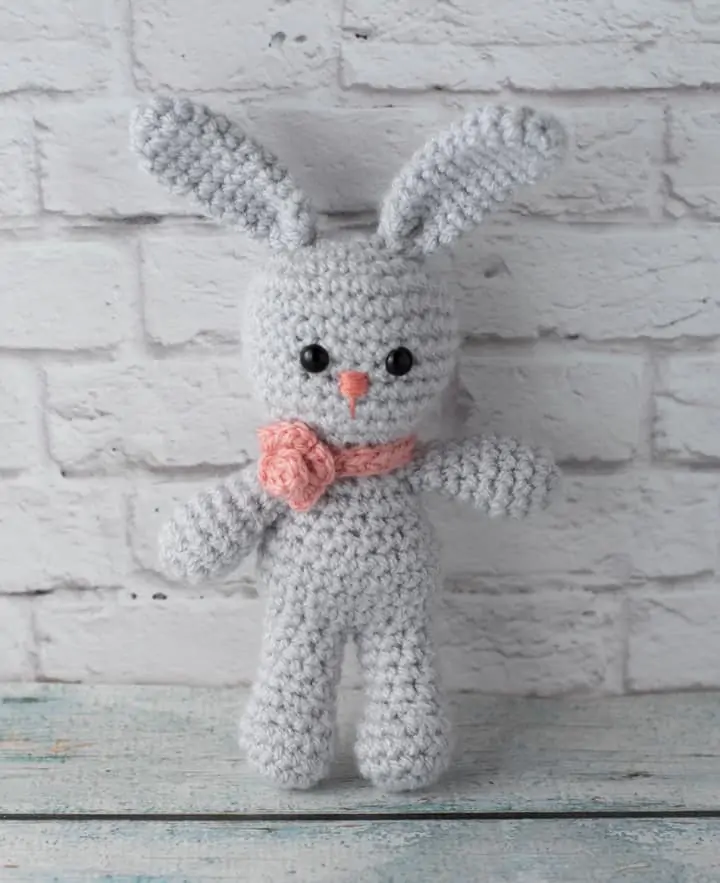
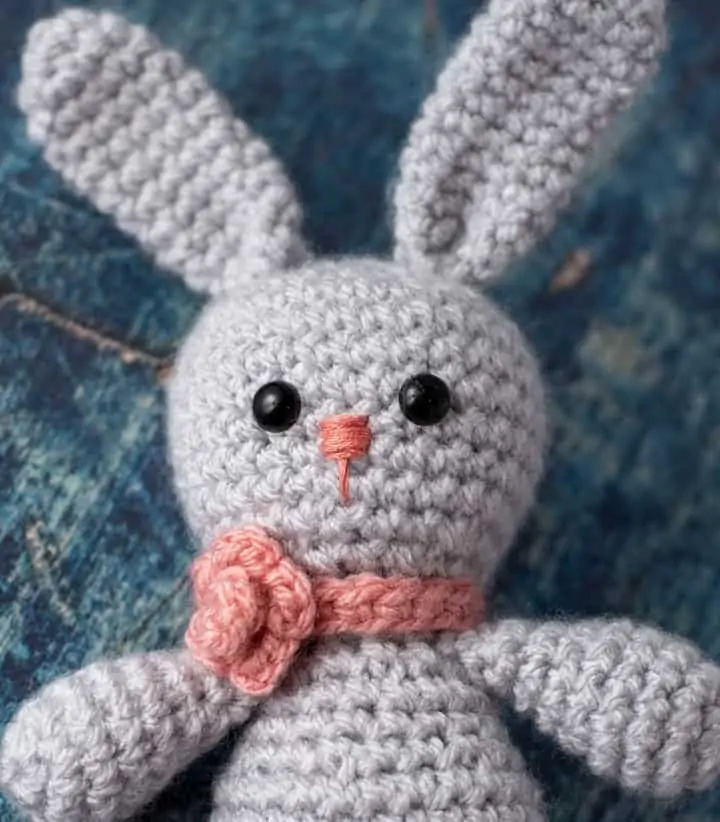
Meet Bernadette, she’s a sweet and adorable crochet bunny doll friend, the latest in our Tamingo series. Adorable from her cute little ears and tiny (no required) to her sweet toes, she’s about to steal your heart.
What’s a Tamingo you might ask? Good question! The word “Tamingo” is a made up word. It was my son’s mispronunciation of the word “Flamingo” when he was a young boy. But it’s too darn cute NOT to be in our everyday vocabulary, I say!
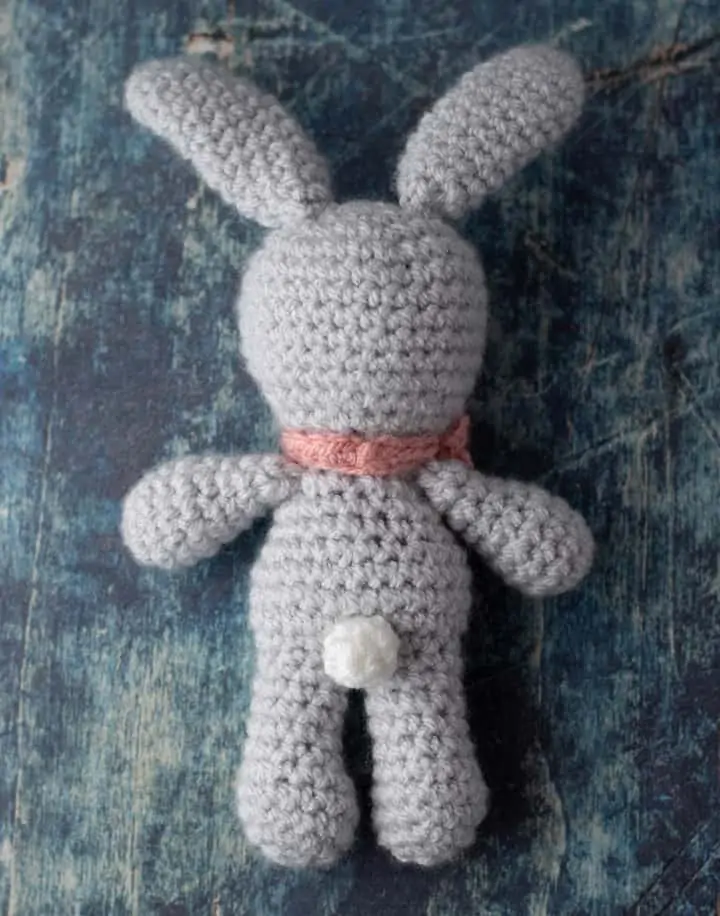
A Tamingo is a small crocheted friend. The cute dolls in this series are a mere 6.5″ tall. And any removable clothing is mix-and-match so if you’re loving Rachel’s cute dress, it will fit Bernadette too!
These darling little amigurumi are perfect for clutching in a little one’s hand. But who says patterns are only meant for cuddling? Sure you could make this as an or a for an Easter basket. But it’s perfectly acceptable (and enjoyable) to make a for your workspace! Spread the joy, I say.. with crocheted bunnies for bunny season all the time!
I adore these little dolls because they are so small, yet made out of . The works up so quickly and they are just so fun to make! Look forward to even more in the Tamingo series! Squee! Love them so, so much!
If you’re looking to learn how to make the best amigurumi, be sure to check out my Amigurumi: A Beginner’s Guide. It’s a massive 165 page ebook of detailed tutorials, tips and tricks (plus exclusive patterns). You can read about that right here.
MORE BUNNY PATTERNS
If you love the Bernadette, the Crochet Bunny pattern, you might also like to check out these other bunny ideas:
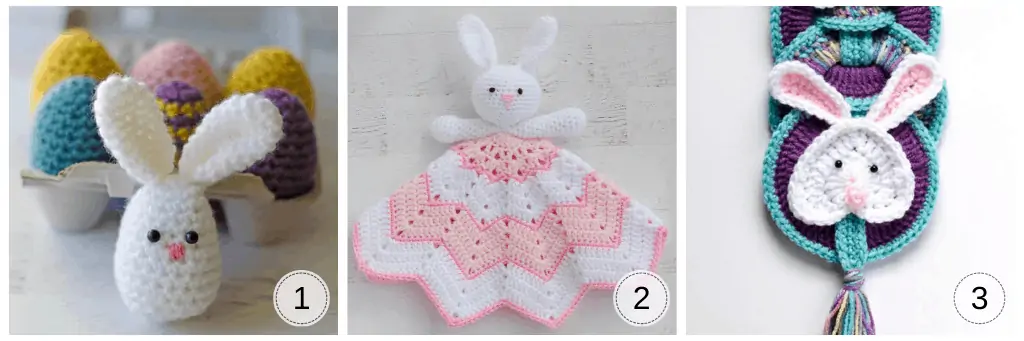
1. Easter Bunny Egg // 2. Crochet Bunny Lovey // 3. Bunny Wall Hanging
Let’s get started on crocheting Bernadette, our darling …
Purchase an ad-free printable version of Bernadette – Crochet Bunny Pattern Here
Crochet Bunny
Here is what you will need:
- US G 6/4.0 mm crochet hook.
- Worsted Weight yarn
- Main: 1.25 oz, sample used Paintbox Simply Aran in Misty Grey
- Flower Necklace: 1/4 oz, sample used Paintbox Simply Aran in Vintage Pink
- Tail: 1/4 oz, sample used Paintbox Simply Aran in Paper White
- 9 mm Black Safety Eyes
- Embroidery floss nose. I used DMC 760 to match the pink yarn
- Fiberfill
- Tapestry needle and scissors
Resources and tutorials you may find helpful in following this : Abbreviations, US to UK Conversion Chart. Find links to stitches on the “Tutorial” menu: Getting Started will show basic stitches used in many patterns such as single crochet stitch, double crochet stitch and chain stitch. The Dictionary shows our growing collection of tutorials.
For amigurumi specific tutorials be sure to read about the , how to (), (or ) so you’re familiar with the simple stitches for this crochet bunny design.
Gauge is not important in this . You may use other weights of . Adjust size to fit your needs. With the and size given, my gauge is about 4 stitches to an inch.
Finished is approximately 6.5″ tall from top of head (excluding ears) to bottom of feet.

Crochet Bunny Head
With Main Color yarn, make a magic ring
R1: 6 sc into ring (6 sts). (Do not join, worked in rounds)
R2: 2 sc in ea st (12 st)
R3: *sc in next st, 2 sc in next. Repeat from * around. (18 st)
R4: *sc in next 2 st, 2 sc in next. Repeat from * around. (24 st)
R5: *sc in next 3 st, 2 sc in next. Repeat from * around. (30 st)
R6-11: sc around. (30 st)
R12: *sc in next 3 st, sc2tog. Repeat from * around (24 st) Begin stuffing head
R13: *sc in next 2 st, sc2tog. Repeat from * around (18 st)
Insert safety eyes between rows 8 and 9, leaving 3 stitches in between the eyes. Adjust stuffing and stuff the remainder of the head.
R14: *sc in next st, sc2tog. Repeat from * around (12 st). Fasten off leaving a long strand for sewing.

Crochet Bunny Ears (Make 2):
With Main Color yarn, make a magic ring
R1: 5 sc into ring (5 sts). Work in rounds
R2: *2sc in ea st*, repeat * to * around (10 st)
R3-11: sc around (10 st)
R12: *sc in next 3, sc 2 tog, repeat from * once. Sl st in next st and fasten off, leaving a long strand for sewing. (8 st)
Fold ear in half and sew bottom closed. Then, using same strand of yarn, sew to top of head.
Repeat for 2nd ear.
If desired, add pink to inside of bunny ear using pink blush (or pink eyeshadow) and a brush.
Note on Limb and Body construction for your crochet doll: The legs are worked separately and then joined together in the first row of the body. The body is worked to the neck and fastened off. Then the arms are worked and the pieces are sewn together. Please follow the instructions carefully for stuffing and fastening off notes. If you’d like an complete photo tutorial on joining amigurumi legs in this manner, please read ‘‘Joining Amigurumi Limbs’ here.
Legs (Make 2):
With Main Color yarn, make a magic ring
R1: 6 sc into ring (6 sts). (Do not join, worked in rounds)
R2: 2 sc in ea st (12 st)
R3: *sc in next 3 st, 2 sc in next. Repeat from * around. (15st)
R4: sc around
R5: *sc in next 3 st, sc2tog. Repeat from * around (12 st).
R6: sc in next 3 st, [(sc2 tog) three times], sc in last 3 st (9 st). Stuff the feet.
R7-10: sc around (9 st). Fasten off for first leg. After second leg, do not fasten off, continue to body below. Stuff the rest of the legs.
Body:
In the next row, the legs are crocheted together and form the bottom of the body. Position the legs so that they are in the correct position with both feet facing forward. Use a stitch marker to mark where they meet in the middle. This stitch marker holds the center stitch from each leg to each other. Also make sure that you also have a stitch marker in the last stitch worked in the leg just completed. This stitch will be the last stitch worked in this row.
R1: Sc in the next stitch of the leg just worked. Continue to single crochet in each stitch until you reach the marker holding the 2 legs together. Work a single crochet in the next stitch (which is the stitch holding the legs together). THEN work a single crochet in the matching stitch on the OTHER leg. You can remove the stitch marker if you’d like. Continue to single crochet all the way around the other leg (9 stitches on that leg). You are now at the middle of the doll on the opposite side. Single crochet in the remaining unworked stitches on the first leg worked in this row, finishing in the stitch you marked as the end of the row. Count your stitches for this row. There should be 18 stitches in the row. If you have more or less than this, take a look at the stitches worked at the joining points and see if you’ve missed or worked an extra stitch here.
R2: Continuing to work in the round, *sc in next 2 st, 2sc in next st, repeat from * around (24 st)
R3-5: sc around (24 st)
R6: *sc in next 2 st, sc2tog. Repeat from * around (18 st)
R7-8: sc around (18 st). Stuff body.
R9: *sc in next st, sc2tog. Repeat from * around (12 st).
R10: sc around (12 st). Fasten off leaving a long strand for joining.
Stuff the rest of the body.
Arms (Make 2):
With Main color yarn, make a magic ring
R1: 6 sc into ring (6 sts). (Do not join, worked in rounds)
R2: 2 sc in ea st (12 st)
R3-5: sc around (12 st).
R6: *sc in next st, (sc2 tog, repeat from * around (8 st). Lightly stuff hand
R7-9: sc around
Leave remainder of arm unstuffed.
Assembly and Finishing:
Using yarn from ends of work, sew head to body. Sew arms to sides near the neckline.
Embroider Nose:
Using embroidery floss, make several stitches close together for the nose along with one stitch down as shown in the photo.
Tail:
With (or color ), make a
R1: 5 sc into ring (5 sts). (Do not join, worked in rounds)
R2: 2 sc in ea st (10 st)
R3: *sc2tog. from * around (5 st). Fasten off , leaving a long strand for . Thread and weave through stitches and tighten to form a small ball. to center bottom just above the legs.
Necklace Band
With pink yarn, chain 16.
R1: sc in 2nd ch from hook and across chain. Fasten off.
Flower Necklace
The rose is made in 2 layers and then the center layer is laid on top of the petal layer. The end from the center layer is pulled through the center of the petal layer and all is sewn down on to the necklace band
Center: With Pink Yarn, make a make a magic ring, ch 2, 6hdc into the ring. Pull ring tight. Do NOT fasten of starting strand. With the working strand, join last stitch to top of starting chain 2 with an invisible join (alternatively, you can slip stitch to the 1st stitch). Fasten this end off and weave in.
When the center is complete, there should be the starting strand left which will be used to insert into the center of the petal layer.
Petal Layer: With Pink Yarn, make a magic ring and work all of the following into the ring: *ch1, 2 hdc, ch1, sl stitch around magic ring (petal made). Repeat from * 4 more times to make a total of 5 petals. At the end of the round, pull the magic ring tight.
Assemble Rose and Sew On to Necklace Band: Place the center layer on top of the petal layer. Use the remaining yarn strand from the center and thread it inside the magic ring of the petal layer. Then use strands to attach rose to the band. Place necklace around bunny and sew the ends of the band together in the back.
Note: The necklace is not removable. If you’d like the necklace to be removable so the bunny can wear clothing from other dolls in the Tamingo series, you can make chain ties and attach to either end of the necklace and tie in place instead.
Frequently Asked Handmade Bunny Questions
Are you loving this cute amigurumi bunny pattern but have questions or are wondering if you can adapt this quick bunny in other ways? Here are some frequently asked questions from readers.
Can I make this Bunny in Other Yarns? You certainly can! This cute amigurumi bunny pattern is made in worsted weight yarn, but you can use a variety of yarns. A bulkier weight yarn will make a bigger finished bunny rabbit. A velvet amigurumi bunny would be adorable with chenille style yarn! You could also make this stuffed bunny in a smaller weight yarn for a smaller bunny
Can I Make Pom Pom Tails for Bunny Amigurumi Patterns? If you don’t want to crochet your handmade bunny a tail, you can certainly use a purchase pom pom instead for a quick bunny finish!
What is the Easiest Animal to Crochet? I love this amigurumi bunny crochet pattern and really any of the patterns in my Tamingo series because they are fun and so easy to make.
How Do You Crochet Bunny Garland? To crochet a handmade bunny garland you first need to decide if your bunnies will be flat like an appliqué or a stuffed bunny. If you’d like to adapt this amigurumi bunny crochet pattern for a garland you could make it in a small yarn for an overall smaller bunny, or you could continue closing off the head and stuff for bunny heads for your garland. For the garland itself, a simple chain or a row of single crochet works well. Then mount the bunnies to the strand for a garland!
Purchase an ad-free printable version of Bernadette – Crochet Bunny Pattern Here
This wonderful bunny pattern makes a perfect gift, but it’s also downright fun to keep for yourself! If you’re looking for a crochet bunny for a baby, be sure to check out my very popular amigurumi bunny lovey pattern too!
I love seeing your finished projects! If you enjoyed making this Crochet Bunny Pattern I’d love to see yours on Instagram, be sure to tag me @crochet365knittoo. If you are on Facebook, stop over to the Crochet 365 Knit Too Facebook page or pop over to the Crochet365KnitToo Club and share a photo! I’d love to see your work!
Hi Cheryl,
The name of this brought back memories. I had a childhood friend named Bernadette but everybody called her Bunny.
I enjoy your blog so much because we have so much in common. You are a wonderful writer and have such interesting stories.
Beside our names, I too have gone through the hyperactive dog phase recently so I identify with your stories about your dogs.
I also live on acreage but in a very warm climate.
Sorry for your recent loss and God bless you and your family.
I was just starting to look for a cute bunny to make for my son’s girlfriend’s daughter for Easter–she’s 5 and this showed up. Can’t wait to make Bernadette!
Absolutely delightful. Would be treasured by any child big or small.
Thank you for providing this free pattern! I just finished making the bunny for a friend of mine who recently had a baby and I’m really pleased with how it turned out! I used bulky yarn as that was what I had available and it worked out really well 🙂