
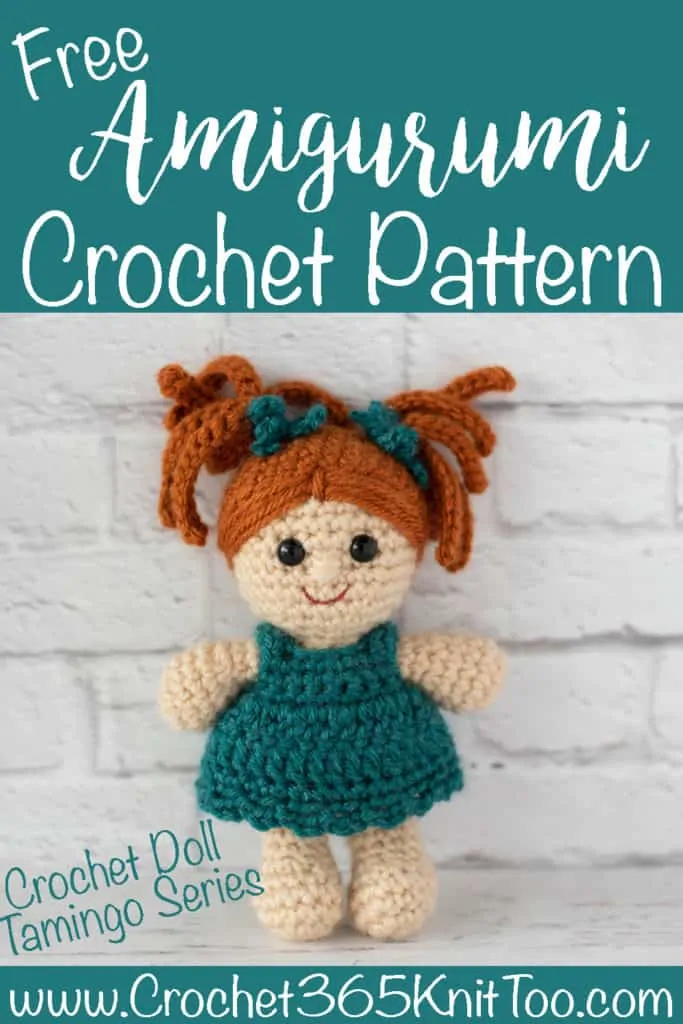
Rachel ~ A Crochet Doll To Love
This post may contain referral/affiliate links. Please read my disclosure for more info.
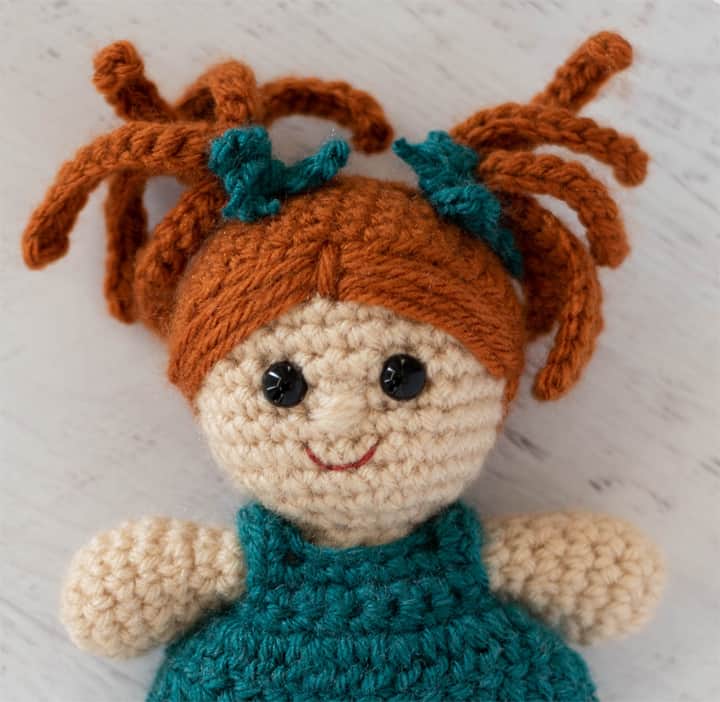
Meet my latest heartthrob. Introducing my brand new Tamingo Amigurumi Series to the blog starting with Rachel, a delightful crochet doll!
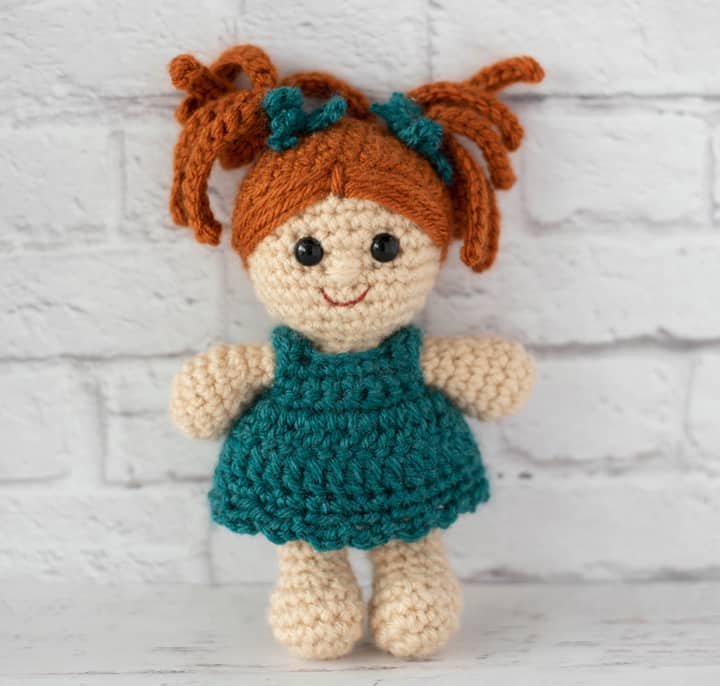
What’s a Tamingo you might ask? Good question! The word “Tamingo” is a made up word. It was my son’s mispronunciation of the word “Flamingo” when he was a young boy. But it’s too darn cute NOT to be in our everyday vocabulary, right? A Tamingo is a small crocheted friend. These cute crochet dolls are a mere 6.5″ tall. They are perfect for clutching in a little one’s hand. They also prop nicely up in your office at work. In case you love that sort of thing. I’m just saying.
I love these little cutie pies because they are so small, yet made out of worsted weight yarn. They work up quickly and are so fun to make you might not be able to stop with one! You will be seeing A LOT more of them in the coming months because I have a whole series planned. We’ll use the same basic head and body in fun and unique ways with new bits of goodness to create all sorts of crochet dolls and creatures you’re going to love! I can’t even wait!
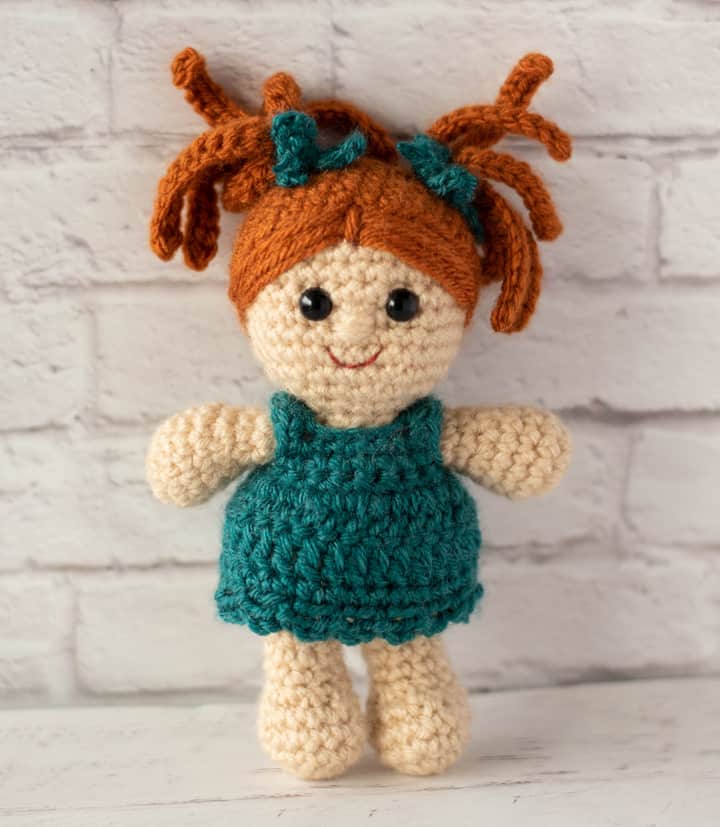
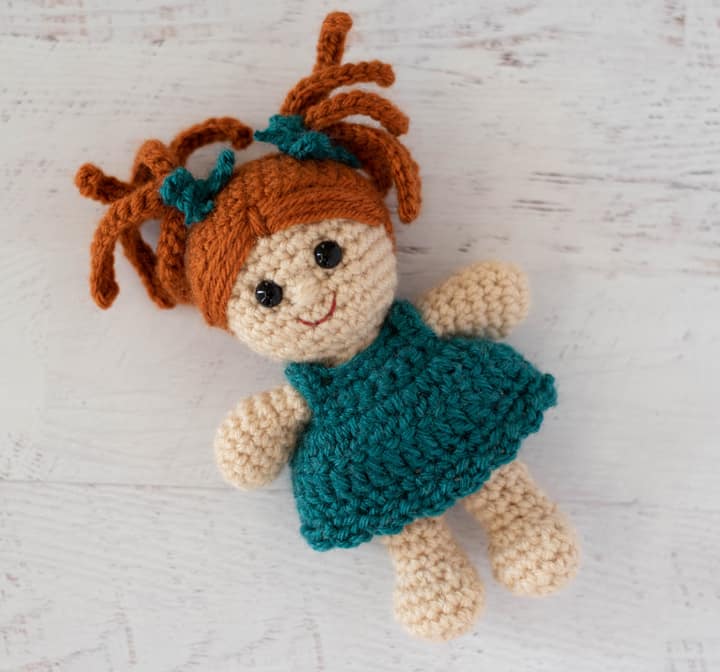
Little Rachel kicks off our Tamingo series. Isn’t she just adorable? I love those auburn pig tails. She’s named after my niece, Rachel who blogs over at Barely Bookish and is the amazing model in my Boho Boss Bag photos. They have the same sweet smile and gorgeous hair!
If you’re looking to learn how to make the best amigurumi, be sure to check out my Amigurumi: A Beginner’s Guide. It’s a massive 165 page ebook of detailed tutorials, tips and tricks (plus exclusive patterns). You can read about that right here.
Let’s get started on crocheting Rachel, the first in our Tamingo series…
Purchase an ad-free printable version of Rachel – Girl Tamingo – Crochet Doll Pattern Here
Crochet Doll
Here is what you will need:
- US G 6/4.0 mm crochet hook.
- Worsted Weight yarn
- Main: 1 oz, sample used Vanna’s Choice in Beige
- Hair: 1/2 oz, sample used Vanna’s Choice in Rust Color
- Dress: 1/2 oz, sample used Vanna’s Choice in Peacock
- 9 mm Black Safety Eyes
- Small button for dress
- Thread to sew button, Embroidery floss for smile
- Fiberfill
- Tapestry needle and scissors
Resources and tutorials you may find helpful in following this pattern: Crochet Abbreviations, US to UK Crochet Conversion Chart. Find links to stitches on the “Tutorial” menu: Getting Started will show basic stitches used in many patterns and Crochet Stitch Dictionary shows our growing collection of crochet stitch tutorials.
Gauge is not important in this pattern. You may use other weights of yarn. Adjust hook size to fit your needs. With the yarn and hook size given, my gauge is about 4 single crochet stitches to an inch.
Finished doll is approximately 6.5″ tall from top of head (without hair) to bottom of feet.

With Main Color yarn, make a magic ring
R1: 6 sc into ring (6 sts). (Do not join, worked in rounds)
R2: 2 sc in ea st (12 st)
R3: *sc in next st, 2 sc in next. Repeat from * around. (18 st)
R4: *sc in next 2 st, 2 sc in next. Repeat from * around. (24 st)
R5: *sc in next 3 st, 2 sc in next. Repeat from * around. (30 st)
R6-11: sc around. (30 st)
R12: *sc in next 3 st, sc2tog. Repeat from * around (24 st) Begin stuffing head
R13: *sc in next 2 st, sc2tog. Repeat from * around (18 st)
Insert safety eyes between rows 8 and 9, leaving 3 stitches in between the eyes. Adjust stuffing and stuff the remainder of the head.
R14: *sc in next st, sc2tog. Repeat from * around (12 st). Fasten off leaving a long strand for sewing.
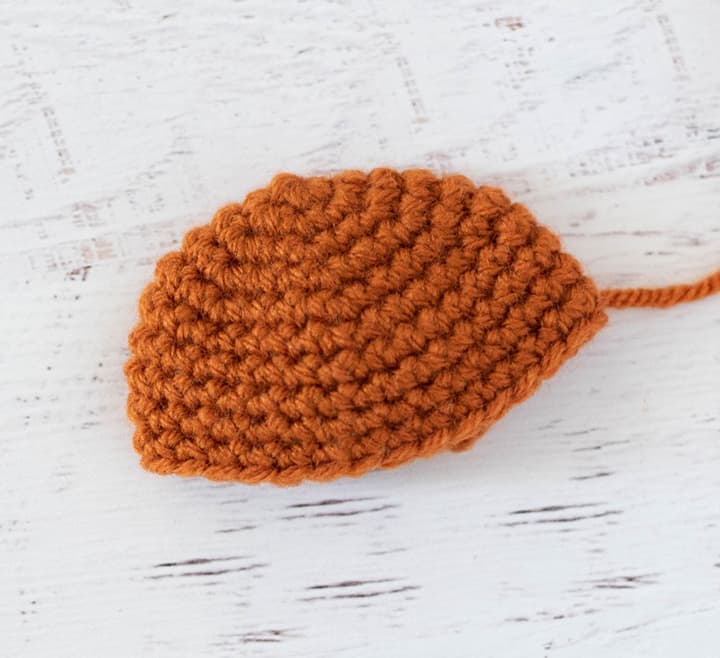
Wig Cap for Crochet Doll:
With Hair Color yarn, make a magic ring
R1: 6 sc into ring (6 sts). (Do not join, worked in rounds)
R2: 2 sc in ea st (12 st)
R3: *sc in next st, 2 sc in next. Repeat from * around. (18 st)
R4: *sc in next 2 st, 2 sc in next. Repeat from * around. (24 st)
R5: *sc in next 3 st, 2 sc in next. Repeat from * around. (30 st)
R6-10: sc around (30 st). Join with slip stitch to next stitch. Fasten off leaving a long strand for sewing.
Attach Wig to Crochet Doll
Using the fastened off strand from the wig, sew wig onto head, positioning on an angle. The bottom of the wig should sit between rows 13 & 14 of the head at the back of the neck. Sew carefully and do not pull stitches too tightly so that wig sits on head and is not noticeably sewn down.
To add bangs, thread tapestry needle with yarn, sewing several stitches (4 or so) to each side of center front as shown. Finish with 1 or 2 short stitches to simulate a part in the bangs at the center front.
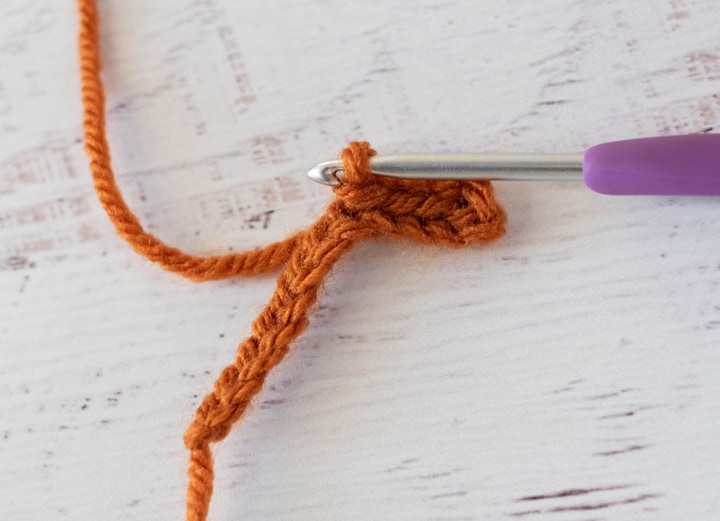
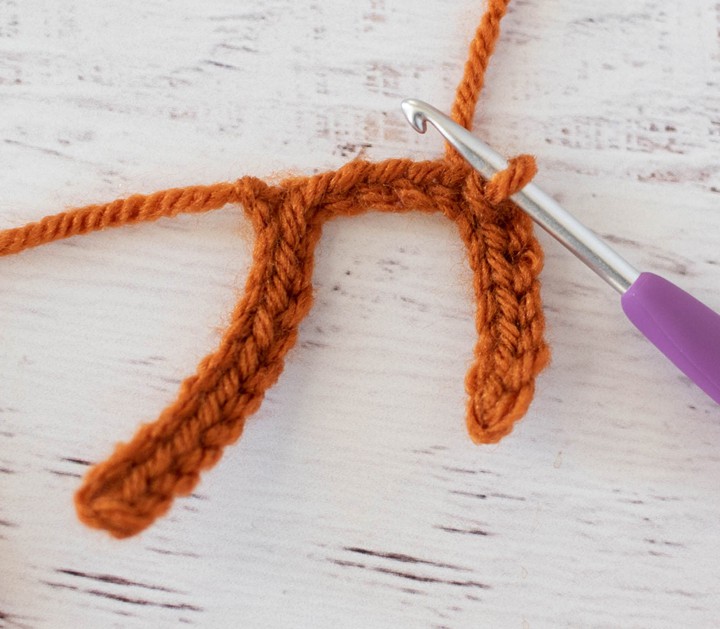
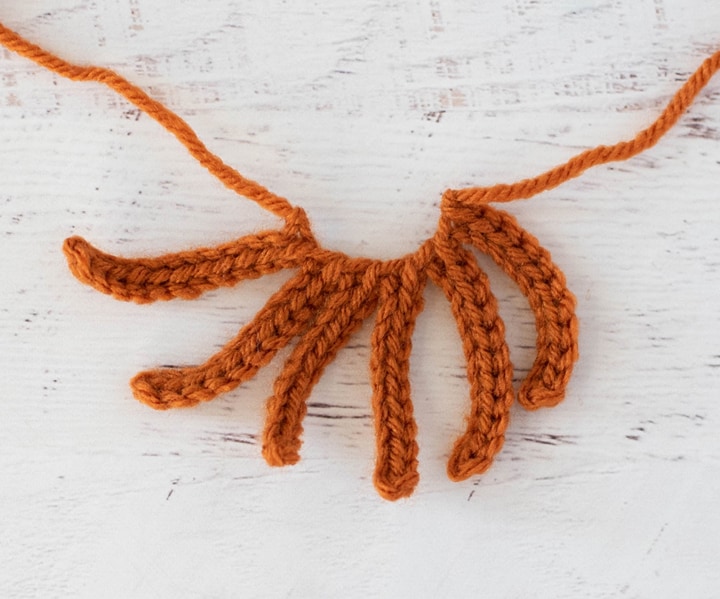
Pigtails (Make 2):
Each pigtail is a fringe of slip stitched chains. Work as follows, using hair color yarn:
Strand 1: Chain 12, sl st in 2nd ch from hook and in each chain across. Do not break yarn, move on to directions for next strand. As you work, you will form a fringe of hair.
Strand 2-6: Ch 12, sl st in 2nd ch from hook and in each ch across.
Fasten off, leaving a long strand of yarn for sewing.
To sew pigtail, roll up fringe. Hold joined section together and sew a few stitches to hold the pigtail together and then stitch on doll’s hair as shown in photos.
Note on Limb and Body construction for your crochet doll: The legs are worked separately and then joined together in the first row of the body. The body is worked to the neck and fastened off. Then the arms are worked and the pieces are sewn together. Please follow the instructions carefully for stuffing and fastening off notes. If you’d like an complete photo tutorial on joining amigurumi legs in this manner, please read ‘‘Joining Amigurumi Limbs’ here.
Legs (Make 2):
With Main Color yarn, make a magic ring
R1: 6 sc into ring (6 sts). (Do not join, worked in rounds)
R2: 2 sc in ea st (12 st)
R3: *sc in next 3 st, 2 sc in next. Repeat from * around. (15st)
R4: sc around
R5: *sc in next 3 st, sc2tog. Repeat from * around (12 st).
R6: sc in next 3 st, [(sc2 tog) three times], sc in last 3 st (9 st). Stuff the feet.
R7-10: sc around (9 st). Fasten off for first leg. After 2nd leg, do not fasten off, continue to body below. Stuff the rest of the legs.
Body:
In the next row, the legs are crocheted together and form the bottom of the body. Position the legs so that they are in the correct position with both feet facing forward. Use a stitch marker to mark where they meet in the middle. This stitch marker holds the center stitch from each leg to each other. Also make sure that you also have a stitch marker in the last stitch worked in the leg just completed. This stitch will be the last stitch worked in this row.
R1: Sc in the next stitch of the leg just worked. Continue to single crochet in each stitch until you reach the marker holding the 2 legs together. Work a single crochet in the next stitch (which is the stitch holding the legs together). THEN work a single crochet in the matching stitch on the OTHER leg. You can remove the stitch marker if you’d like. Continue to single crochet all the way around the other leg (9 stitches on that leg). You are now at the middle of the doll on the opposite side. Single crochet in the remaining unworked stitches on the first leg worked in this row, finishing in the stitch you marked as the end of the row. Count your stitches for this row. There should be 18 stitches in the row. If you have more or less than this, take a look at the stitches worked at the joining points and see if you’ve missed or worked an extra stitch here.
R2: Continuing to work in the round, *sc in next 2 st, 2sc in next st, repeat from * around (24 st)
R3-5: sc around (24 st)
R6: *sc in next 2 st, sc2tog. Repeat from * around (18 st)
R7-8: sc around (18 st). Stuff body.
R9: *sc in next st, sc2tog. Repeat from * around (12 st).
R10: sc around (12 st). Fasten off leaving a long strand for joining.
Stuff the rest of the body.
Arms (Make 2):
With Main color yarn, make a magic ring
R1: 6 sc into ring (6 sts). (Do not join, worked in rounds)
R2: 2 sc in ea st (12 st)
R3-5: sc around (12 st).
R6: *sc in next st, (sc2 tog, repeat from * around (8 st). Lightly stuff hand
R7-9: sc around
Leave remainder of arm unstuffed.
Dress:
With Dress Color yarn, chain 21
R1: sc in 2nd ch from hook, sc in next ch, 3sc in next ch, *sc in next 4 ch, 3sc in next ch. Repeat from * twice. Sc in next 2 ch, ch 1 and turn (28 st)
R2: sc in next 4 st, ch 3, skip next 6 st, sc in next 8 st, ch 3, skip next 6 st, sc in last 4 st. ch1 and turn. (22 st including chain sts)
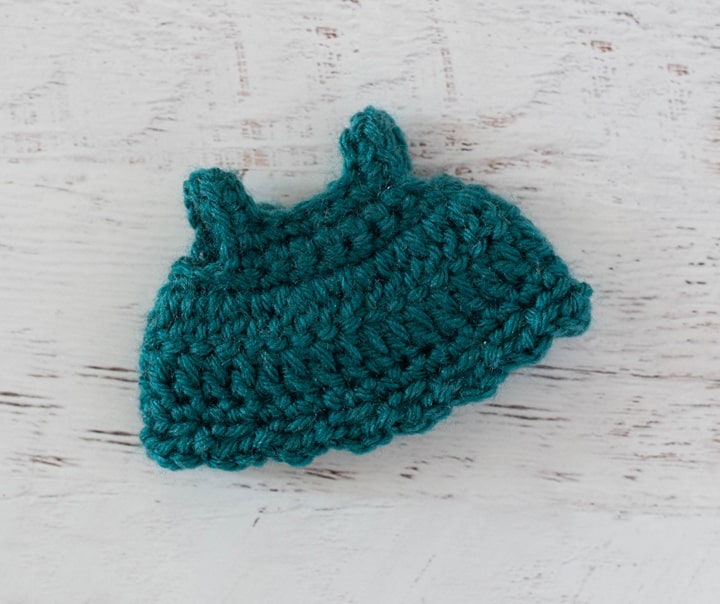
R3: sc in next 4 st, sc in next 3 ch, sc in next 8 st, sc in next 3 ch, sc in last 4 st. Turn. (22 st)
R4: ch 3 (counts as dc) Dc in same st as joining, *dc in next st, 2dc in next st. Repeat from * around. (33 st)
R5: ch 3 (counts as dc). Dc around. At end of round JOIN with sl st to top of starting chain. Do NOT turn.
R6: ch1, sc in same stitch as joining. Sc around. Join with a sl st to top of first st. (33 st).
R7: *ch 3, skip 1 st, sl st in next st. Repeat from * around. Join with sl st to bottom of starting chain in round. Fasten off and weave in ends.
Assembly and Finishing:
Using yarn from ends of work, sew head to body. Sew arms to sides near the neckline.
Put dress on doll with the opening to the back. The ‘buttonhole’ will be any gap on the right side between stitches or at the end of a row close to the neckline. Try a small button in the gap beforehand to make sure it fits through. Then sew the button on the left side near the neck across from the buttonhole. Alternatively, if you do not want the dress to be removed, you can sew the dress closed in the back after it is on the doll.
Hair Ties (Make 2):
With Dress color yarn, chain 30. Fasten off and pull each end tight, cutting yarn close to the chain. Tie hair tie over pigtail close to head.
Facial Features:
With Main Color yarn, work 3-4 stitches to form nose. Work over 2 or so stitches centered between the eyes, starting approximately between rows 8-9 of head and working downward.
Use a scrap of rust color floss or yarn to stitch a smile a few rows beneath the nose, referring to photo. First stitch the horizontal portion of mouth about 1.5-2 stitches below bottom of nose. Then make one stitch on each side of line slanting up and out to form smile.
Purchase an ad-free printable version of Rachel – Girl Tamingo – Crochet Doll Pattern Here
If you loved Rachel, but sure to check out this adorable crochet doll pattern too! And if you want a hand held plush doll, my crochet ballerina is adorable!
I love seeing your finished projects! If you enjoyed making this Crochet Doll Pattern I’d love to see yours on Instagram, be sure to tag me @crochet365knittoo. If you are on Facebook, stop over to the Crochet 365 Knit Too Facebook page or pop over to the Crochet365KnitToo Club and share a photo! I’d love to see your work!
Pin Now Crochet Later ⇨
Adorable
This doll is adorable. I can’t wait to see the rest of your collection.
This is so cute!! I can’t wait to make her; x 3. I have 3 nieces, 1 just over a year old and twins born in March.
Are you going to design more clothes for her?
Thanks so much for sharing your creativity with us.
I’m so glad you love her! I’m planning a whole series for the blog. So when the other creatures have outfits they would also fit Rachel. 🙂
Hi Cheryl, Rachel is super adorable! Thank you for visiting and linking up at our Wednesday Link Party this week. Your crochet doll is being featured at Wednesday Link Party 354 and you can check out the feature tomorrow here: https://oombawkadesigncrochet.com/2020/07/a-free-crochet-doll-pattern-is-being-featured-this-week.html Best wishes, Rhondda
I was so happy to see little Rachel there! Thank you!
This little doll is so cute! thank you for sharing the pattern. 🙂 x
Rachel is so cute. Any boy dolls in the future?
There is a boy doll included with my Amigurumi ebook which you can read about here.
Cheryl – I love your site and enjoy your emails. Thank you for all of the fun free patterns. I have successfully completed many of your projects and they come out great because the patterns are well thought out and so easy to follow. I just wanted to say Thank You!
You are so welcome! I’m glad you’re having fun crocheting my patterns!