
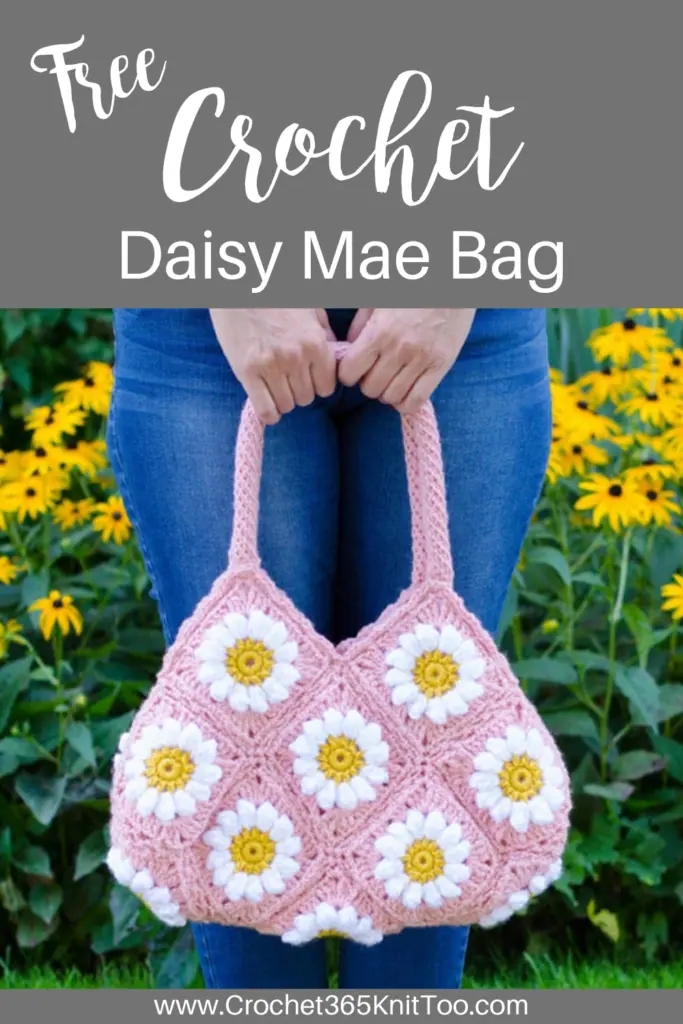
Crochet Daisy Bag
This post may contain referral/affiliate links. Please read my disclosure for more info.
There is something magical about flower season. I love the warm weather, the blue skies and gorgeous blooms and this beautiful crochet daisy bag fits in perfectly!
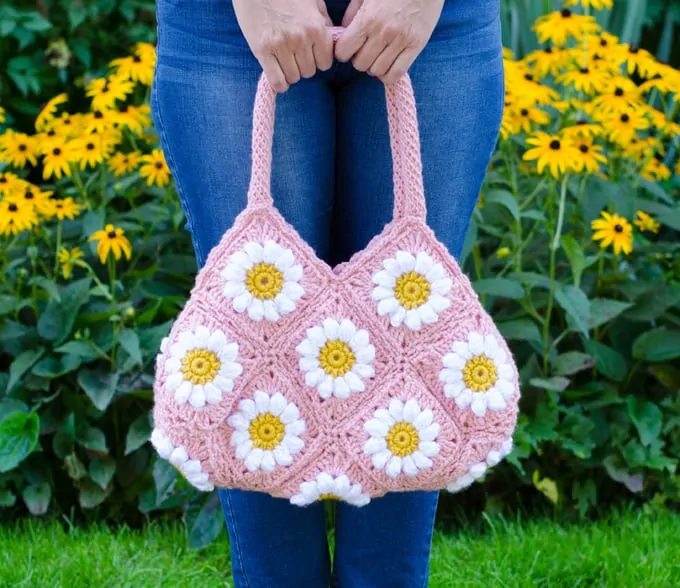
Isn’t she lovely? Those delicious puffy daisies. The roominess. Those special handles!
Like a lot of crocheters, I have a fondness for granny squares. The idea that you can take a granny square… or a variation of it.. and turn it into something amazing.. well, it just delights my crocheter’s heart.
My Crochet Sunflower bag is so fun to make. So are my other granny square themed bags: the Boho Boss Bag and Sunflower Crossbody Bag. What they all have in common, though, is a simple, sweet square that is configured in a special way to make an amazing bag.
What is different about each one is the special square, the layout, the edging and handles. With a little imagination and creativity, you can swap out the squares to make different bags. A Sunburst Granny Square in this Daisy Mae Crochet Bag layout would be really fun.
And you could totally take this puffy daisy square and use it in the Sunflower Bag layout too. So, so fun.
Grab your crochet hook and let’s dive into this fun pattern!
print & stitch
Purchase the Beautifully Crafted AD-FREE PDF Download Today
Do you just want to relax and crochet? This nicely formatted pattern features clear instructions and perfectly sized photos for a more enjoyable crochet experience.
Get the free pattern below or purchase an ad-free pattern on Etsy or Ravelry
Daisy Mae Crochet Bag
Materials
- Worsted Weight, #4 Yarn, Sample used Lion Brand Vanna’s Choice
- Main: 5 oz Pink
- Flower Petals: 3.5 oz White
- Flower Centers: 2 oz Mustard (yellow)
- US H8/5 mm Crochet hook
- Tapestry needle and scissors
- Optional Lining and Closure: Purse can be used without a lining and/or closure. A lining requires use of a sewing machine, 1/2-3/4 yard of fabric, magnetic closure.
Resources and tutorials you may find helpful in following this pattern: Crochet Abbreviations, US to UK Crochet Conversion Chart. Find links to stitches on the “Tutorial” menu: Getting Started will show basic stitches used in many patterns and Crochet Stitch Dictionary shows our growing collection of crochet stitch tutorials.
Crochet Abbreviations:
- ch = chain
- sc = single crochet
- hdc = half double crochet
- sl st = slip stitch
- st = stitch(es)
- tr = treble crochet
Finished Size
Each square is approximately 4.5” x 4.5” before joining (this includes a final round to prepare for joining). The finished bag is 17.5” wide by 18.5” tall (including handles).

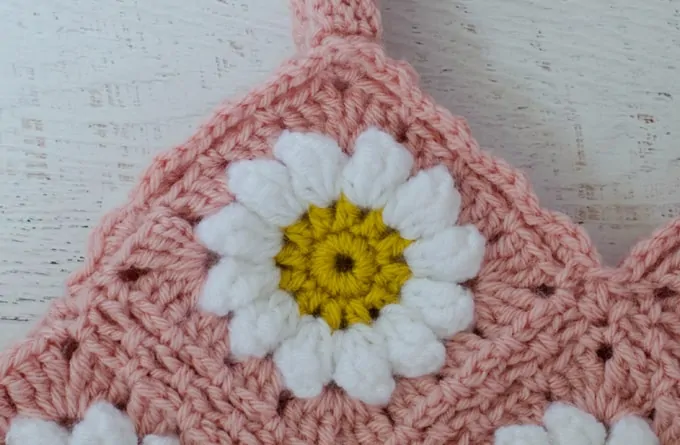
Daisy Granny Square (Make 17):
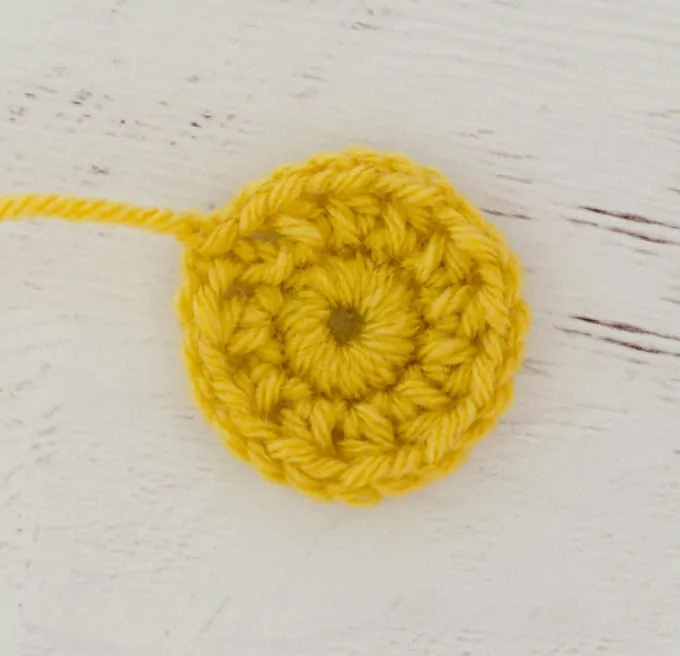
With yellow yarn, chain 4, join with sl st to make a ring.
R1: Ch 1, 12 sc into ring, join with sl st to first st. (12 sts).
R2: Ch 3 (counts as 1st hdc plus 1st ch), *hdc in next st, ch 1. Repeat from * around (12 hdc and 12 ch-1 sp). Join with sl st in top of first st. Fasten off yellow.
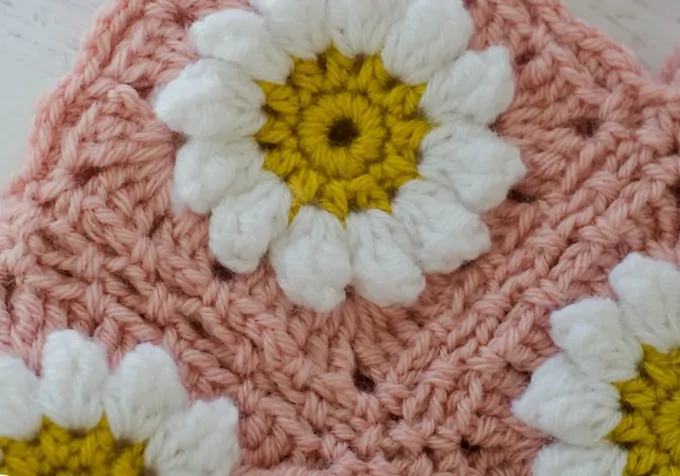
In the next round, we’ll make the puffy petals. Remember that Tr stands for ‘treble crochet’. Here is how to crochet a treble crochet stitch. Also note that the following photos show the 3rd petal, but all petals are formed the same way.
R3: Join white with a slip stitch in any ch-1 sp. Ch 4 (counts as 1st tr). 3 tr in same stitch.
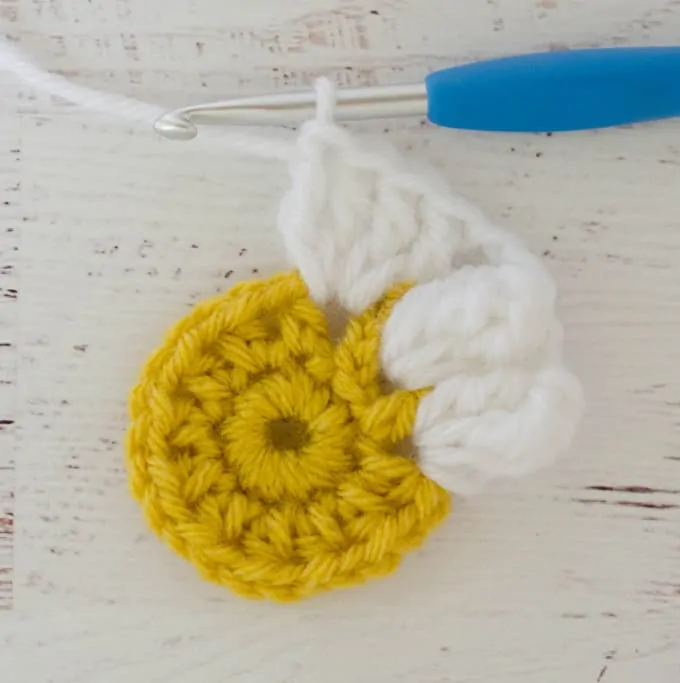
Remove hook from loop and insert it into the top of the first stitch in the petal. Grab the loop while it is in this new position.
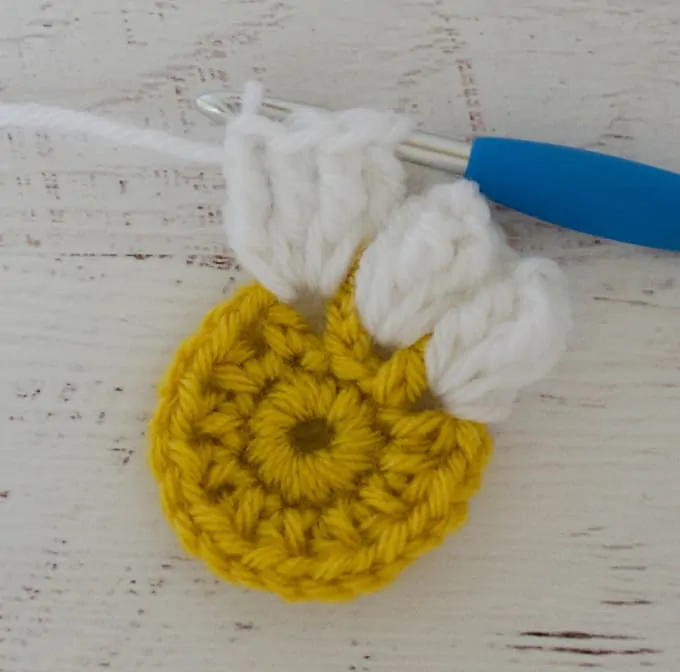
Then pull the loop through the stitch on the hook.
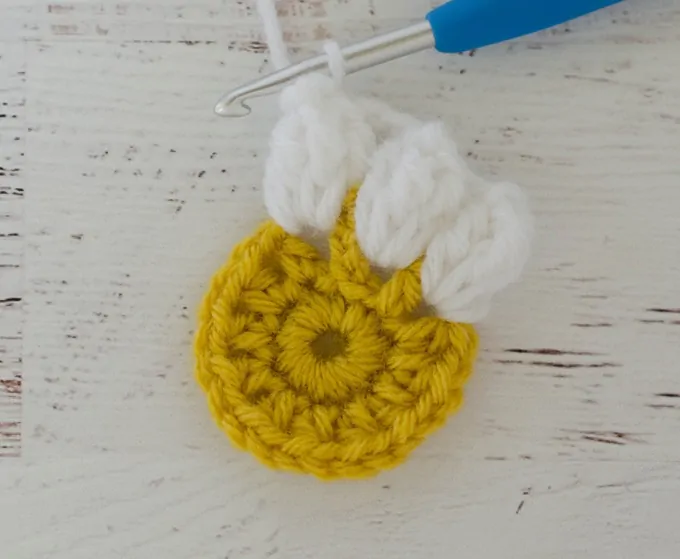
Petal made. Continue to make the rest of the petals as follows (noting the chain 2 in between each petal): *ch 2, 4 tr in next ch-1 space, remove hook from loop, insert into the top of the 1st tr of the petal and pull the last loop through. Petal made. Repeat from * 10 more times for 12 total petals. Ch 2 after last petal and join with a slip stitch to the top of the first petal. Fasten off White.
Now let’s turn this daisy into a Daisy Square!
R4: Join pink in any space between petals with a sl st. Chain 4 (counts as 1sttr), 2 tr, ch 2, 3 tr (1stcorner made), *skip to next space, work 3 dc, skip to next sp, work 3 dc, in next space work 3tr, ch 2, 3 tr (2ndcorner made). Repeat from * around. Join with sl st to start of round.
Note that the treble crochets in the corners help square off this cute Crochet Puff Daisy Square! Now it’s time to do one more round to prepare for joining the squares.
R5: ch 1 and sc in same space as joining. *Ch 3, (sc, ch 2, sc) (1stcorner made), [ch 3, sc in next space] 3 times. Repeat from * around, working a sc and chain 3 in each space (formed between the 3 stitch clusters from the previous round) along the sides, as well as the following sequence in each corner: (sc, ch 2, sc). Join with sl st to start of round. Fasten off.
Easy Way to Make Multiple Granny Squares
Does 17 seem like a lot? They go fast! You can either make one complete square at a time or do like I did and do 17 yellow centers. Then do ALL the petals with white yarn. And then crochet the last 2 rounds with pink yarn.
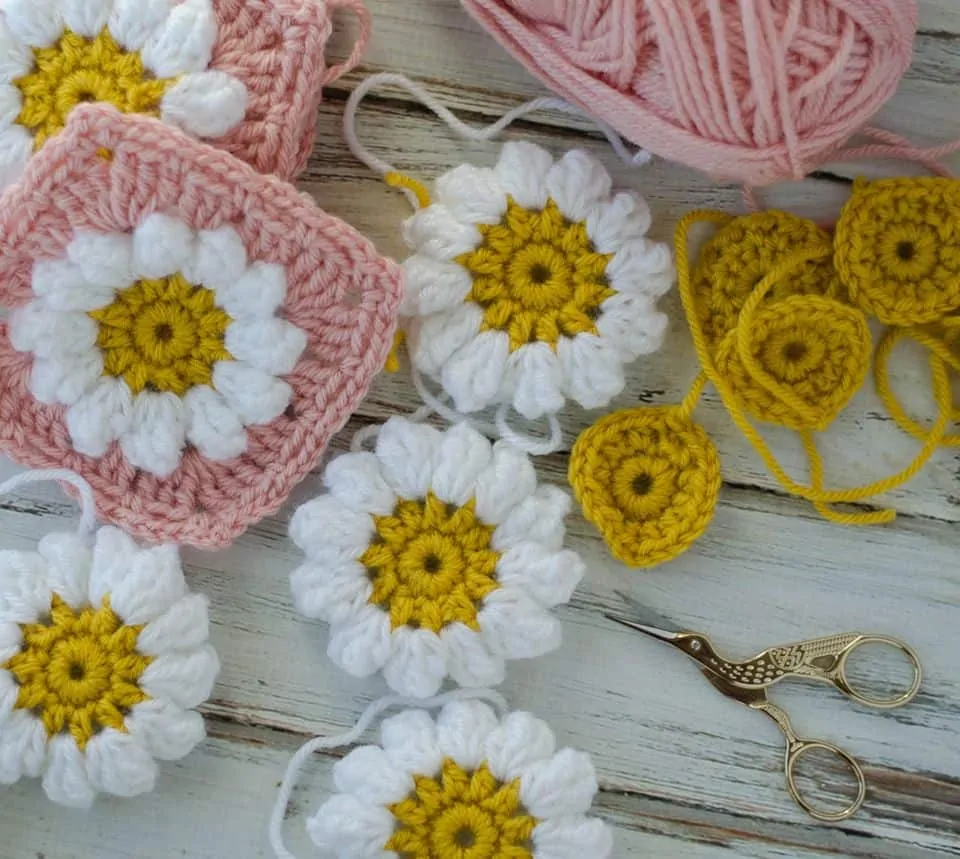
I actually worked on these while we were traveling by car on vacation. I kept dropping them off my lap and onto the car floor until I came up with the brilliant idea of taking a spare piece of yarn and threading it through each center (like threading beads) and loosely tied them together in a bow. When I wanted to work on one square, I would untie the bow, take out the next square and tie the rest back up.
There you go. A crochet life hack you never even knew you needed!
How To Join Granny Bag Squares
Before you start joining the granny squares for the Crochet Daisy Bag you need to know the layout and the join technique.
Let’s talk about the join first and then we’ll move on to the layout. When joining squares for afghans or crochet bags, you have many options. You can just sew the squares together. Or you can use a fancier joining technique.
For the Daisy Mae Bag, I used a Faux Braid Join. While it looks somewhat similar to the very popular Flat Braid Join, it is much easier to execute.
You might be wondering if you can use a different joining technique for your special crochet bag. You can! However, keep in mind that you likely will have to adjust the border and handles to suit the join you choose. For instance, if you are seaming this bag, you mind find the border in the Sweet Summer Sunflower Bag to be more suitable.
In this Daisy Bag pattern, the border is specially designed to coordinate with the Flat Braid Join.
Faux Braid Join
One of my most favorite ways to join granny squares is The Faux Braid Join. This joining method offers the best of everything: It is quick. It is easy. It looks amazing.
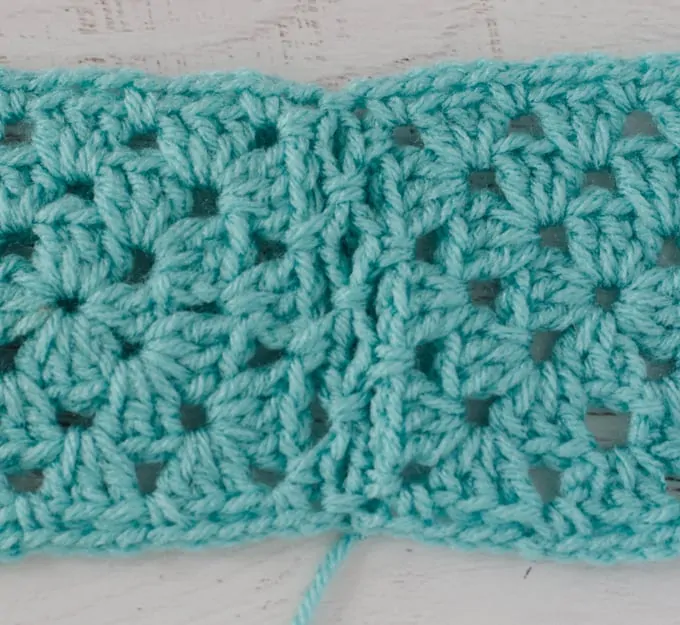
If you’re unfamiliar with this joining technique, pop over to my Faux Braid Join photo tutorial for step by step photos.
Here is what the flat braid join looks like on the bag up close:
Joining Diagram
Now that you’re familiar with the flat braid join, let’s talk about how this cute purse comes together. You need to follow this diagram carefully to join the blocks properly.
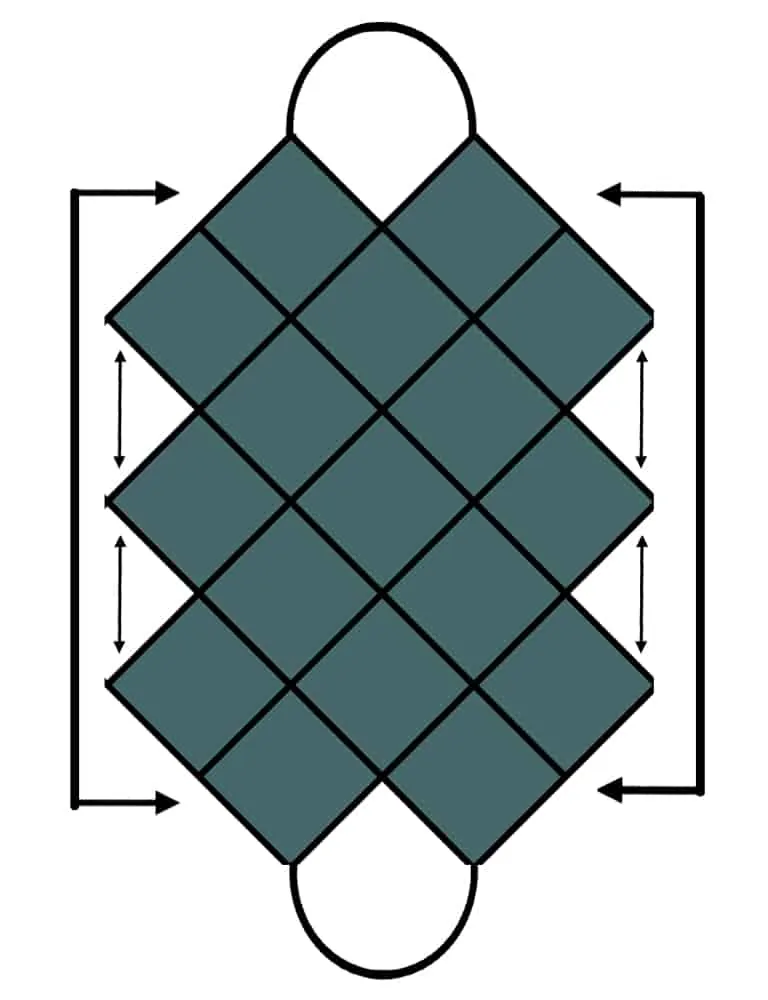
Ultimately it is up to you what order you assemble the squares for your bag. I find it easiest turn it a bit so I see “rows” and then to assemble by row.
Once your squares are laid out and crocheted together in the same shape as the diagram of teal colors squares above, you will look to the arrows to fold the purse in half and join those sides. I found it easiest to fold in the bottom center first. Once I did that, it seemed more obvious what sides went with what part. You may find it helpful to use pins or clips.
Also pay attention to the small arrows. Those indicate that only ONE side of a block gets joined to only ONE side of the opposite block. You are making a 3-D project here and it can be easy to overlook or forget this fact and then incorrectly join the sides.
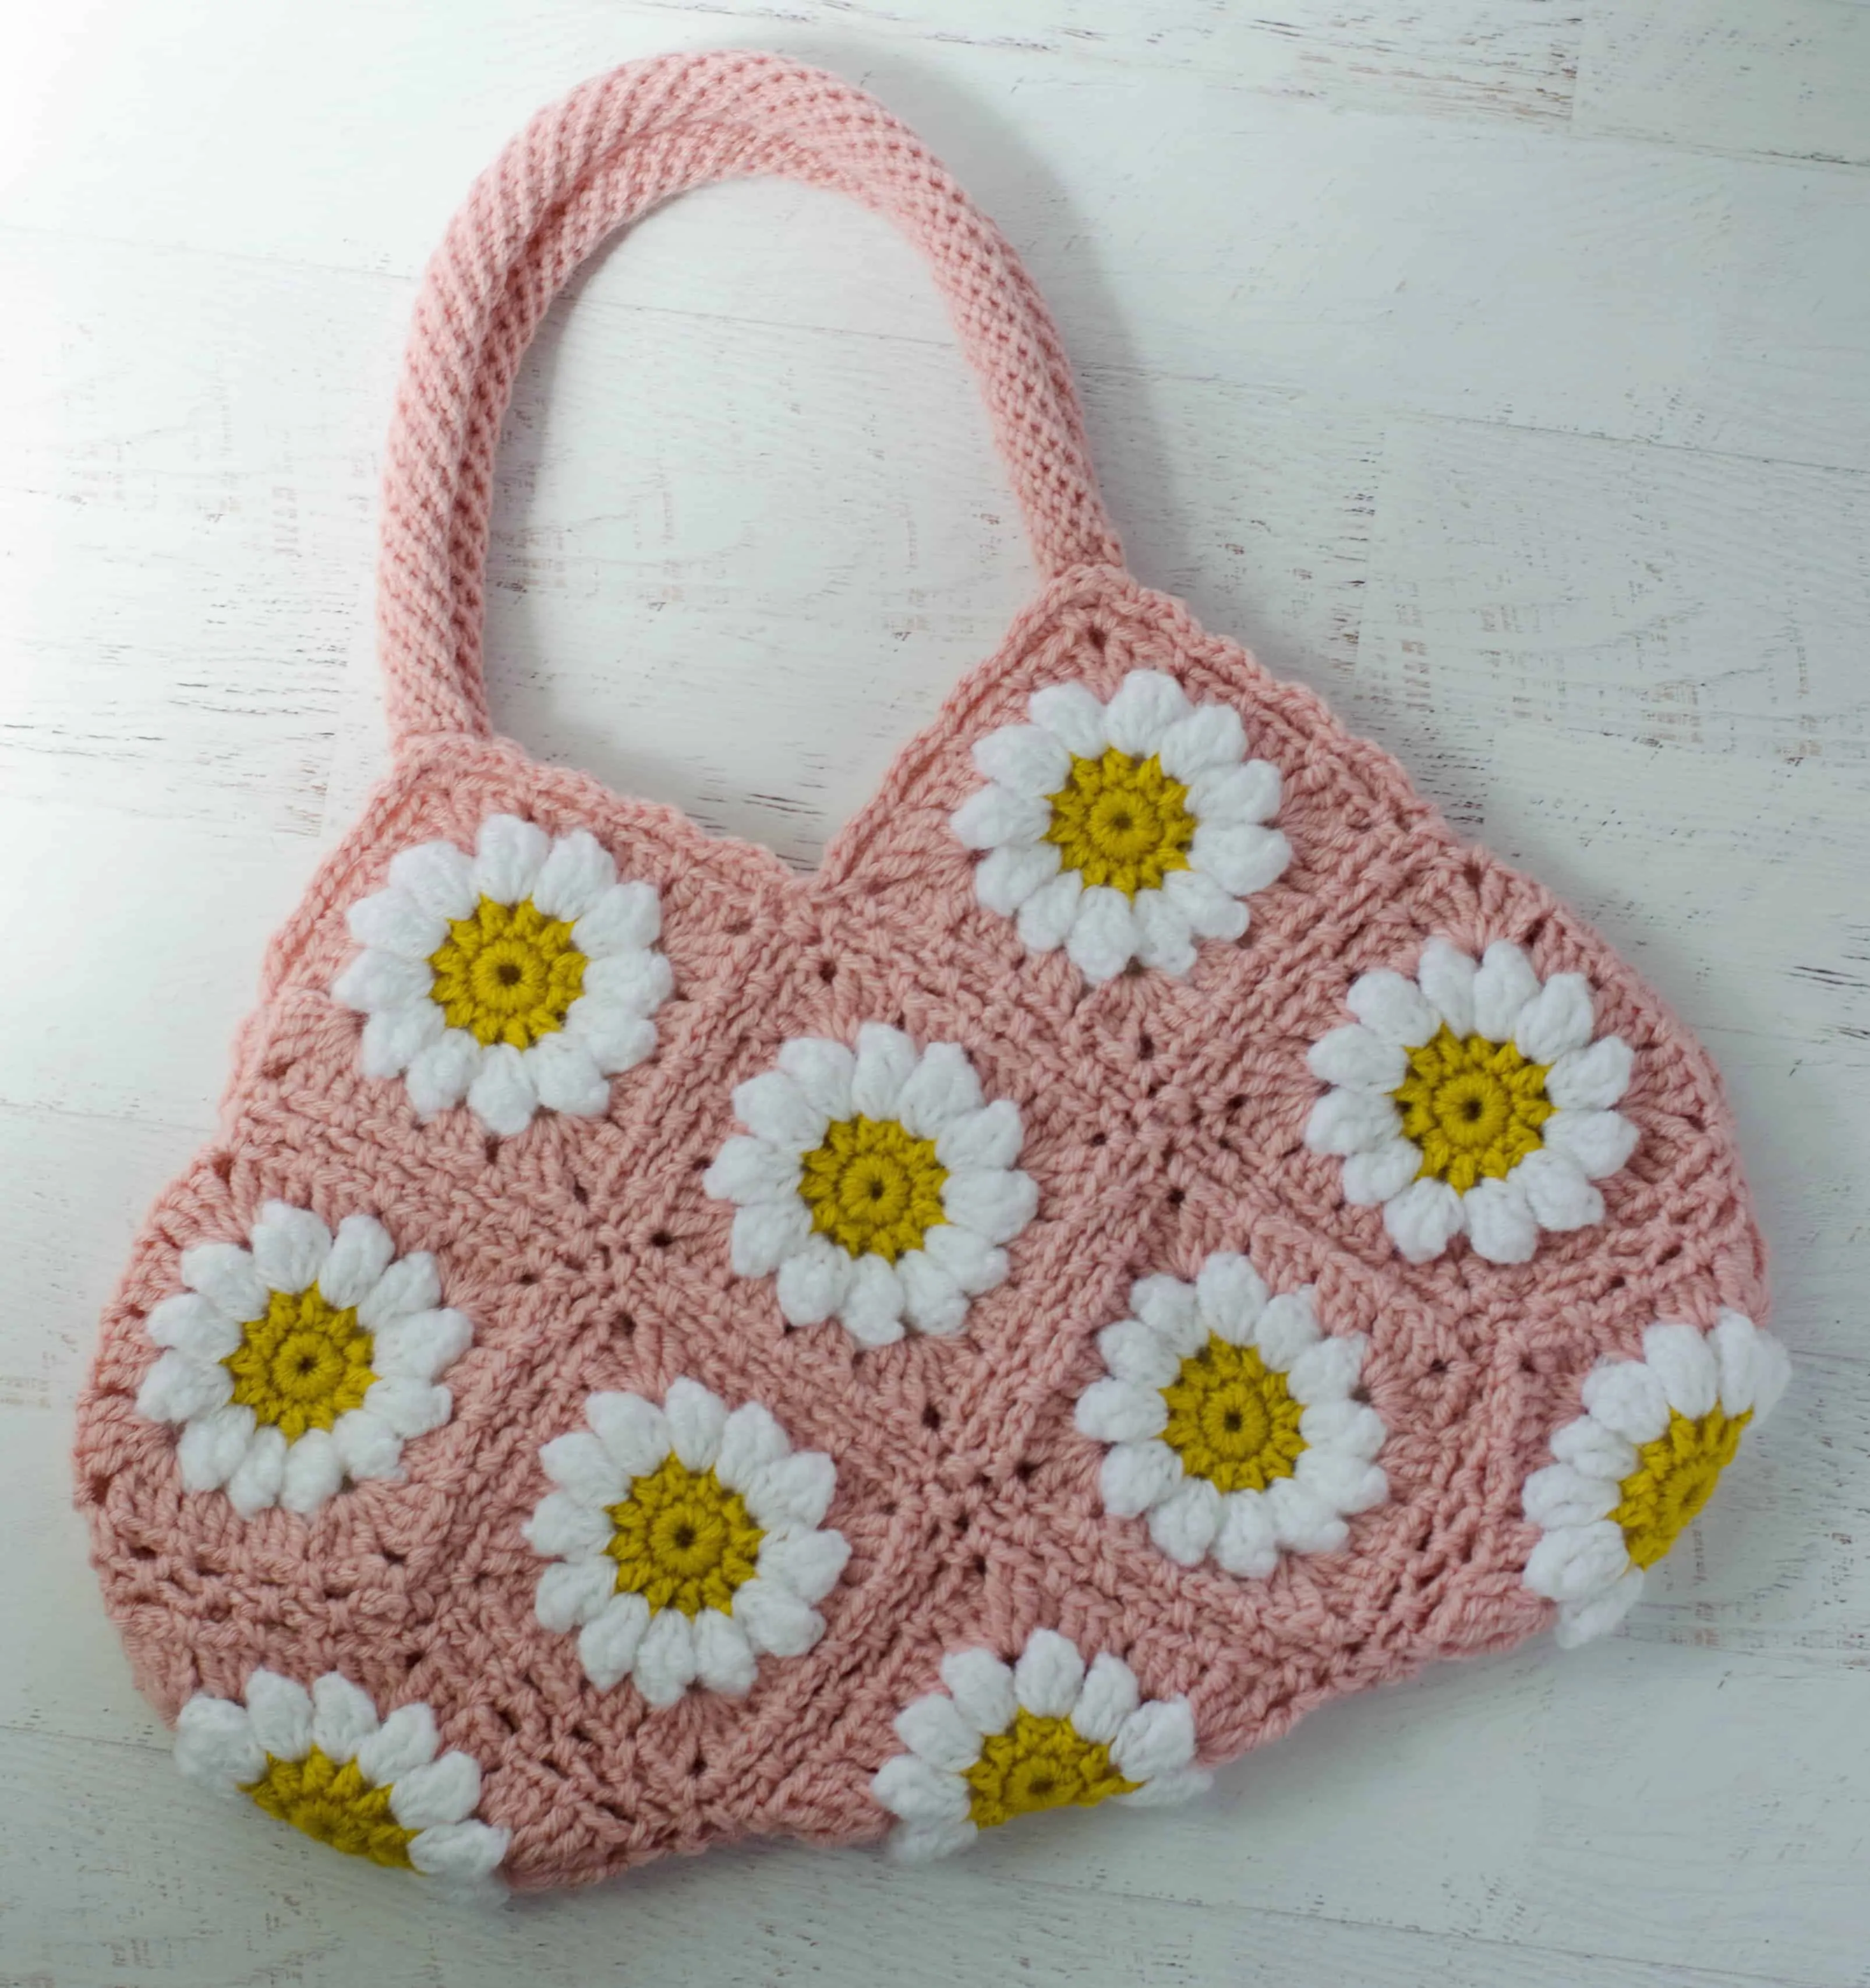
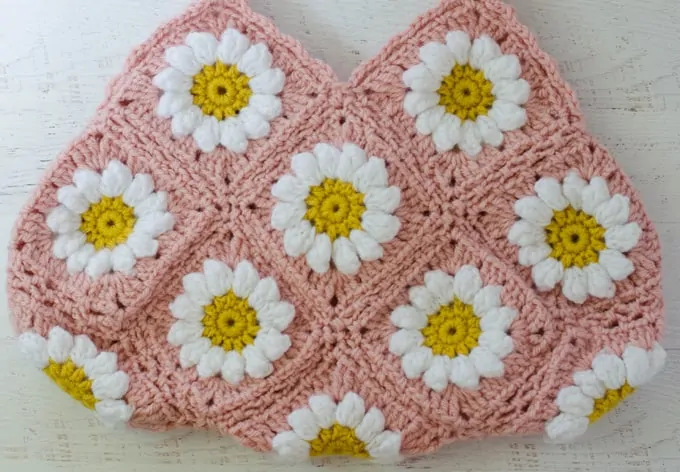
Note that the top most two squares are only attached on 2 sides. The open area of the bag forms a sort of M, so that the bag can open well. You can see the border over this area in the photo below.
If you get confused, pop over to our Facebook group: Crochet 365 Knit Too Club and post a photo. Someone will jump in and help you out!
Keep referring to the diagram and the finished bag (above) to connect your pieces correctly. (Note that the above photo shows the border on the top edge, which is our next step).
A final important note about working corners. When you are putting together the squares, there will be times that 4 squares are joined together.
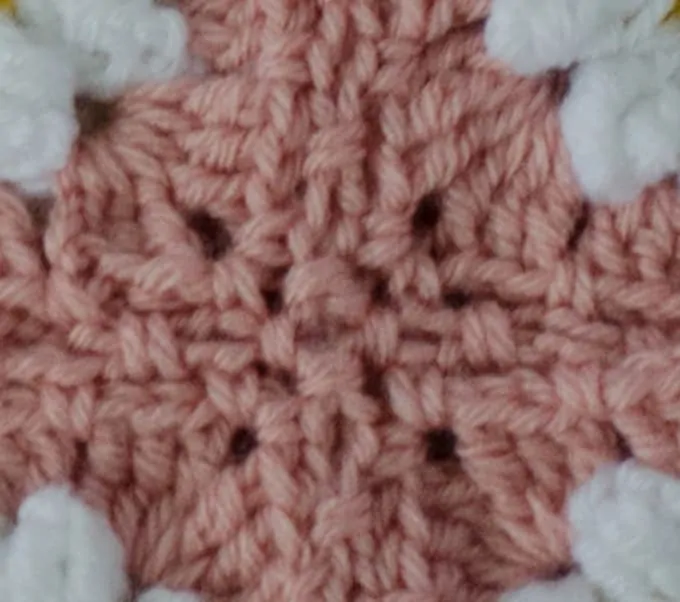
Note that when 4 squares come together that the finished piece will have the join worked into the corner spot twice (once for each side). It is really easy when joining rows together to “forget” to place the corner stitch.
To join correctly, make sure to connect each corner to it’s adjacent piece. If you look at the photo above you can see that each corner square is connected twice—once to the square next to it on the side and once to the square connected to it on the top/bottom side.
You are going to be surprised at how quick it is to join the squares into a bag with this method! Now is a good time to weave in any ends.
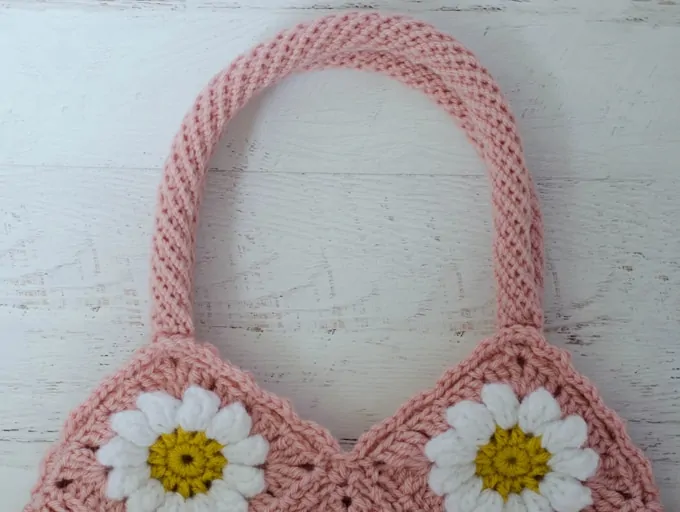
Crochet Spiral Handles (2)
The handles for the Crochet Daisy Bag are each 16 inches long. These handles are made in a rather unusual crochet method, so I have a special tutorial (and video) just for the handles. Pop over to my Crochet Spiral Handle post to get all the details and then work the handle until it is 16 inches long.

If you find the spiral handle too difficult or too confusing, you can also just make simple handle straps by chaining to the desired length and then working single crochet stitches on each side of the chain until it is the width you desire.
When the handles are done, set them aside until we’re ready to assemble the Daisy Mae Bag.
Edging
The edging is worked with the same main color and hook as the rest of the bag. Before we get started, let’s talk about how your bag should be looking at this point.
The blocks of your granny square purse are attached everywhere except the upper half of the two squares on either side of the top of the bag. This portion forms the opening of the purse.
You will notice that this looks a bit like two “mountains” with a peaks at the top where you will attach your handles. And valleys where the edge dips down: in the center front and center back and at either side.
When we crocheted the squares, the last round “prepped” us for the faux braid join. Therefore, the edges of the bag have chain-3 “spaces” separated by single crochets. In the corners you have a “sc, ch2, sc”.
Now that we have the “lay of the land”, let’s talk about how to work the border around the open edge of the granny square purse.
Attach yarn with a slip stitch to the 2nd chain space after one of the side “valleys”. Work around the bag working the following:
- In each ch-3 space work a (sc, hdc, sc).
- Work a sl st in the sc stitches that separate the ch-3 spaces.
- In the space at the peaks (where the handles will attach), work 3 hdc
- When you come to the center front “valley” and center back “valley”, sc 3 together to cinch that inside corner in. If you are wanting to close your bag with a button and loop, when working the back valley, chain enough stitches to stretch over the front of the bag to where the button will be attached. Slip stitch the chain back to the last stitch worked to make a loop. If you are NOT using a button and loop closure, just work the back “valley” the same as the front.
- When you come to the “valleys” at the sides sc 2 together TWICE.
When you get to the end of the row, work an invisible join and weave in your end.
The object of this row is that your bag lays nicely without pulling or rippling. We all crochet a bit differently and you may have worked your bag slightly different when joining the squares. So feel free to adapt the “valley” decreases so that YOUR purse lays nice and flat when you are done.
Finishing the Daisy Mae Bag
It’s important to make a few decisions before moving on with the finishing. Namely: Do you want to make a fabric liner? And How do you want your granny square purse to close?
Some things to consider: How is your crochet? Do you have a lot of gaps in the crochet? What are you planning on using the bag for? Will you be using it as a purse and want to carry pens and small objects that might slip through the crochet?
Or perhaps you are concerned about the weight of your purse. The weight could stretch out the crochet and if you line it with fabric, the fabric portion will absorb the weight and your bag is less likely to stretch. In this case, I would recommend a fabric lining.
If you are using your Daisy Mae granny square purse for something else–like a project bag where it is just carrying some yarn, notes and lightweight things, you might not want to line it at all.
If you line the bag, you can make an inside pocket, or go pocket-less. Finally, do you want a closure? You can opt for no closure at all if you don’t mind your bag flopping open. Or you can attach a magnetic purse snap to the lining.
For my bag, I sewed a lining with a pocket and installed a magnetic closure in the lining. If you’d like to make a similar lining, pop over to my post on How to Line a Crochet Bag for all the details.
If you’re making a lining, it’s easiest to trace around your bag to make your pattern before you sew on the handles. Then you sew on the handles. Then you sew in the lining.
If you’re not making a lining, then it’s time to sew on the handles.
Sewing on the Handles
Sew on the handles by using yarn to sew them securely behind the edging as shown. Remember, if you are sewing a lining into your bag, do that first, before you sew on the handles. Otherwise, just sew on your handles now.
Fasten off and weave in any ends. Then enjoy your completely adorable Crochet Daisy Bag!
Purchase an ad-free printable version of the Daisy Mae Bag pattern here
I love seeing your finished projects! If you enjoyed making one of my patterns I’d love to see yours on Instagram, be sure to tag me @crochet365knittoo. If you are on Facebook, stop over to the Crochet 365 Knit Too Facebook page or pop over to the Crochet365KnitToo Club and share a photo! I’d love to see your work!
I am very bad at crochet but I really wanted to make this bag so I’d have something cute to tote my projects to & from work in. I am also known to “go rogue” and deviate from patterns. I used a fluffy chenille yarn for the centers, used a turquoise instead of pink for the main color. I made each square larger so the end result would be a bigger bag. Used a calico fabric that is a close match to the chenille to double-line the inside (I wanted the pretty side of the fabric to peek out between the gaps). Just finished it tonight and will load it with a half-done blanket I’m knitting for a friend so I can finally complete it. Thank you!