
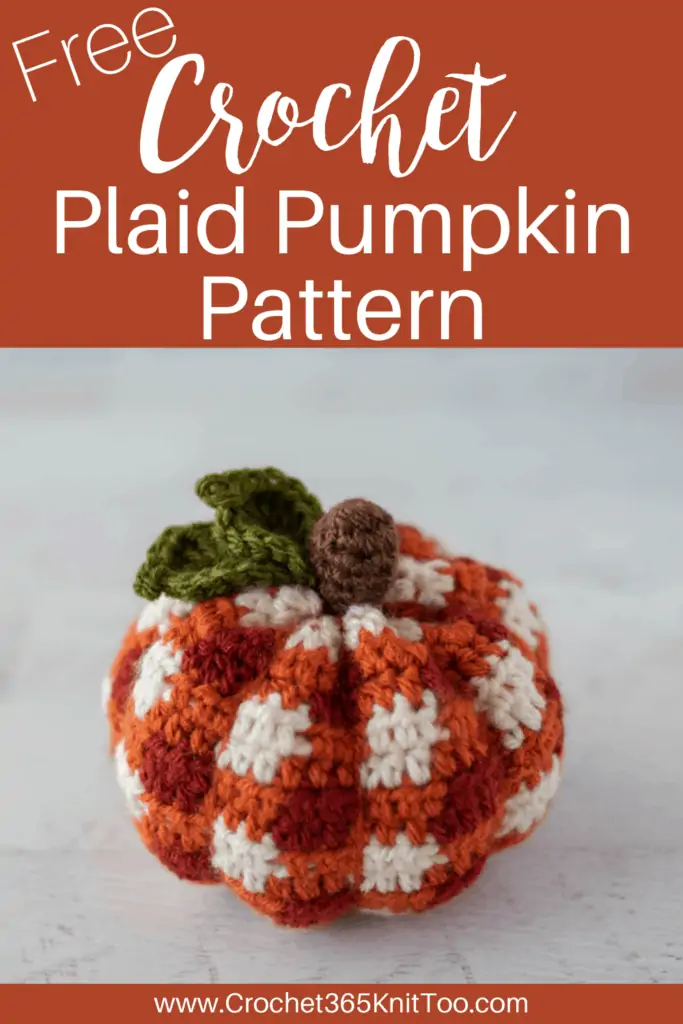
Crochet Plaid Pumpkin
This post may contain referral/affiliate links. Please read my disclosure for more info.
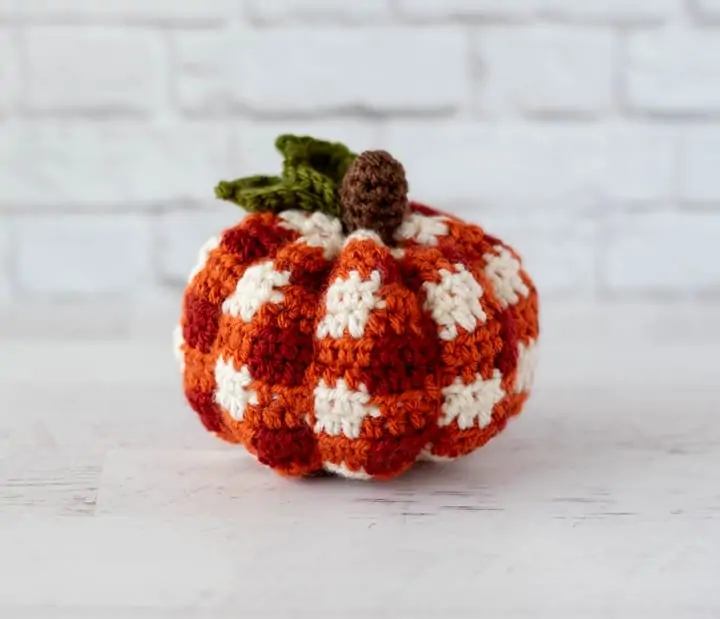
You know what would totally make my fall complete? This delicious crochet plaid pumpkin! I’m completely in love
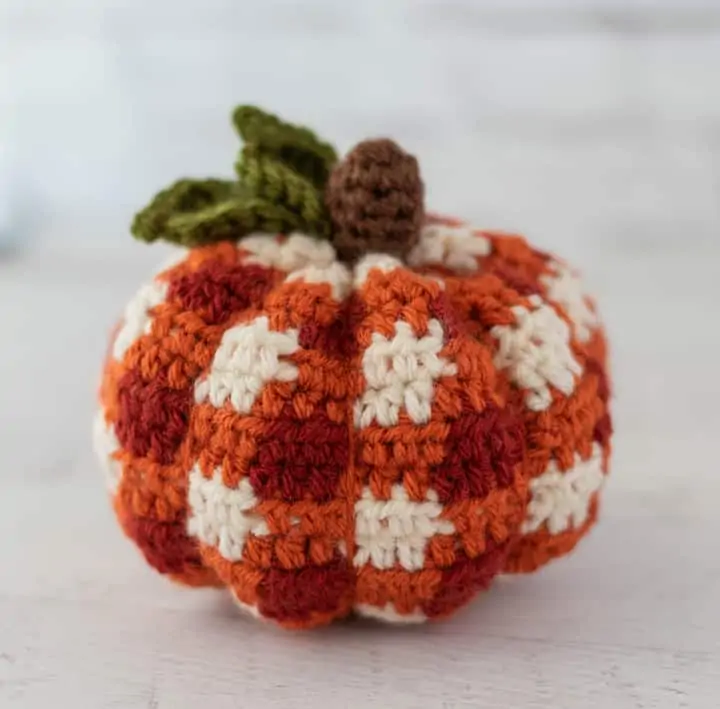
A plaid pumpkin is a delightful thing. Just pick out two shades of yarn in your favorite color, add white and you are well on your way to a cute little pumpkin.
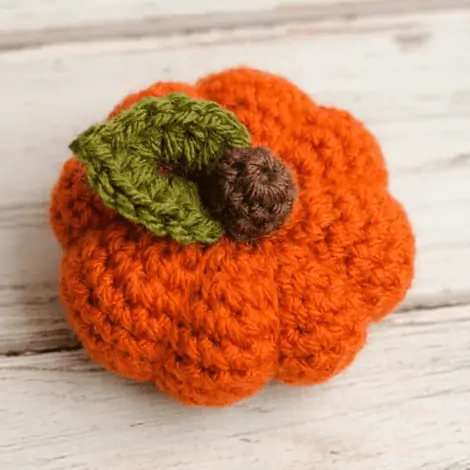
You might remember our lovely medium size crochet pumpkin with it’s sweet leaves, cute curly tendril and fun stem.

I wanted to incorporate that same rich fall color into a similarly sized plaid pumpkin and when I worked the Glorious Gingham Dishcloth Pattern, I knew I had the perfect pattern for this cute plaid pumpkin!
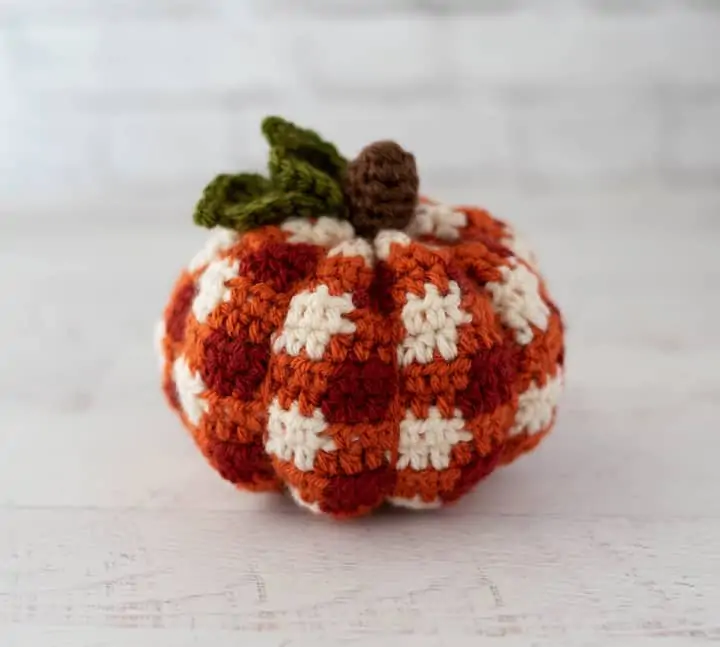
The secret? This plaid pumpkin crochet pattern is worked in a half double crochet stitches. A lot of the plaid crochet pumpkins out there are worked in double crochet and while they may look nice, there’s a little problem no one tells you about–the stuffing can peek through the spaces in that bigger stitch.
The half double crochet solves all that, creating a nice fabric that keeps the stuffing inside where it belongs while still making for a fast crochet project!
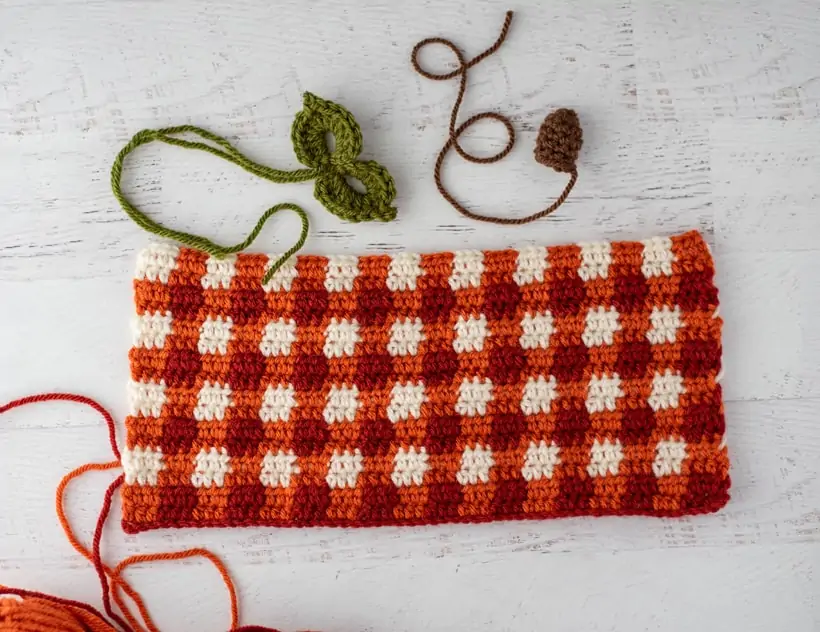
Instead of working this amigurumi pumpkin in the round, I worked the plaid pattern in a rectangle. Then I seamed it together, gathered and stuffed and crocheted the leaves and stem.
The leaves and stem are the same as those used in the medium crochet pumpkin pattern. So, so fun!
Let’s dive in!
Crochet Plaid Pumpkin Pattern
Materials
- Worsted Weight Yarn (sample used Lion Brand’s Vanna’s Choice)
- 24 Yards Dark Orange (Vanna’s Choice in Brick Color)
- 24 Yard Ivory(Vanna’s Choice in Fisherman Color)
- 48 Yards Orange (Vanna’s Choice in Terra Cotta Color)
- Scraps of brown and green yarn for stem and leaves
- US G6/4.00 mm crochet hook(these are my absolute favorite hooks I recommend to everyone!)
- Fiberfill stuffing
- Tapestry needle and scissors
Gauge
4 stitches per inch with the yarn and hook size given, however gauge is not that important in this pattern
Resources and tutorials you may find helpful in following this pattern: Crochet Abbreviations, US to UK Crochet Conversion Chart. Find links to stitches on the “Tutorial” menu: Getting Started will show basic stitches used in many patterns and Crochet Stitch Dictionary shows our growing collection of crochet stitch tutorials.
Plaid Pumpkin Size:
Pumpkin measures approximately 4.5″ in width and 4.25″ in height.
Crochet Abbreviations
- ch = chain
- sc = single crochet
- hdc = half double crochet
- dc = double crochet
- sl st = slip stitch
- st = stitch(es)
Pattern Notes
- Ch 2 at the start of a row DOES NOT count as a stitch
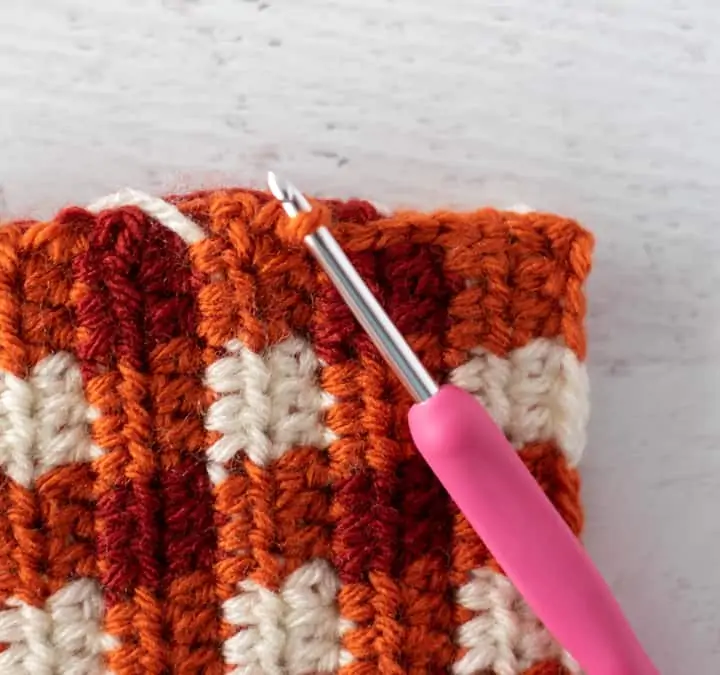
- To switch colors, pull new color through in last stitch (so, work the half double crochet until there are 3 loops on the hook, then pull the new color through all 3 loops and you are ready to crochet stitches in the new color). Read this post on How To Change Color in Crochet for more help.
- As you are working, lay the unused color in the row on the top of the work and crochet over it until it is needed again.
- Carry the unworked color from the previous row up the side of the work (it will be hidden by the seam when the pumpkin is sewn together).
Pumpkin
The pumpkin is worked in the plaid pattern back and forth in rows to make a large rectangle, then it is sewn together and stuffed.
With Orange (Terra Cotta) color yarn, chain 56
With Orange (Terra Cotta) color yarn, chain 56
R1: Hdc in the 3rd chain from hook then in each of the next 2 chains, changing to Dark Orange in the last hdc worked, *with Dark Orange, work a hdc in each of the next 3 chains, changing to Orange in the last stitch. With Orange work a hdc in each of the next 3 chains, changing to Dark Orange in the last stitch. Repeat from * across, ending in dark orange. (54 st; remember, do NOT count the ch 2 at the start of the row). Turn
R2: Continuing to work in Dark Orange, ch 2 (does not count as a stitch), *with Dark Orange, hdc in next 3 st. With Orange, hdc in next 3 st. Repeat from * across row. In the very last stitch in the row, change to Ivory yarn in the last stitch. (54 st). Turn.
R3: Ch 2 (does not count as a stitch), *With Ivory, hdc in next 3 st. With Orange, hdc in next 3 st. Repeat from * across row, ending in orange. (54 st). Turn.
R4: Continuing to work in Orange, ch 2 (does not count as a stitch), *With Orange, hdc in next 3 st. With Ivory, hdc in next 3 st. Repeat from * across row, changing to Orange in the last stitch. (54 st). Turn.
R5: Ch 2 (does not count as a stitch), *with Orange, hdc in next 3 st. With Dark Orange, hdc in next 3 st. Repeat from * across row, ending in Dark Orange. (54 st). Turn.
R6: Continuing to work in Dark Orange, ch 2 (does not count as a stitch), *with Dark Orange, hdc in next 3 st. With Orange, hdc in next 3 st. Repeat from * across row. In the very last stitch in the row, change to Ivory in the last stitch. (54 st). Turn.
R7-14: Repeat rows 3-6 Twice (54 st)
R15-16: Repeat rows 3-4 (54 st)
Fasten off Ivory and Dark Orange Yarn.
Assemble Pumpkin
To assemble pumpkin, fold the short ends of the plaid rectangle together with right sides facing. Sew the two ends together, forming a tube.
This can be done by slip stitching across or thread a tapestry needle and sew together instead. (Note: I ultimately decided I preferred the look of the sewn seam vs the slip stitch seam, but it is up to you.) Make sure that the yarn carried up the sides will be hidden on the wrong side of the work.
This will form a tube. Turn the tube right side out.
Use yarn and a tapestry needle to gather the starting round of the rectangle. Pull tight and knot off. You may need to make several stitches to secure the bottom closed.
Stuff the pumpkin. Then, using a tapestry needle and a long strand of yarn, repeat the gathering process for the top of the pumpkin to close the top opening. Knot off tight, but do not fasten off the yarn.
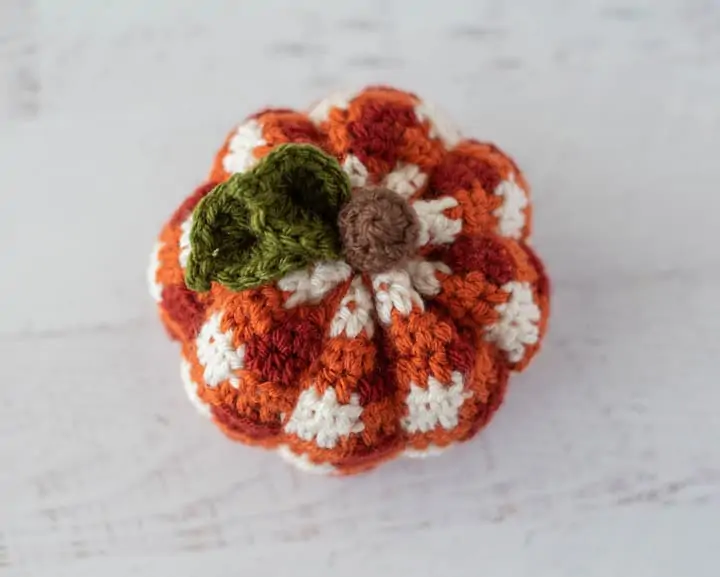
Plaid Pumpkin Shaping
Using the same strand of yarn used to secure the top of the pumpkin, wrap yarn over and around pumpkin to starting point to divide pumpkin in half. Pull tight and knot at center. Now divide in half again to form 4 equal sections, wrapping the yarn up and around. Loop under the knot you made and tighten it up.
Knot whenever you feel like you need to hold the yarn and the end of a wrap. Divide the pumpkin 2 more times to have a total of 8 sections. Knot securely at center and finish off.
Weave in all ends.

Pumpkin Stem
Make a magic ring
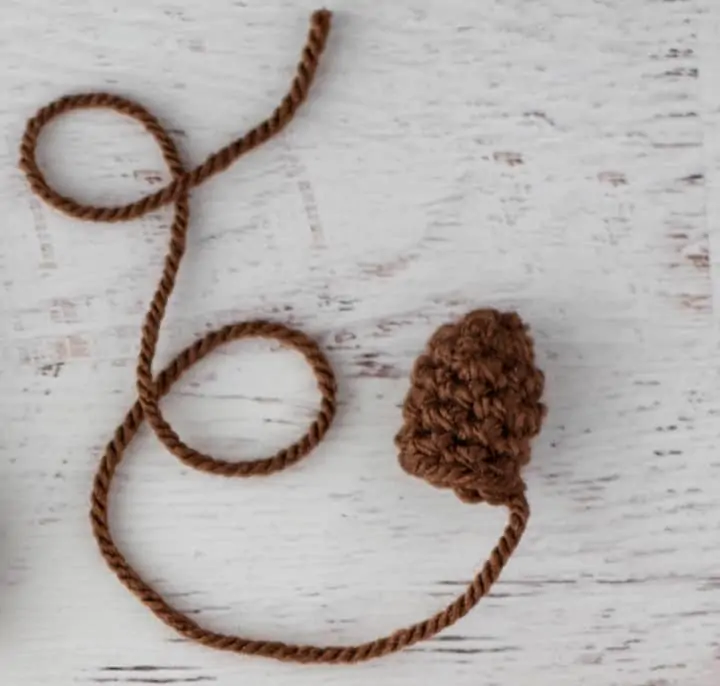
R1: 8 sc into ring (8 sts).
R2-5: sc around. At end of 3rd round, slip stitch to next stitch and finish off, leaving a long strand for sewing. Stuff.
Leaves
*Chain 8 and join to form ring.
R1 in the ring just made work all of the following: ch 2, 6 dc, ch 3, sl st to 1st ch, 6 dc, ch 2, sl st.* One leaf made. Do NOT fasten off.
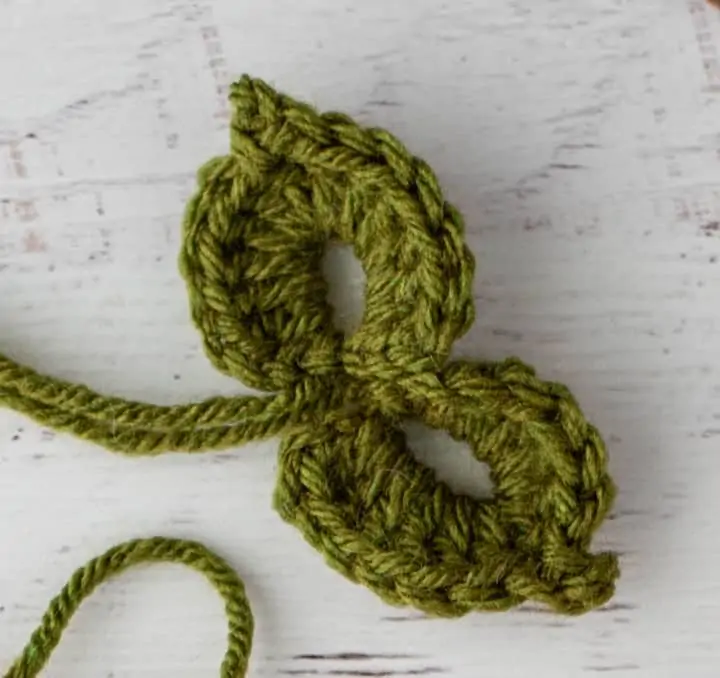
Repeat from * to * to make a 2nd leaf. Fasten off, leaving a long strand for sewing.
Sew the leaf and stem in place on top of the pumpkin.
Free Crochet Pumpkin Patterns
If you love the this darling crochet plaid pumpkin, you might also like to check out these other crocheted pumpkins:
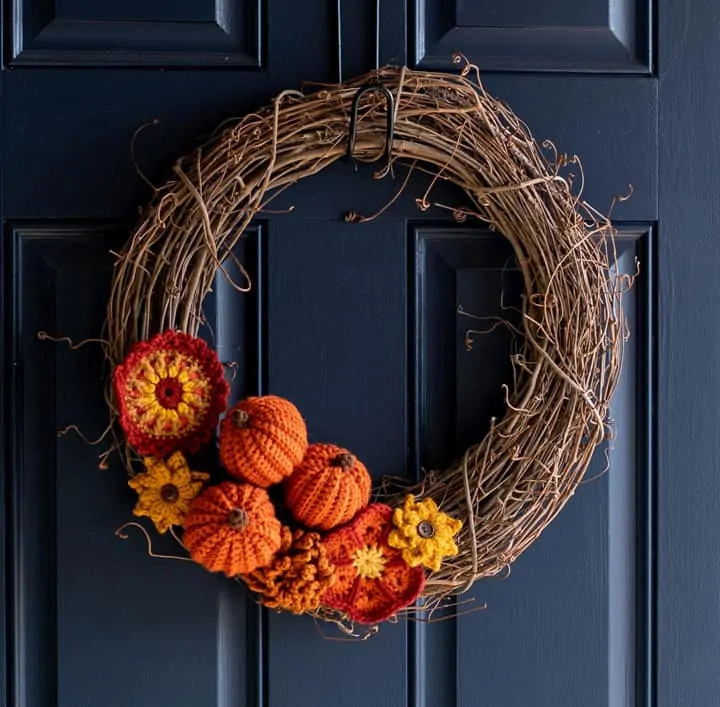
Looking for yet another pattern for a crochet pumpkin? Be sure to also check out the tiny pumpkins in my Fall Crochet Wreath pattern. The wreath features an easy to make cinched pumpkin with a ribbed texture.
I love seeing your finished projects! If you enjoyed making the Crochet Plaid Pumpkin, I’d love to see yours on Instagram, be sure to tag me @crochet365knittoo. If you are on Facebook, stop over to the Crochet 365 Knit Too Facebook page or pop over to the Crochet365KnitToo Club and share a photo! I’d love to see your work!
I’m guessing, being new to color changes within a row, that the old color is carried within the new? And that will also help.with no stuffing peeking out?
Sadly, our state still allows plastic bags at checkout, so I reuse the clean, dry ones, cut into 2″ straps, as filling. No peeking or poking though, usually. The hdc is a great idea! Thank you for sharing.
Happy Autumn!
Yes, in this case, the not used color is carried along the top of the work and crocheted over as you work. The half double crochet stitches are shorter than double crochet and that, combined with the hook size relative to the yarn creates a nice ‘hole-free’ fabric so that stuffing doesn’t peek out. I like your idea of up cycling the plastic bags for stuffing!
I love your use of plaid in this pumpkin! I crocheted my first plaid project this past week (christmas ornaments) and love the style it adds. Still getting used to changing between colors but plaid projects are a good way to learn 😉
Crocheting plaid is really fun. It is a great way to try out a new technique on a smaller project! Glad you’re enjoying the pattern!
This little Plaid Pumpkin is so cute! Can’t wait to make a bunch of them to give as a lovely fall gift…with endless possibilities for customization to match the recipient’s decor colors, I know they’ll be loved! Thanks for the adorable pattern!
So glad you love them as much as I do!!
The chain 2 at the beginning of the row does NOT count as a stitch and then the rest of the row is alternating 3 hdc stitches in one color and 3 hdc in a different color. I would try looking at the photo where the piece is laid flat. Hopefully one of those tips helps get you on track!