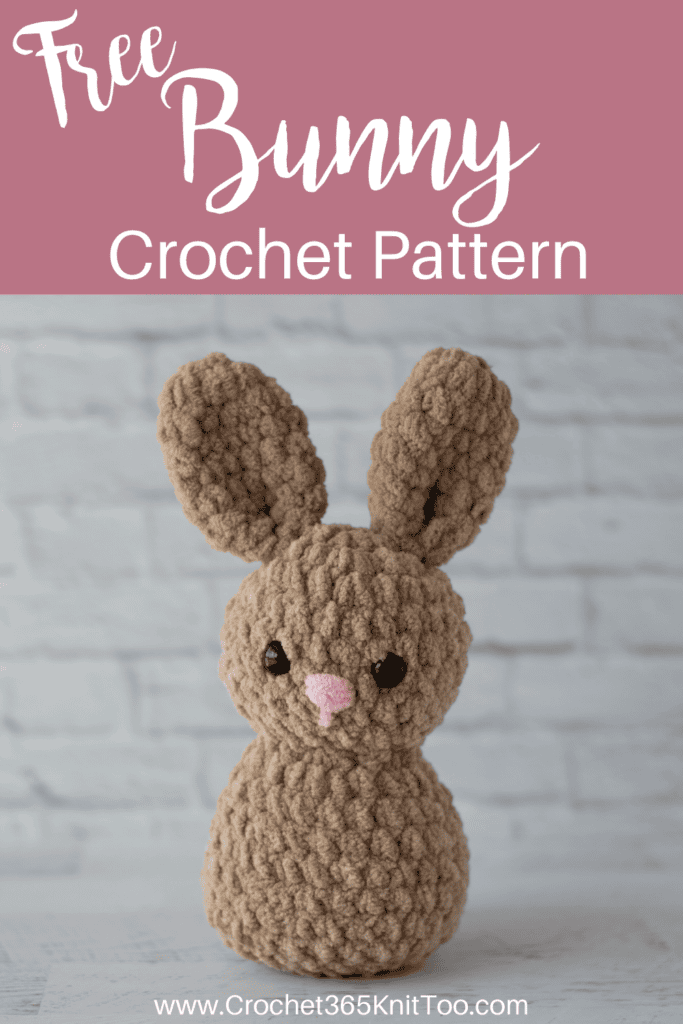
Blossom Bunny Crochet Pattern
This post may contain referral/affiliate links. Please read my disclosure for more info.
A bunny crochet pattern is one of those projects that just makes you smile from the very first stitch. Whether you’re making a sweet Easter gift, a cuddly toy for a child, or simply adding a bit of springtime charm to your home, this adorable bunny is full of personality and softness!
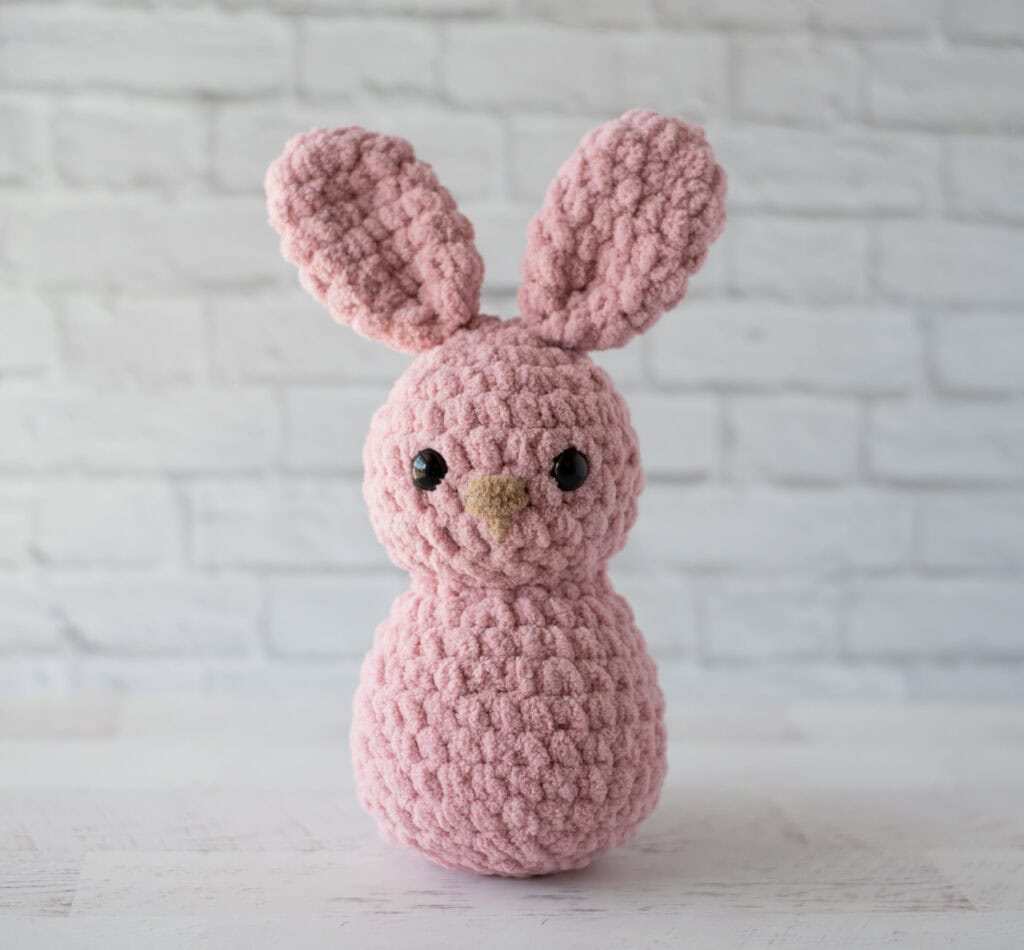
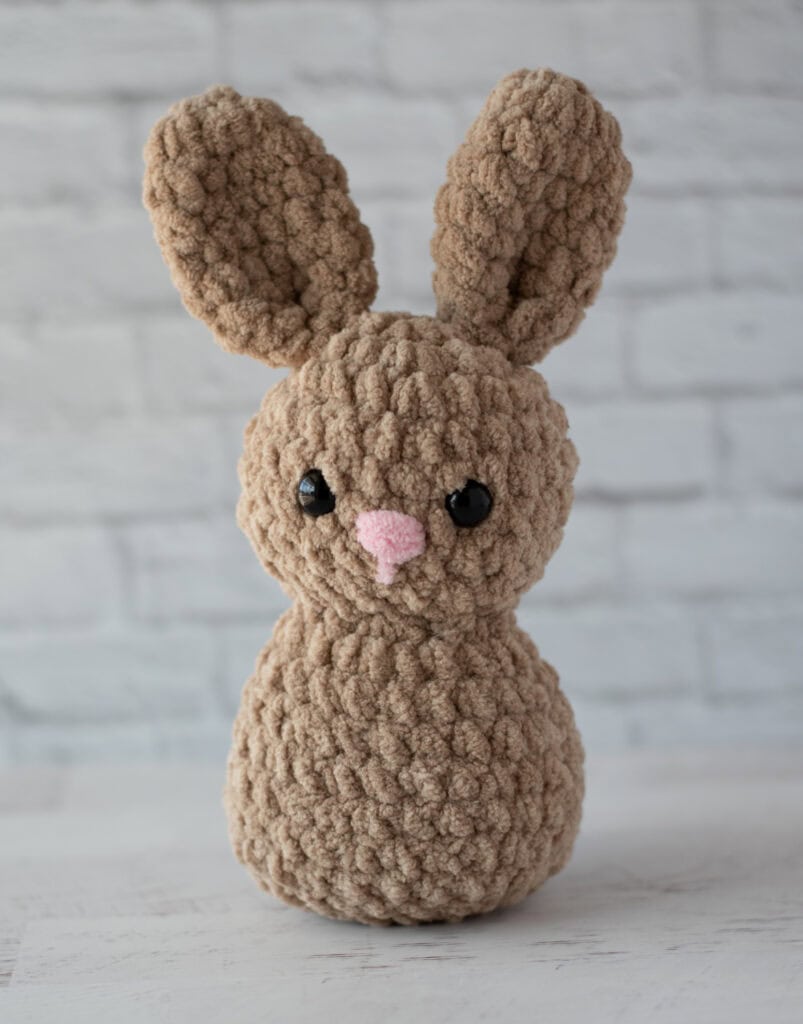
Let’s be honest here… there is just something irresistible little Blossom – a soft, squishy bunny with a fluffy tail and those sweet little ears standing tall.
My journey into designing this bunny crochet pattern started with a simple idea: I wanted something plush, cozy, and extra cuddly—something that felt just as sweet to hold as it looked sitting on a shelf.
I also wanted quick and simple construction with minimal sewing and a design that just flows from the hook.
So Blossom Bunny was born. Isn’t she just adorable?
She’s tall, soft, and oh-so-huggable, with a plush body and sweet little details that bring her to life. And best of all? She’s made with super bulky yarn, which means she works up faster than you’d think for such an adorable finished piece.
What Is a Bunny Crochet Pattern?
A bunny crochet pattern is a type of amigurumi pattern used to create a stuffed bunny using basic crochet stitches like single crochet, increases, and decreases.
This bunny crochet pattern is designed to be soft, plush, and beginner-friendly, using super bulky yarn to create a cozy, squishy texture and those adorable upright ears.
Is This Bunny Pattern Beginner – Friendly?
Yes! This bunny crochet pattern is a great choice for beginners who are ready to try amigurumi.
It uses basic stitches like:
- single crochet
- increases and decreases
- working in the round
The head and body are worked in one continuous piece, which keeps things simple and avoids a lot of complicated assembly at the end.
If you’re comfortable with the basics and ready for something a little extra fun, this is a wonderful next project.
Why You’ll Love Crocheting Bunnies!
There’s just something about working with plush yarn that feels extra special.
The stitches are soft and squishy, and as your bunny starts to take shape, it almost feels like it comes to life right in your hands.
And those ears? Because of the super bulky yarn, they stand up on their own—which gives Blossom Bunny her sweet, perky personality.
You’ll start at the top of the head and work your way down, shaping the neck and then the body. It’s one of those patterns where you look down and suddenly realize… you’re holding a bunny.
And then you immediately want to make another one.
Bunny Crochet Pattern Essentials
If this crochet bunny is your first time working an amigurumi pattern, here are a few tips to get you started with this free crochet pattern:
Start with a magic ring (also called a magic circle) to make your starting stitches nice and tight. Wondering how magic rings work? Be sure to check out my magic ring tutorial!
The bunny free pattern is worked mostly in single crochet. You’ll also need to know slip stitches and how to increase and decrease. And of course, you will need stuffing and a tapestry needle to finish off your crochet bunny.
Amigurumi patterns are worked in continuous rounds so keeping track of your rows is important. That’s why I always use a stitch marker on the last stitch in a row.
Some crocheters prefer placing the marker in the first stitch or using a scrap piece of yarn—either way works! Just pick a method and stay consistent.
How This Bunny is Constructed
One of my favorite things about this bunny crochet pattern is how simple and seamless the construction is.
The head and body are worked as one piece:
- Start at the top of the head
- Decrease to form the neck
- Then increase again to shape the body
This creates a smooth, continuous shape without needing to join multiple sections.
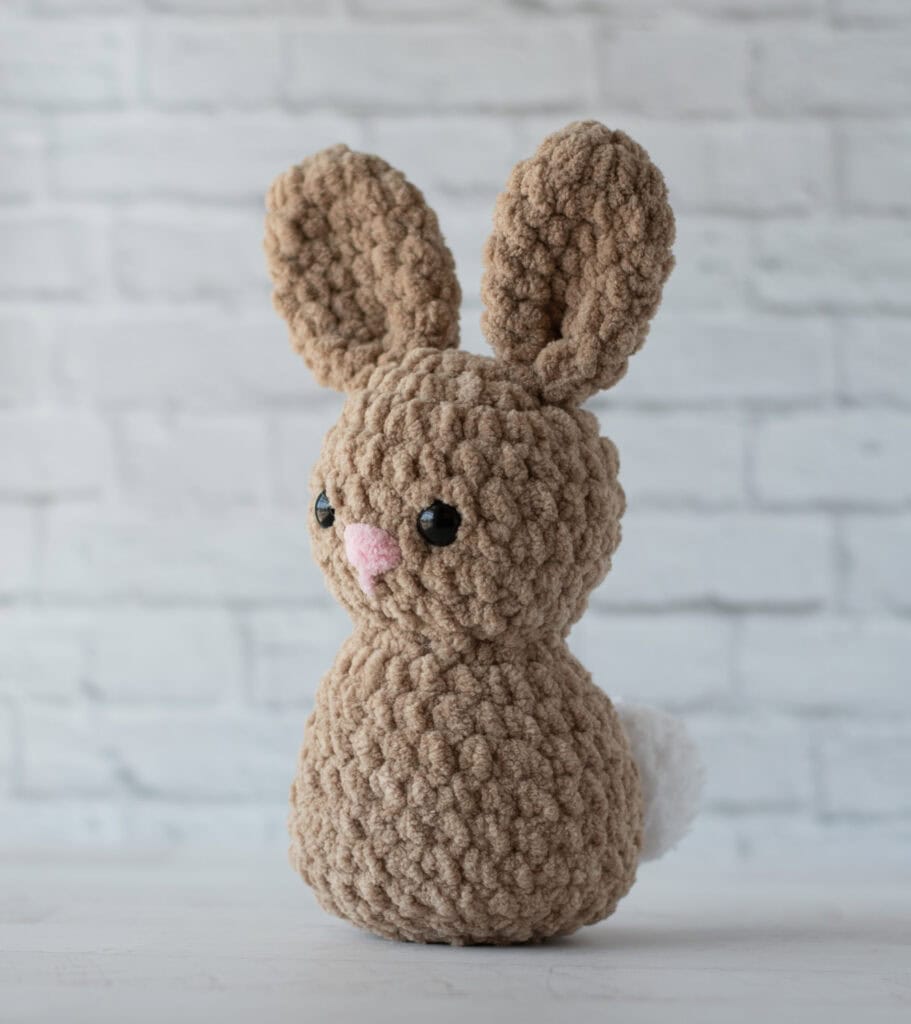
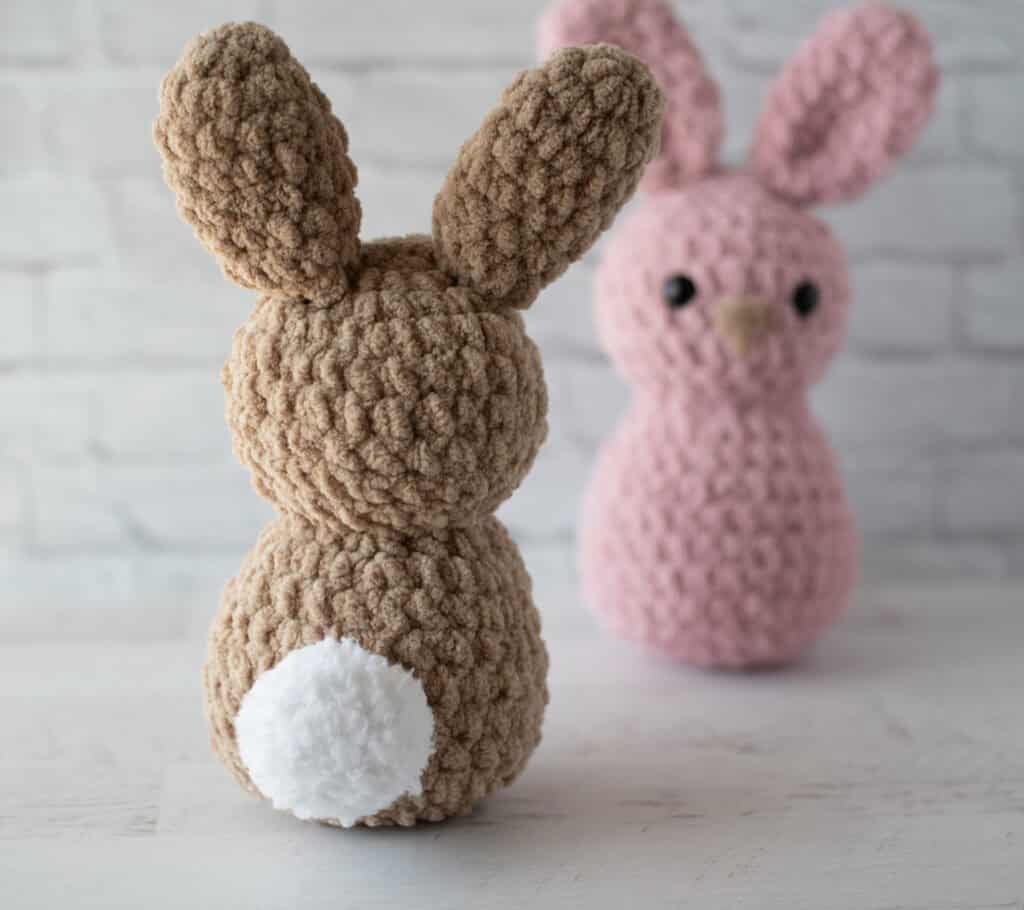
The ears and tail are crocheted separately and sewn on at the end, allowing you to position them just the way you like.
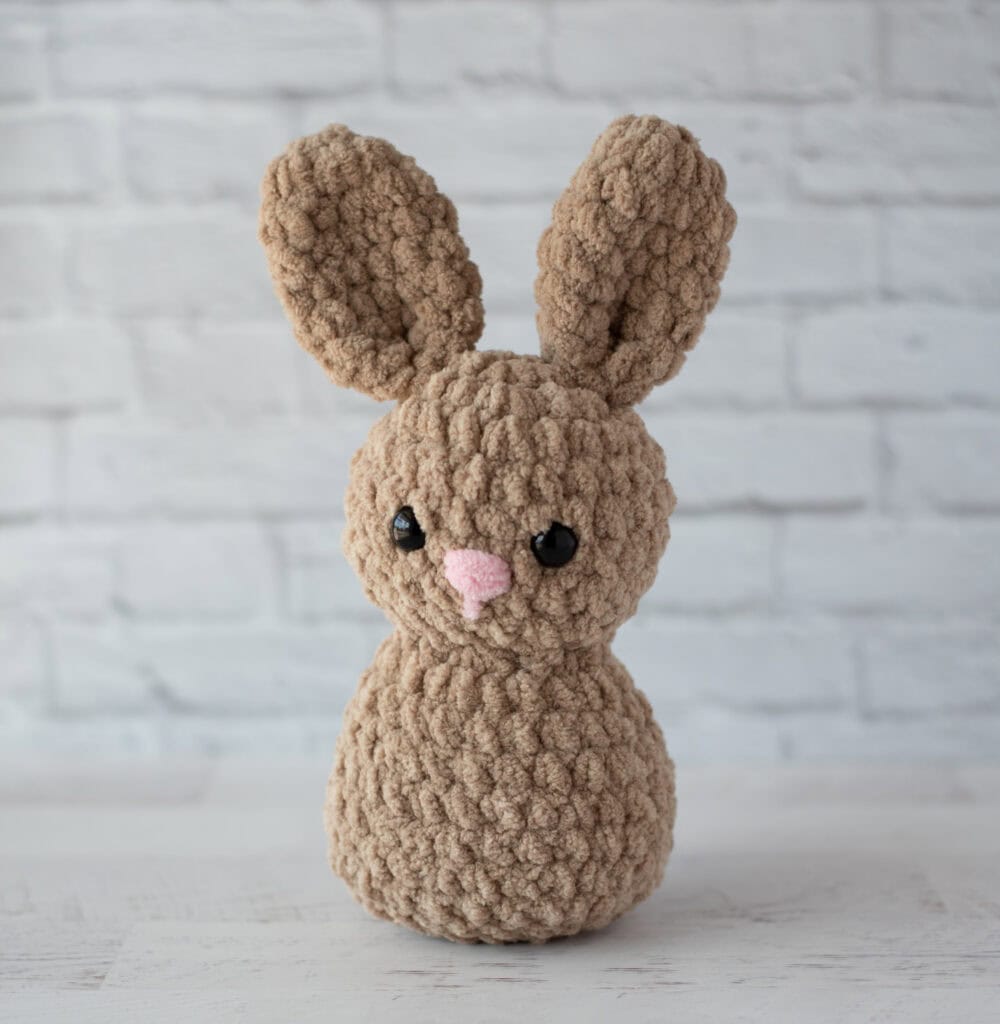
And to finish it all off, a simple embroidered nose adds the sweetest little detail.
How Do You Add a Bunny Face?
There are a couple of options when it comes to adding your bunny’s face.
Safety eyes give a clean, polished look and are easy to insert as you work.
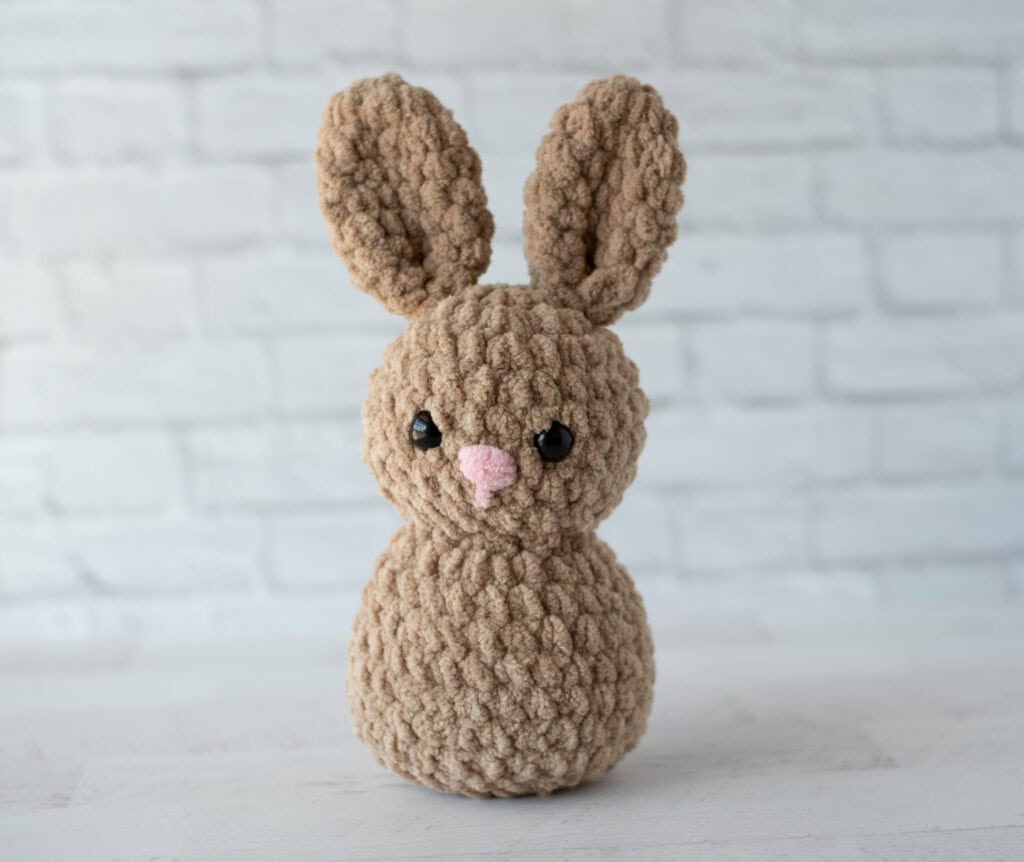
If you’re making this bunny for a baby or young child, I always embroider the features instead.
For Blossom Bunny, I especially love a simple embroidered nose—it keeps the look soft and sweet without overcomplicating things.
Supplies You’ll Need for Crocheting A Bunny
You’ll need very basic supplies for crocheting your bunny: yarn, a crochet hook, a stitch marker, stuffing and a yarn needle.
Crochet Hook Suggestions for Bunny Patterns
When working with super bulky plush yarn, it’s important to use a hook that creates a tight fabric so the stuffing doesn’t show through.
Depending on your tension, you may need to adjust your hook size slightly. I’ve also found that the thickness of #6 Super Bulky yarn can vary quite a bit. For instance, here are two similar patterns.
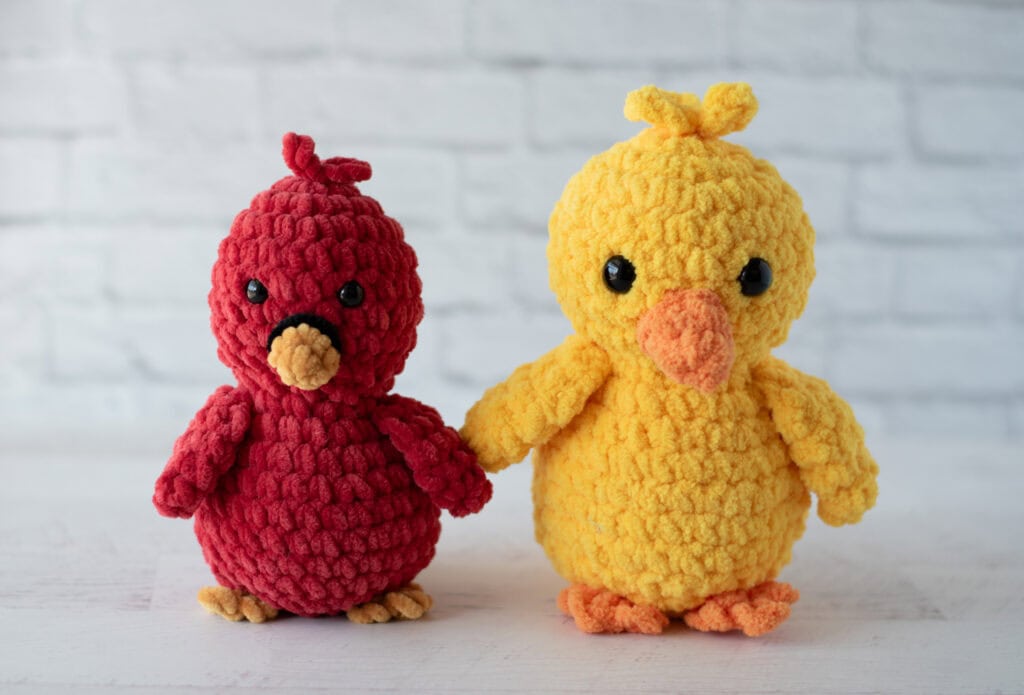
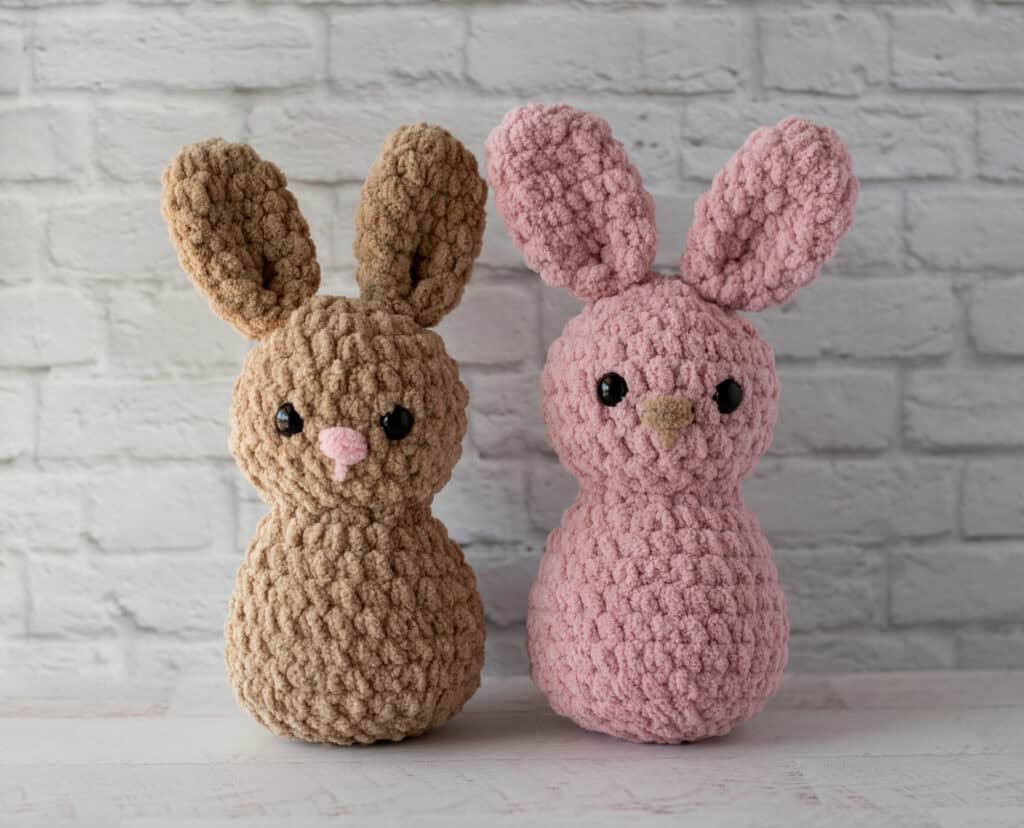
Like Blossom Bunny, Buttercup the Chick is worked in Premier Basix Chenille vs Carl the Cardinal which is worked in Premier Parfait. Both are #6 Super Bulky Weight yarn.
The beauty of amigurumi is that your bunny will stay in proportion, even if it turns out a bit larger or smaller. When working with Premier Basix, I love to use a 6.5mm hook. But when working with Premier Parfiat, I prefer a 5 mm hook.
While you can easily move up or down in crochet hook size and your bunny will still look in proportion, just keep in mind that your little bunny might turn out a bit smaller or bigger than you planned when you change the hook and yarn size!
Best Yarn Options for a Crochet Bunny Pattern
This bunny crochet pattern was designed using super bulky (#6) chenille-style yarn.
This type of yarn gives you that soft, velvety texture that makes plushies extra cuddly.
You can absolutely experiment with other yarn types, but keep in mind:
- lighter yarn = smaller bunny
- bulkier yarn = larger bunny
Just adjust your hook size accordingly.
Tips for a Perfect Crocheted Bunny
Here are a few simple tips to help your bunny turn out beautifully:
• Use a stitch marker to keep track of rounds
• Stuff gradually as you go for a smooth, even shape
• Take your time with stitch placement (plush yarn can make stitches tricky to see!)
• Position the ears evenly before sewing them in place
And remember—each bunny has its own personality. That’s part of the charm.
Adjusting Your Stitch Tension
Tension can make a big difference in how your bunny turns out.
If your stitches are too loose, stuffing may show through—try going down a hook size. If your stitches feel too tight or hard to work, try sizing up slightly.
The goal is a fabric that feels comfortable to crochet while still holding its shape.
print & stitch
Purchase the Beautifully Crafted AD-FREE PDF Download Today
Do you just want to relax and crochet? This nicely formatted pattern features clear instructions and perfectly sized photos for a more enjoyable crochet experience.
Get the free pattern below or purchase an ad-free pattern on Etsy or Ravelry
Crochet Bunny Pattern
Here is what you will need:
- Premier Basix Chenille Brights, size 6 super bulky weight, 100% polyester, 112 yds/103m per 5.3 oz skein (try Herrschners, Amazon or Etsy)
- Main Color (Steel Cut Oats or Blush): 65 yards
- Contrast Color for Nose (Cotton Candy or Steal Cut Oats): 1 yard
- Bernat Pipsqueak, size 5 bulky weight, 100% polyester, 101 yds/92m per 3.5 oz skein
- White White: 7 yards
- US K10.5/6.5mm crochet hook and H8/5.0mm crochet hook
- 14 mm Safety Eyes
- Stitch Marker
- Fiberfill
- tapestry needle and scissors
Resources and tutorials you may find helpful in following this pattern: Crochet Abbreviations, US to UK Crochet Conversion Chart. Find links to stitches on the “Tutorial” menu: Getting Started will show basic stitches used in many patterns and Crochet Stitch Dictionary shows our growing collection of crochet stitch tutorials.
Gauge:
My gauge is 5 sc to 2 inches. However, gauge is not important in this pattern.
Resources and crochet tutorials you may find helpful in following this pattern: Crochet Abbreviations, US to UK Crochet Conversion Chart. Find links to stitches and basic crochet skills on the “Tutorial” menu: Getting Started will show basic stitches such as the slip stitch, single crochet, double crochet stitch and chain stitch used in many patterns and Crochet Stitch Dictionary shows our growing collection of crochet stitch tutorials.
Crochet Abbreviations:
- ch(s) = chain(s)
- sc = single crochet
- sc2tog = single crochet 2 together
- sl st = slip stitch
- st = stitch(es)
Finished Bunny Size
Bunny is approximately 10.5” tall (including ears) x 6” wide.
How to Crochet this Bunny
Using the larger hook for the bunny and ears, the head and body of the bunny are worked in one piece starting at the top of the head, decreasing to the neck and then increasing to work the body. You’ll then crochet two ears. The bunny tail is worked with a smaller hook and thinner yarn. Finally you’ll put it all together with a few simple stitches. Let’s dive in!
Bunny Head and Body
Using main color yarn and larger hook, make a magic ring.
R1: 6 sc into ring. Place stitch marker and work in continuous rounds. (6 st)
R2: 2 sc in ea st. (12 st)
R3: *Sc in next st, 2 sc in next. Repeat from * around. (18 st)
R4: *Sc in next 2 st, 2 sc in next. Repeat from * around. (24 st)
R5-8: Sc around. (24 st)
R9: *Sc in next 2 st, sc2tog. Repeat from * around (18 st)
R10: *Sc in next st, sc2tog. (12 st)
Insert safety eyes between rows 6 & 7, leaving 4 stitches in between them. Stuff head and continue to stuff body as you work.
R11: *sc in next st, 2 sc in next. Repeat from * around. (18 st)
R12: *Sc in next 2 st, 2 sc in next. Repeat from * around. (24 st)
R13: Sc around (24 st)
R14: *Sc in next 5 st, 2 sc in next. Repeat from * around. (28 st)
R15-18: Sc around. (28 st)
R19: *Sc in next 5 st, sc2tog. Repeat from * around. (24 st)
R20: *Sc in next st, sc2tog. Repeat from * around (16 st) Firmly stuff body the rest of the way.
R21: *Sc2tog. Repeat from * around. (8 st) Fasten off, weave end through last stitches and pull tight.

Bunny Ears (Make 2):
Using main color yarn and larger hook, make a magic ring.
R1: 6 sc into ring. Place stitch marker and work in continuous rounds. (6 st)
R2: 2 sc in ea st. (12 st)
R3-7: Sc around. (12 st)
R8: *Sc in next 4 st, sc2tog. Repeat from * once. (10 st). Do NOT stuff ears. Fasten off leaving a long strand.
Fold open end of ear in half and then in half again. Thread a tapestry needle and whip stitch closed. Then sew each ear on row 2 of the head referring to photos.
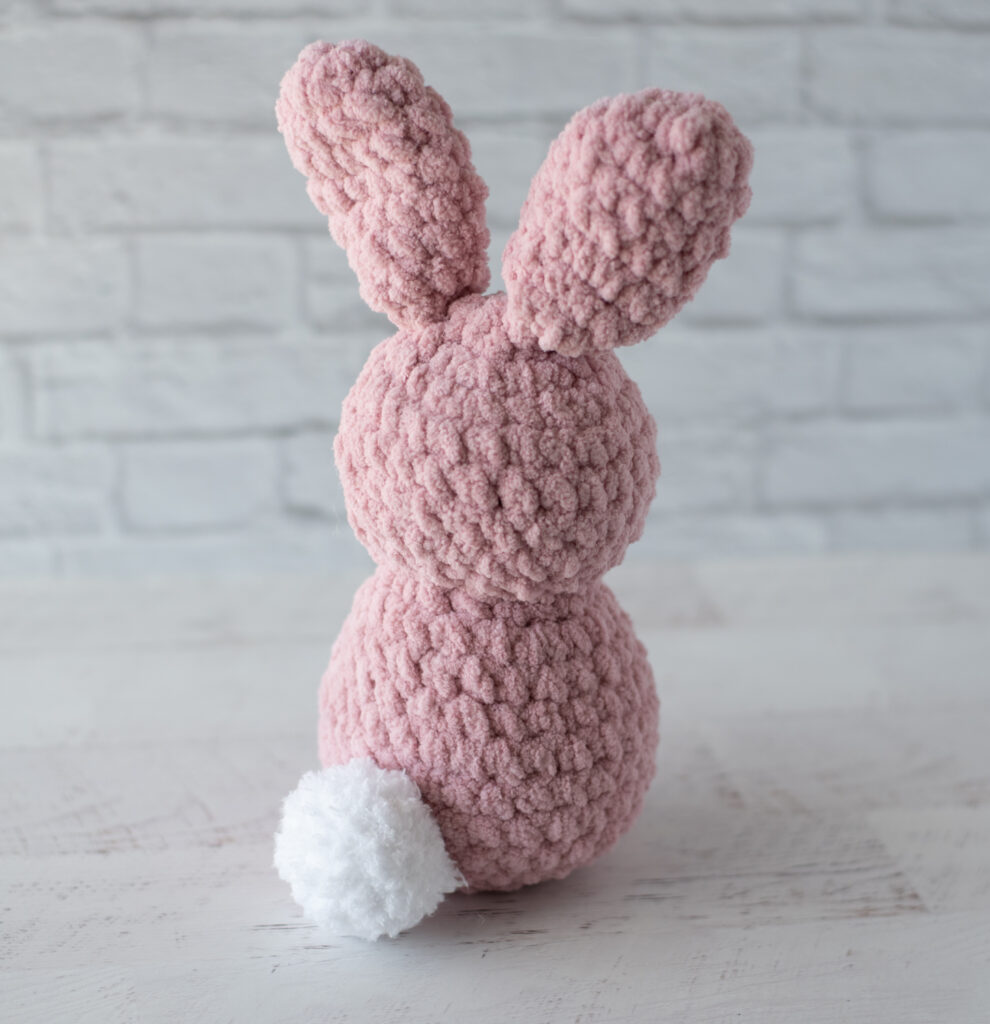
Bunny Tail:
When single crocheting with Pipsqueak yarn the ‘wrong’ side of the work is actually the fluffier side. So, the tail is turned inside out at the end, enabling the fluffier side to be on the outside.
Using Pipsqueak yarn and smaller hook, make a magic ring.
R1: 8 sc into ring. Place stitch marker and work in continuous rounds. (8 st)
R2: 2 sc in ea st. (16 st)
R3-5: Sc around. (16 st)
R6: Sc2tog around. Fasten off, leaving a long strand. Then flip inside out (as the inside is fluffier than the outside) and stuff the tail lightly. Weave end through last stitches and pull tight. Sew tail to lower back of bunny. around. Fasten off yarn and then weave the yarn through the remaining stitches and pull tight. Sew tail to lower back of bunny.

Finishing the Bunny
Using contrast yarn sew 3 horizontal stiches between eyes to form nose. The stitches cover the lower 3/4 of round 7. Then sew one vertical stitch under the horizontal stitches to finish the facial embroidery.
Crochet Bunny Frequently Asked Questions
This crochet bunny might just be one of my all time favorite patterns. It is just so fun and fast to make. I love it tucked into my spring decor, but it also would make the most darling gift or Easter Basket essential.
What is a bunny crochet pattern?
A bunny crochet pattern is an amigurumi-style pattern used to create a stuffed bunny using basic crochet stitches like single crochet, increases, and decreases.
Is this bunny crochet pattern beginner-friendly?
Yes! This pattern is great for beginners with basic crochet experience who are ready to try amigurumi.
How is this bunny constructed?
The head and body are worked in one continuous piece, starting at the top of the head, shaping the neck, and then forming the body. The ears are sewn on at the end.
What yarn works best for this bunny crochet pattern?
Super bulky chenille yarn works best for a soft, plush finish, but other yarns can be used with adjustments.
Can I embroider the face instead of using safety eyes?
Absolutely. Embroidered features are a great option—especially for babies and young children.
Blossom Bunny pairs perfectly with both Buttercup the Chick and my Crochet Bunny Basket.
More Free Amigurumi Crochet Patterns
If you love this bunny crochet pattern, you might also enjoy these other adorable designs:
Loving all the free Easter patterns on my blog? Pop over to this post to see ALL my free crochet Easter Patterns or all my free spring crochet patterns! So much goodness to crochet!
I love seeing your finished projects! If you enjoyed making the Crochet Bunny Pattern I’d love to see yours on Instagram, be sure to tag me @crochet365knittoo. If you are on Facebook, stop over to the Crochet 365 Knit Too Facebook page or pop over to the Crochet365KnitToo Club and share a photo! I’d love to see your work!