
Flower Power Crochet Wallflower
This post may contain referral/affiliate links. Please read my disclosure for more info.
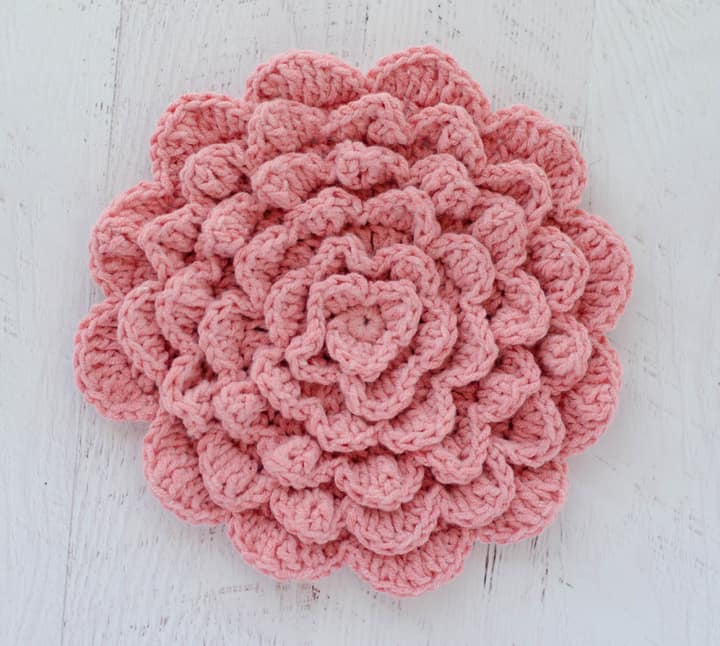
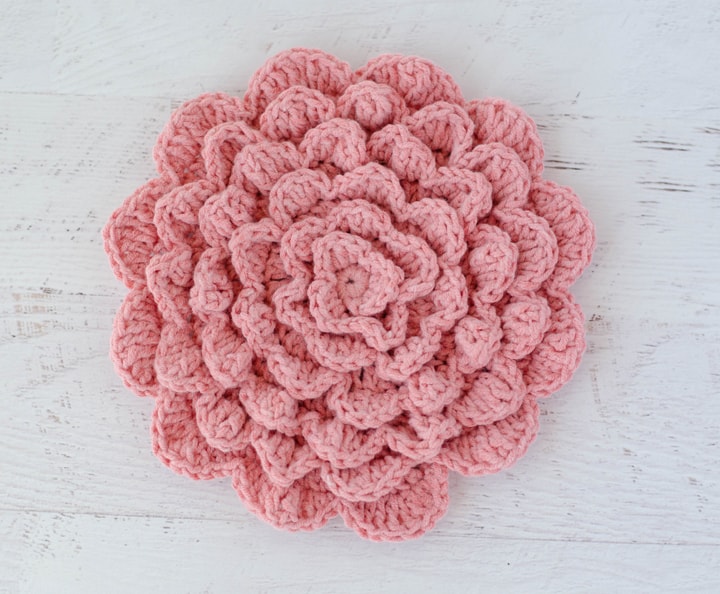
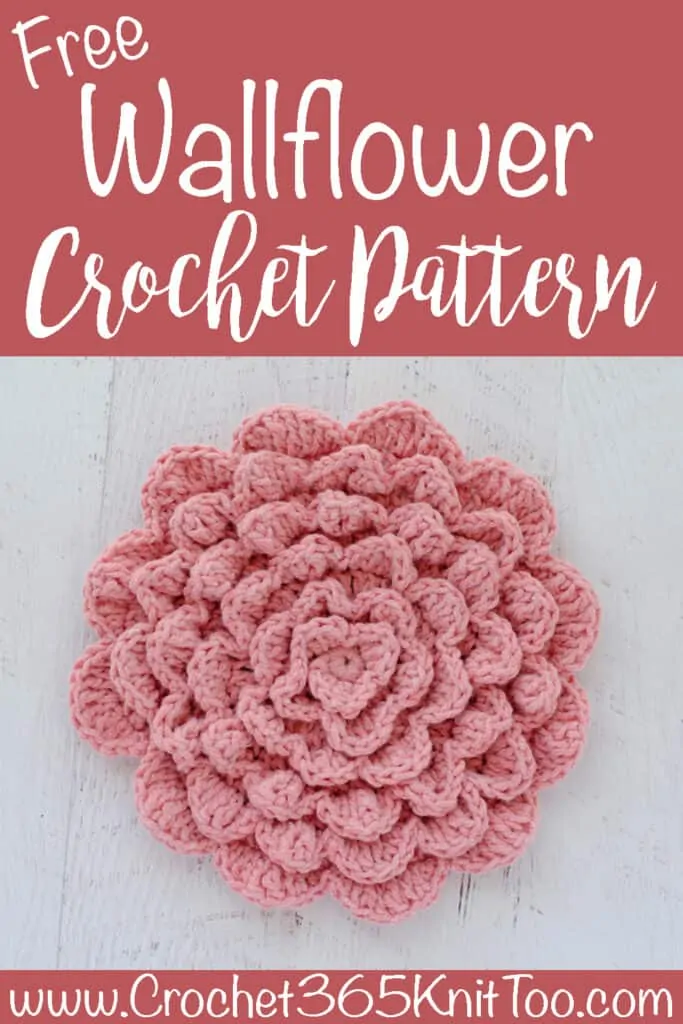
Sometimes a girl just needs a big, beautiful pink flower to brighten up the day. And when that flower can be hung on the wall? Well.. AMAZING! Meet this beautiful Crochet Wallflower!
I love that hangable flower piece of artwork is called a wall flower, don’t you? It sort of takes that negative “I’m at the 7th grade dance and no boy will ask me out on the dance floor” wallflower feeling and turns into something beautiful.
And side note.. adult me would tell 7th grade me to dance anyway because now I’m all about the road less traveled and adventures and not as much of a rule follower. But I digress.
This gorgeous crochet wallflower is inspired by those big metal flowers you can find in the decor section of your favorite store. I don’t know who came up with the idea of big beautiful pieces of metal art, but its totally my vibe! Somehow that stark contrast of hard metal lines and soft petals gets me every time. Like a perfect flower, frozen in full on open bloom. Gorgeous.
I also love that they are called “wallflowers”.. because.. HELLO.. they are flowers and they go on the wall.. so of COURSE they’d be called wallflowers! Brilliant, right?
And then, like many of my design inspirations go.. I thought.. WHAT IF I made a crochet version with soft ‘oh I wanna touch them’ petals and made it mountable. So I could even make a few and hang on the walls of my blog space/craft room. The walls in this happy space are a soft butter color that reminds me of a sunny day. So of course, a few beautiful blooms were in order!
More Free Home Decor Crochet Patterns
If you love this Flower Power Crochet Wallflower pattern, you might also like to check out these other patterns for your home! You can find all our Home Decor Crochet Patterns here.
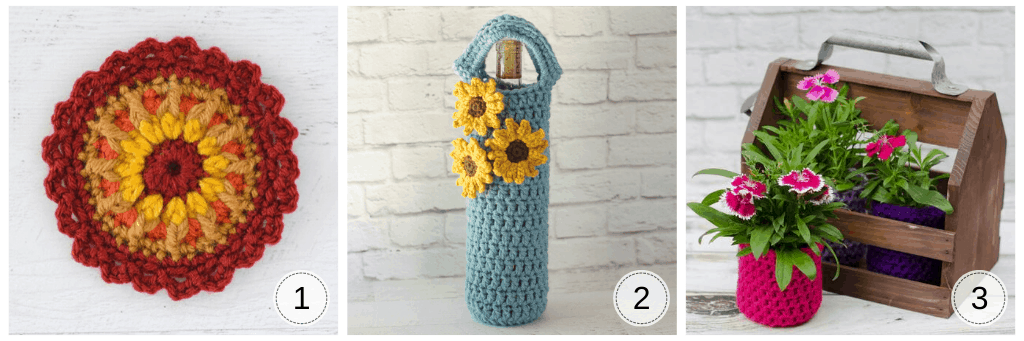
1. Flower Mandala // 2. Sunflower Wine Cozy // 3. Crochet Flower Pot
The crochet wallflower is worked in two parts. First the base is crocheted in a continuous circle, working in the back loops only. Then the yarn is reattached in the center and the delicious petals are crocheted. I used a Caron Cotton Cake in Frosted Pink which appears to be a challenging color to come by these days. But there are plenty of other lovely Caron Cotton colors to choose from . Or pick another worsted weight #4 yarn to substitute. I can’t wait to see YOUR wallflower!
Purchase an ad-free printable version of the Flower Power Crochet Wallflower Pattern here
Crochet Wallflower
Here is what you will need:
- US G6/4.0 mm crochet hook. (Did you know you can purchase my go-to hooks on Amazon?)
- 1-1/2 oz Worsted Weight Cotton or Cotton Blend Yarn, sample used Caron Cotton Cake in Frosted Pink
- 6″ Plastic Canvas Circle
- 3/4″ Plastic Ring (for hanging)
- Tapestry needle and scissors
Resources and tutorials you may find helpful in following this pattern: Crochet Abbreviations, US to UK Crochet Conversion Chart. Find links to stitches on the “Tutorial” menu: Getting Started will show basic stitches used in many patterns and Crochet Stitch Dictionary shows our growing collection of crochet stitch tutorials. I really like to use the invisible seamless join when finishing pieces that get sewn together.
Crochet Flower Size
Approximately 7″ across
Note: Crochet Wallflower is worked in 2 parts. First a base is made working through the back loops. Then the yarn is fastened off and joined again to the free loops from the first round to form a petal round.
Wallflower Base
Make a magic ring
R1: 12 sc into ring (12 sts). (Do not join, worked in rounds)
**Work Rounds 2-6 in the back loops only**
R2: 2hdc in ea st (24 st)
R3: *dc in next st, 2dc in next. Repeat from * around. (36 st)
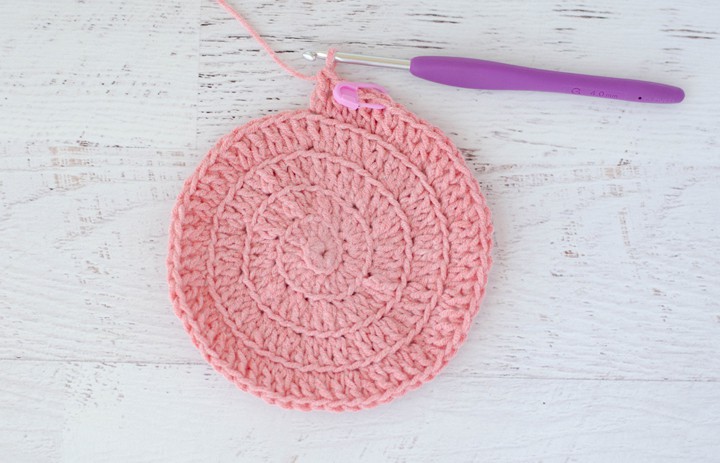
R4: *dc in next 2 st, 2dc in next. Repeat from * around. (48 st)
R5: *dc in next 3 st, 2dc in next. Repeat from * around. (60 st)
R6: *dc in next 4 st, 2dc in next. Repeat from * around until last stitch. In last stitch work 1 hdc and 1 sc. Slip stitch to next stitch and finish off. (72 st)
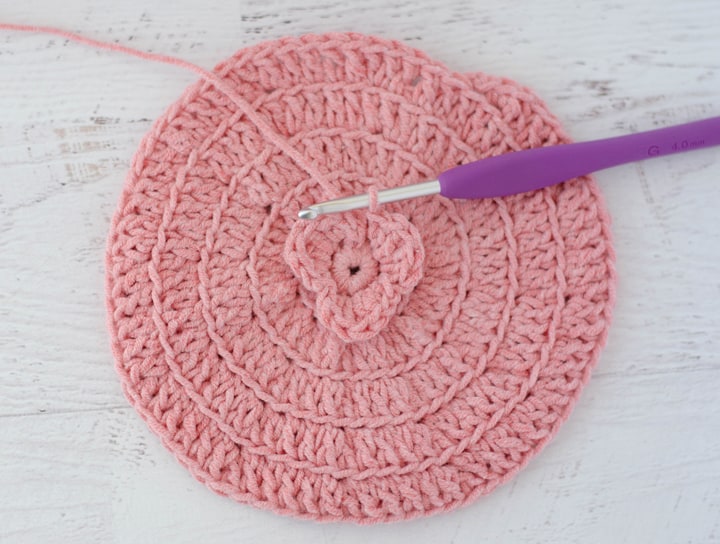
Flower Petal Round
Petals are worked in the free front loop of the base.
Join yarn with a slip stitch to a free front loop in round 1 of base.
R1: *sl st in next st, (sc, hdc) in next st, 2 dc in next st, (hdc, sc) in next st.* Repeat * to * around (3 petals)
R2: *sl st in next st, (sc, hdc) in next st, 2 dc in next st, (hdc, sc) in next st.* Repeat * to * around (6 petals)
R3: *sl st in next st, (sc, hdc, dc) in next st, tr in next st, (dc, hdc, sc) in next st.* Repeat * to * around (9 petals)
R4: *sl st in next st, (sc, hdc, dc) in next st, 2 tr in next st, (dc, hdc, sc) in next st. Repeat * to * around (12 petals)
R5: *sl st in next st, (sc, hdc, dc) in next st, 2 tr in next st, (dc, hdc, sc) in next st. Repeat * to * around (15 petals)
R6: * sl st in next st, (sc, hdc) in next st, 2 dc in next st, 2 tr in next st, 2 dc in next st, (hdc, sc) in next st. Repeat * to * around (12 petals). Sl st to next st. Fasten off leaving a very long strand for sewing.
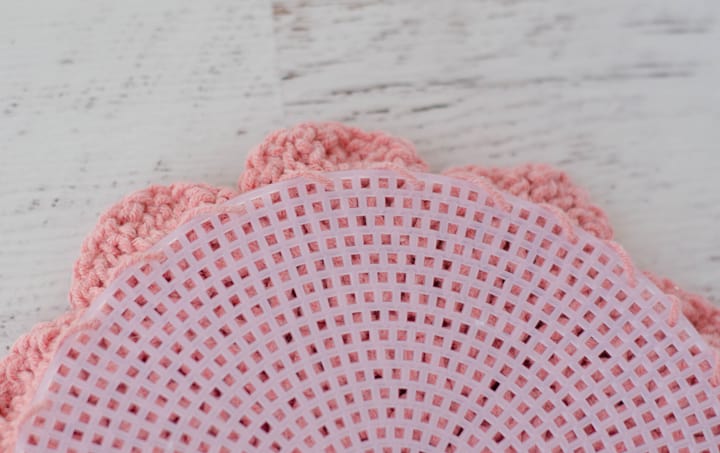
Note: When complete, make sure the base measures 6” across with a tiny bit of stretching. After the petals are complete, the plastic canvas circle will be sewn to the back of the base.
Subscribe to the Newsletter
Sign up to receive email updates from Crochet 365 Knit Too, starting with a Printable Crochet & Knit Journal
Crochet Wall Flower Finishing
Weave in end from start of work. Thread tapestry needle with fastened off yarn end. Hold plastic canvas circle to wrong side of work. Using a whip stitch, carefully sew the plastic canvas circle to the back of the wallflower.
Place the plastic ring (for hanging) near the top of the work and tack down to the plastic canvas with yarn (or thread, if you prefer).
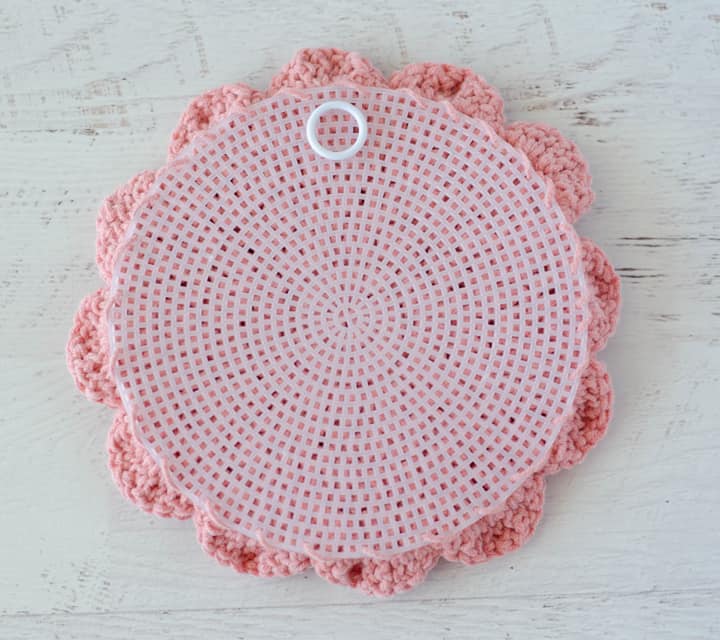
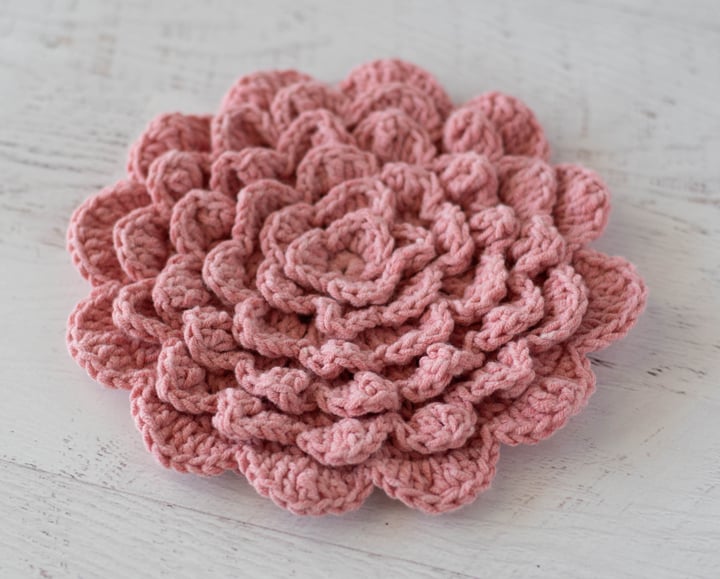
And your bit of beautiful goodness is done! A perfect crochet wallflower perfect for hanging in your favorite space!

Purchase an ad-free printable version of the Flower Power Crochet Wallflower Pattern here
I love seeing your finished projects! If you enjoyed making the Flower Power Crochet Wallflower I’d love to see yours on Instagram, be sure to tag me @crochet365knittoo. If you are on Facebook, stop over to the Crochet 365 Knit Too Facebook page or pop over to the Crochet365KnitToo Club and share a photo! I’d love to see your work!
Once I saw the plastic canvas part of this beautiful design, my mind started whirling. You could line the inside of the canvas, add another piece (lined as well) and a small strip to give some depth. Add a crochet handle and you have the cutest purse around! You could use plain stitches on the back canvas so it’s the same color and covered too. Or you could add another flower, although that might make it a bit chunky. Just a thought. I love this pattern and appreciate your work and your generosity. Thanks so much!!
That would be very cute! Good idea!
Just found your blog via Pinterest! So excited to try some of your patterns! Thank you so much for sharing your creations & patterns!
Loved this pattern ❣️?.
Thank you for sharing your talent. I’m hanging my red flower on my wall for encouraging moments and to brighten my room. I think I’ve got a few of these lovely flowers in my future. 🙂
That sounds lovely. I’m glad you enjoyed the pattern so much. 🙂
-Is there a possible substitute for the plastic canvas? I live in Las Vegas, Nevada and after a short time (a year or so) the plastic canvas gets very brittle then crumbles up and falls apart. This makes using the plastic canvas sort of pointless for at least most projects.
-Thanks your your assistance.
I have never experienced that with plastic canvas. I wonder if you could try a different brand? For a substitute, you would need something firm that also would allow you to sew it to the back of the Wallflower. Perhaps you could try cardboard or another plastic material, cut into a fitting round shape with holes punched along the edge. Hopefully that gives you a couple of ideas to get started.
As a substitute for the plastic canvas, what about using the mesh type fabric used for hooking rugs?
I used the plastic canvas because it is very firm to stabilize the flower enough to hang on a wall and it has holes which make it easy to attach the flower and the hanger. You could try other things that are firm instead and see how it works for you.
Maybe a metal or wood ring like are used in macrame?
I’m so glad I found you this morning! I adore this wallflower! I’m a”quarantine crochet baby,” and started out obsessed with crochet baskets. I’m now obsessed with creating an indoor crochet garden (still trying to figure out how I’m going to put it together, but I’m getting there). I’m at the point where it’s getting harder and harder to find fresh flower/leaf patterns, so I’m overjoyed that you shared this preciousness!! I’ll be putting aside my 50 wips to tackle this beauty! I have the perfect, stunning yarn that will do her justice!!
What a fun idea!