
Crochet Border: Happily Ever Afghan
This post may contain referral/affiliate links. Please read my disclosure for more info.
A beautiful crochet border can be the element that takes a crochet project from good to great! And this simply stunning crochet border is the perfect finale to the Happily Every Afghan series!

It’s hard to believe our beautiful Happily Ever Afghan is almost complete! It has been so fun to share the journey from inspiration piece to planning an afghan, to crochet the blocks and joining. And now we are at the crowning jewel moment.. the crochet border!
Before we dive into the gorgeous crochet border, you might like to check out the rest of the posts for this free crochet pattern series:
1. How Much Yarn To Crochet A Blanket // 2. Afghan Block // 3. Flat Braid Crochet Join
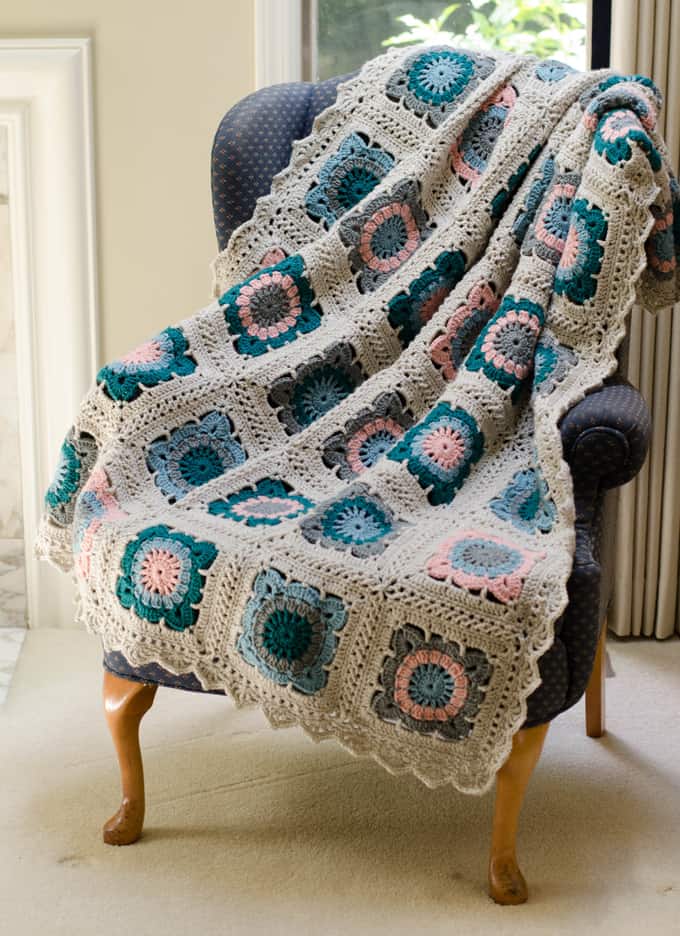
If you’ve been following along, the Happily Ever Afghan is a special afghan I designed for my son and daughter in law as a wedding gift. We are in the home stretch: the crochet border! I wanted a border that had a lacy feel to tie into the beautiful braided join and I also wanted some angles to it to pick up the corners of the block motif. I love how it finishes off this beautiful afghan!
Purchase an ad-free printable version of the COMPLETE Happily Ever Afghan pattern here!
Happily Ever Crochet Border
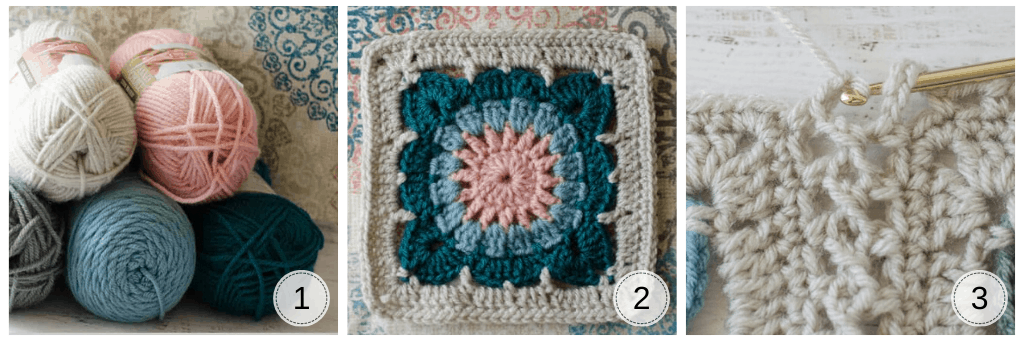
Here is what you will need:
- US H 8/5.00 crochet hook (these are my absolute favorite hooks I recommend to everyone!)
- Worsted Weight yarn (Be sure to read the Happily Ever Afghan Planning Guide Here)
- Tapestry needle and scissors
Resources and tutorials you may find helpful in following this pattern: Crochet Abbreviations, US to UK Crochet Conversion Chart. Find links to stitches on the “Tutorial” menu: Getting Started will show basic stitches used in many patterns and Crochet Stitch Dictionary shows our growing collection of crochet stitch tutorials.
How Do You Scalloped Edges?
If you are looking for a scalloped edge for a afghan, read on! But if you’re looking for a more simple singe or , you’ll want to start with the border basics and then scroll down to the Q&A section at the bottom of the post for working other borders.
Understanding Borders
Before starting a border, you need to understand how they work and do some math. Ugh. I know. But trust, me, the ‘winging it’ and hope it works out right (or fudging) really doesn’t work well. Put down the crochet hook and pick up a pencil and paper and let’s figure this out together.
First we need a foundation row. AND that foundation row must contain the right number of stitches for the border to work correctly. A foundation row is important because it evens out all the jagged edges of the afghan.
To figure out how many stitches you need hopefully the border you love will give you some guidance as to the correct stitch count.
This border has a multiple of 8 stitches plus 5 stitches plus the corners. Another way of saying this is that each side, excluding the 2 corner stitches, will have several repeats of 8 stitches each. If you add up all those repeats THEN add 5 stitches the pattern for the border will work out correctly.
Huh?!
Hang in there. Let me dive in a bit more.
Foundation Row Basics
On this particular afghan there are blocks joined together with a braided join. So the side has loops on the edge of each block. The joining point of each block has 2 larger loops. And there are 2 corners of the afghan. In general, the plan is to work 2 sc in each of the loops on the side of a block, to work 3 sc in each of the 2 large loops of the join (so 6 sc for each join) and then 5 sc in a corner. However, we may have to adjust this plan so that we end up with the right number of stitches.
Let’s try this with the side with 6 blocks:
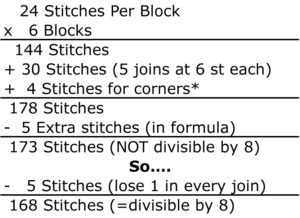
*Notice that we’re only counting 4 stitches for the corners in this calculation even though I said our we would make 5 sc in each of the 4 afghan corners. Remember we are ONLY counting the stitches on the side of the afghan and excluding the corner stitches for this calculation. SO, our calculation includes a total of 4 stitches on the corners that will “count” in our stitch count for the side. Again, the whole point of this calculation is to determine how many stitches in the foundation row we need for a side with 6 blocks.
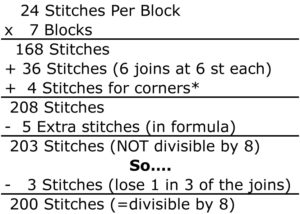
Now let’s try this with 7 blocks:
Foundation Row Recap
Now, to actually crochet the foundation row! Based on the calculations above, work a row of single crochet around, as follows: in each of the 4 corners work 5 sc. Work 2 sc in each loop on the side. Here’s where we accommodate the stitches we need to lose to make the math work. On the sides with 6 BLOCKS, work a total of 5 stitches over the 2 large loops on each join. On the sides with 7 BLOCKS, pick 3 joins evenly spaced and work 5 stitches over the 2 large loops of the join—the other joins will have 6 stitches (3 in each of the large loops of the join).
When you get done with each side, mark the very corner stitch of the afghan and count the stitches. The sides with 6 blocks should have 173 stitches and the sides with 7 blocks should have 205 stitches.
Now go take a break and have coffee or wine or something. You seriously are through the worst part of the whole border—and I know..it was single crochet, but geesh…that math!
Crochet Border Pattern
Base round: Multiple of 8 + 5 + corner stitches (described above)
Begin pattern 3 stitches to the left of a corner stitch.
R1: Ch 1, sc in same st, *[skip 3 st, (tr, ch 1) 4 times in next st, tr in same st (shell made), skip 3 st, sc in next st]. Work from * to 2 st before corner stitch, skip 2 st, in corner work [(tr, ch 1) 6 times, tr], skip 2 st, sc in next st. Repeat from * around, omit last sc, join with sl st to 1st sc.
Work should look like below after the first row, with scallops of 5 triple crochets on each side and a larger scallop of 7 triple crochets in the corner:

R2: sl st in 1st st (ch1, sc in next st), (sc in next space, sc in next st) 2 times, ch 3, sc in same st as last st, (sc in sp, sc in next st) 2 times, skip next st. Continue in pattern until the corner, working a sc in every tr and space of the shell and a (sc, ch 3, sc) in the center stitch of each shell, skipping the sc between each shell. The corner is worked similarly: (sc in next st, sc in next space) 3 times, in next st, (sc, ch 3, sc), (sc in next sp, sc in next st) 3 times.
Purchase an ad-free printable version of the COMPLETE Happily Ever Afghan pattern here!
Frequently Asked Questions
How Much Do you Need to a Border? Great Question! The amount of needed will depend on your chosen border. The best way to calculate the is to a small sample and then do some math to calculate the for the entire border. I cover this in more detail in How Much To A .
How Do You ? Or ? Or . A is one of my most favorite go-to borders and the “how” is similar if you want to work a border in or too. Think of this as 3 rules for the top/bottom; the sides; and the corners. The very most should have 3 stitches on each round. Work 1 on every other on the top and bottom of the work.
On the sides, you work stitches evenly. That can be a little confusing on the first row of the border because you might be working into the side of a larger . The best way to approach this is to work enough stitches so that the work neither ripples because there are too many or pulls because there are two few. Don’t be afraid to rip out to get it just perfect. After the first row, you simply work a into each , like the top and bottom of the work.
How Do you a ? A border may be worked in the same manner as the just described. First, decide what you will be working and then follow the directions in this post to work a more complicated or a or .
How Do You A Border on a ? A is calculated the exact same way as a full afghan border. Simply follow the directions above for the type of border you wish on your !
How Do You End a ? If you want a beautiful finish I highly recommend using an invisible join when fastening off the last in your . Then weave in the ends securely and get ready to enjoy your new afghan!
How Do You Fix A ? If you’ve ever torn an afghan, stained an afghan or wanted to repair a you might think you have to rip the whole thing out to the problem area.. and oh does that ever sound like so much work. But did you know you can actually strategically cut out and repair just the offending section of a ? When I found this Crochet-ER resource, it changed my life and I think it might change yours too! So much easier to fix an afghan than to rip it out!
Final Crochet Border Thoughts
It’s bittersweet coming to the end of the Happily Ever Afghan series of posts. From inspiration to crochet border, it’s been such a fun journey!
If you missed the other posts in this series, you can find them here:
Finally, if you love crochet lace, be sure to check out my post on crochet lace patterns for even more inspiration!
I love seeing your finished projects! If you enjoyed making this Crochet Border I’d love to see yours on Instagram, be sure to tag me @crochet365knittoo. If you are on Facebook, stop over to the Crochet 365 Knit Too Facebook page or pop over to the Crochet365KnitToo Club and share a photo! I’d love to see your work!
Looking for your pattern: how to crochet a flat braid join. It’s in Pinterest, but the link just takes me to a bunch of adds and a detected virus by Apple. How do I find this pattern?? I’d really like it. Please tell me how to find it.
Here is a link to the Flat Braid Join tutorial: http://www.crochet365knittoo.com/happily-ever-afghan-crochet-flat-braid-join/ Unfortunately what is happening on Pinterest is that people steal images and then re-direct people over to their own site where they get paid for ads. If you can send me an email at [email protected] with the URL of the pin, I will reach out to Pinterest and try to get them to take it down.
I just discovered your Happy Ever After Chart and wanted to tell you it’s just lovely. You do beautiful work.
And thank you for including the instructions on how to do a flat braid. I’ve not heard of it before. It’s the prettiest of all the ‘joins’ I’ve seen. I’m just a beginner and excited about attempting your pattern.
Thank you again for your generosity in sharing your afghan.
I am so glad you like it! Enjoy!
I love your border and I’m attempting to incorporate it into my blanket but I feel like I’m missing a step. Is there a row of sc between edging of the blocks and the row of scallops? The picture looks like there might be.
Yes, at the beginning of the post I talk about a Foundation row before actually starting the border pattern. If you scroll up, you can read all about it. It’s really important so you get the correct number of stitches on each side before starting the border.
I am having hard time coming up with the correct calculation for your border. I used the join and have 4 blocks on one side with 16 loops and then 5 blocks on the next with 16 loops. I am coming up with 144 stitches needed on the side with 4 but I have too many stitches. Any idea why I am coming up with more?
Figuring out the math for the border can be challenging. The key is to get the foundation row to have the right number of stitches. If you have TOO MANY stitches, then you need to MINUS out the extra stitches somewhere in the row (evenly spaced). If you do not have ENOUGH stitches, you need to ADD extra stitches evenly spaced in the row to get to the right number of stitches.
I find it helpful to take a break and come back with fresh eyes. You also can “wing it” and fudge a stitch in the actual border or do a bit of trial and error (and ripping out). Hopefully, though, you’ll be able to figure out the math so it works.
Such a beautiful border, Cheryl. I am just about finished knitting a prayer shawl and I would like to add this border to the ends. I don’t want to do corners and the length of the sides, just the ends. I have 57 knitted stitches… Do you have any suggestions as to how I could add your beautiful border to my project? At this point, I’m afraid I’ll probably first just “winging it!”
I would be winging it too..but I bet it will look beautiful! The border is based on the foundation row, so read through this post carefully and see if you can adapt it to fit your afghan, making stitch adjustments in that foundation row.
Beautiful pattern but I think Rounds 3 and 4 are missing. Can you help? Thank you!
The pattern is correct. After the braided join, there are single crochet and spaces around the edge of the afghan. The foundation row puts the sc around that row and sets up for the border. The border is 2 rows, starting with the row of shells and finishing with a sc round. Hope that helps make it more clear for you!
To start, the directions and photos so far for the flat braid have been awesome!
I’m having trouble understanding your calculations for the sc to start the boarder. I have 7×7 blocks. So, not counting the corners, I have 201 sc stitches:
( 2 in each loop=24), 7blocks x 24= 168, 3 large loops with 5sc =15, 3 large loops with 6=18
So, 168+15+18= 201 not 205. Where are you getting this number before I move on?
There are 5 sc in each corner. When you count the side stitches, you are ONLY excluding the very corner most stitch. That leaves 2 stitches on each side of the corner so 201 + 2 + 2 = 205. Hope that helps!
Just completed this afghan and it came out beautifully…Thank you for the pattern!