
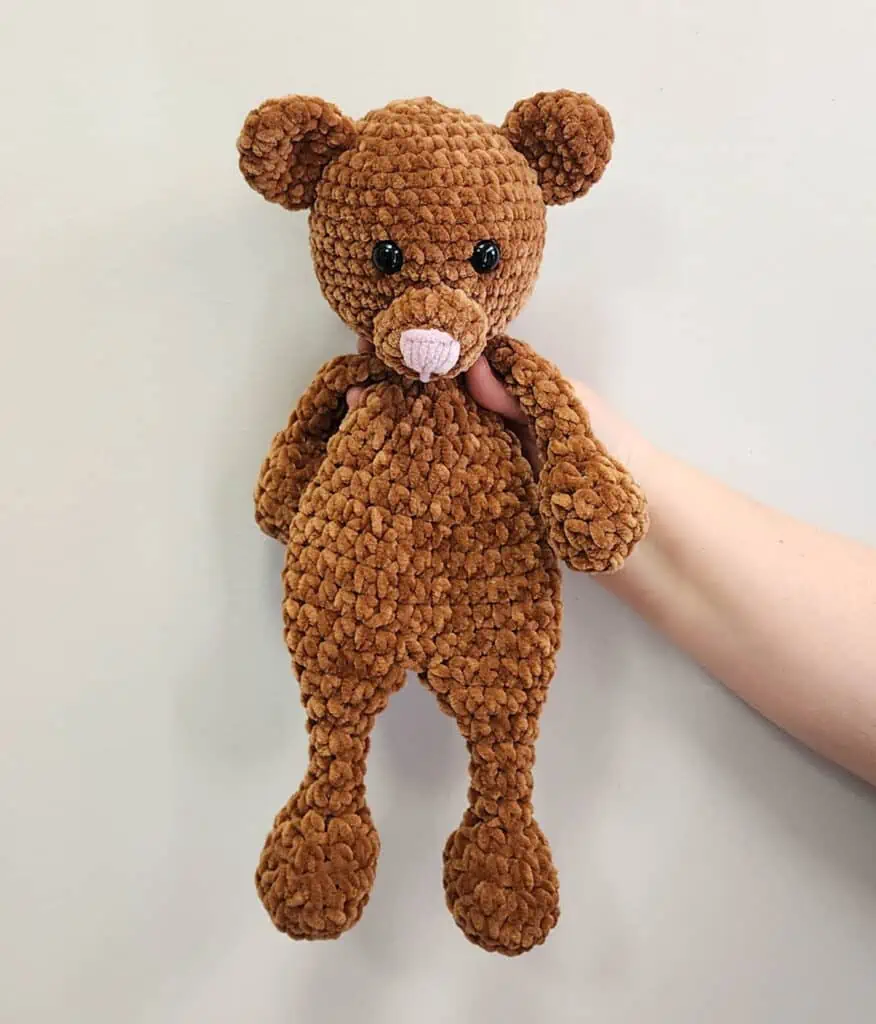
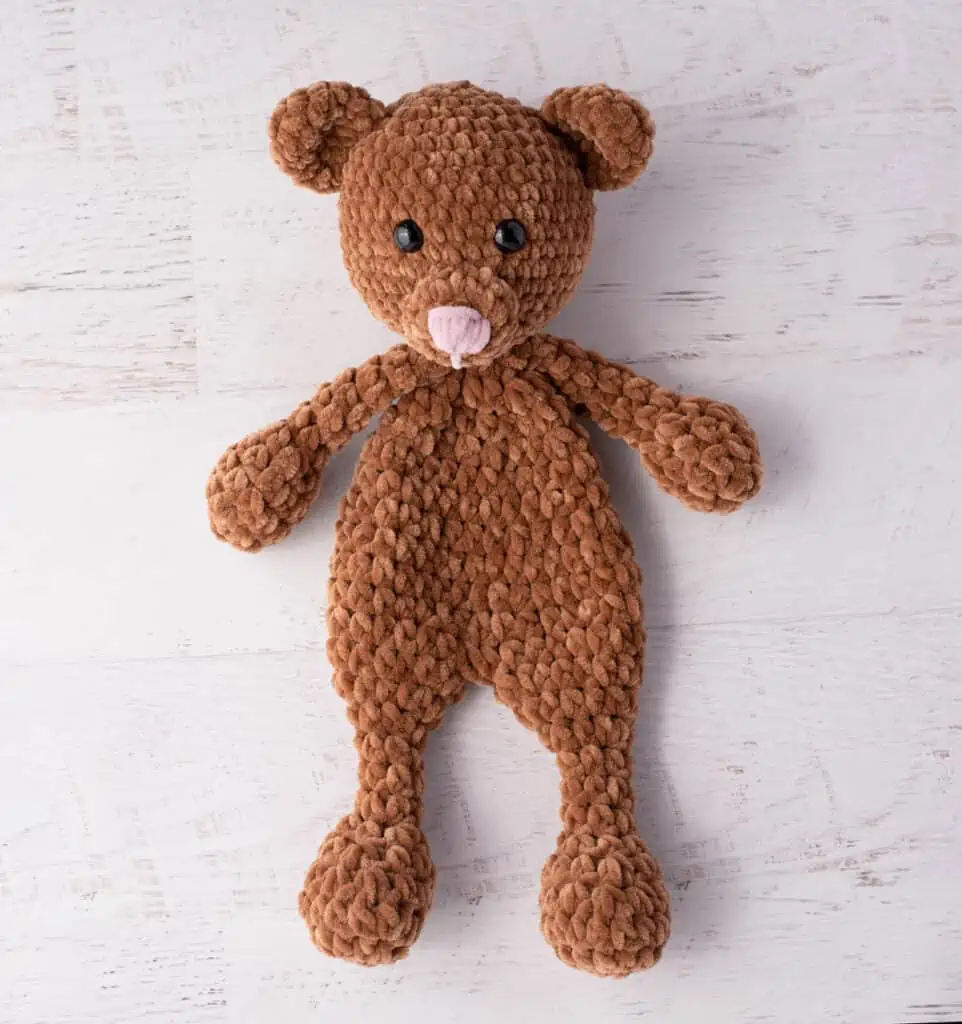
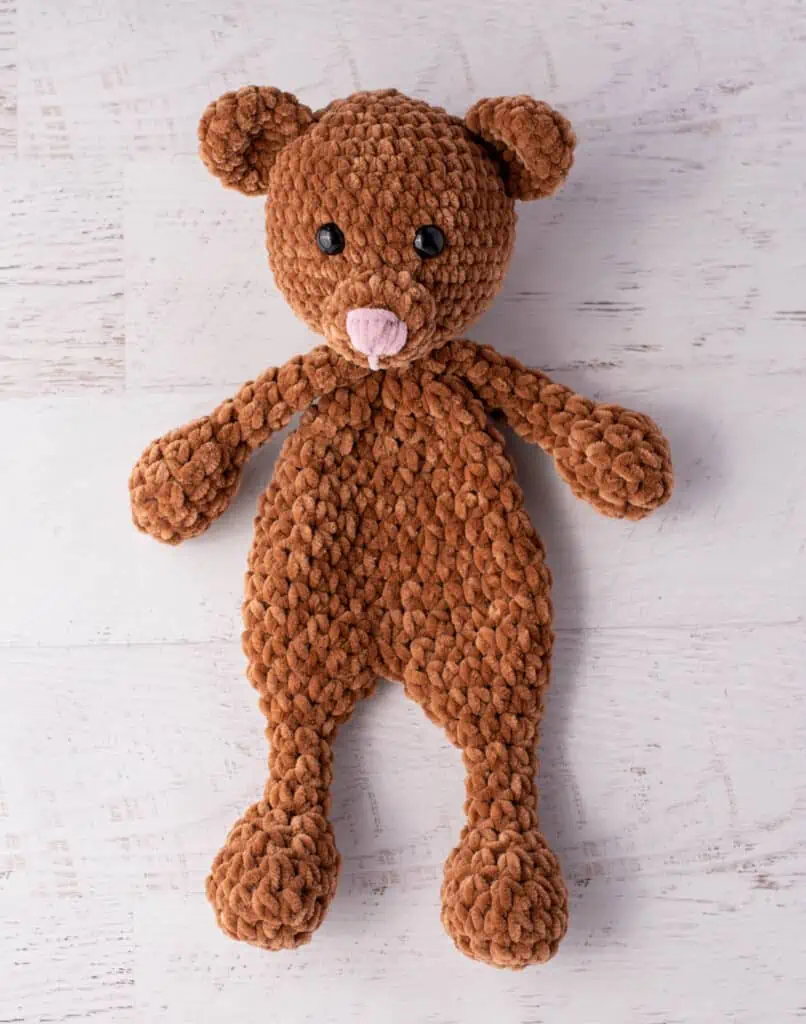
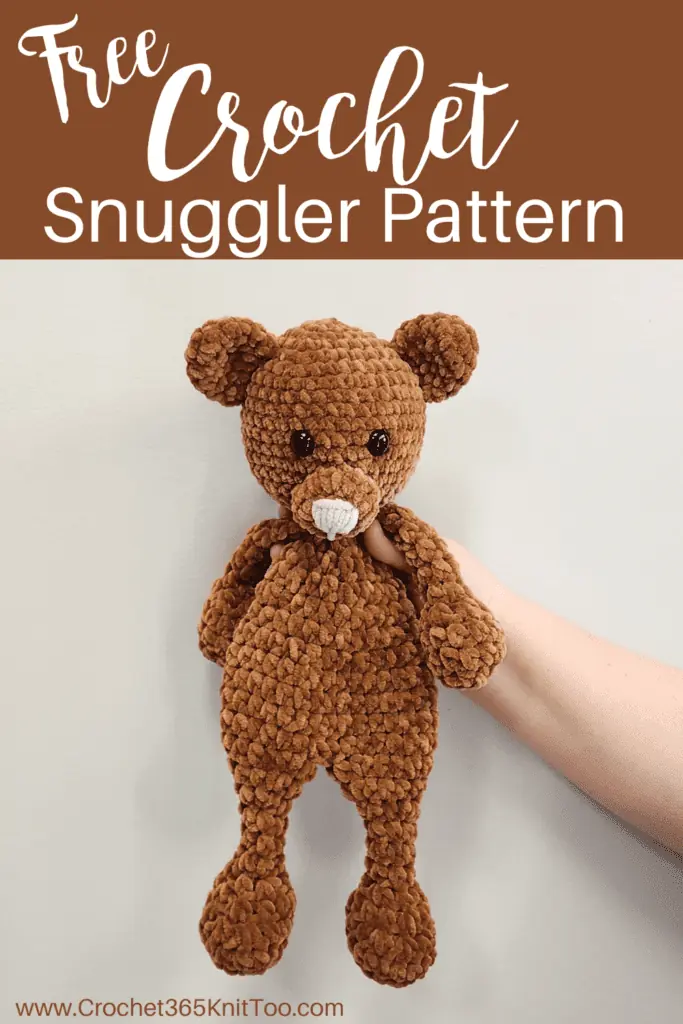
Meet Bernard: A Bear Crochet Snuggler
This post may contain referral/affiliate links. Please read my disclosure for more info.
Be still my little crochet heart because little Bernard Bear Crochet Snuggler has entered my life!
Soon to be your next-make, this sweet little guy is such a fun project!
Crochet Snugglers have entered my life along with Premier Parfait Chunky chenille yarn and I’m completely smitten.
I love the squishy goodness of this soft yarn and the fact that it’s a #6 chunky yarn and a fast project… well.. it kind of makes me swoon. In a good, totally crochet way, of course!
Bernard joins Buggy, my sweet Bunny Crochet Snuggler … if you love these guys as much as I do, you’re going to be so excited to see the rest of my snuggler series.
For awhile, I had the whole gang of snugglers hanging out on the top of my sofa and it totally made me happy every time I walked by. I can’t wait for you to meet them all. They are so darn cute! The photos don’t even do them justice!
So let’s talk details for our little Bear Crochet Snuggler!
First up.. what exactly IS a snuggler?! A crochet snuggler is part amigurumi and part lovey. Typically the head, feet and hands are stuffed, but the rest of the Snuggler remains unstuffed. This makes it fun for a little one to carry around the house while still being all snuggly.
The chenille bulky weight yarn makes for a fast project and this velvety snuggle buddy can be done in an evening or two! I’ve found that gauge changes a bit when you change chunky yarn brands, so you could try a different chunky yarn, but just know that your snuggler could turn out smaller or bigger than mine. Bernat blanket yarn, for instance, is much thicker. It’s also not as easy to work with.
I really love the Premier Parfait Chunky chenille teddy bear brown yarn I used for this design. It is so soft and velvety, but you can still see your stitches, which makes crocheting so easy and fun.
We’re using a bigger crochet hooks with this #6 yarn. We’re using two crochet hooks: the 8.0 mm larger crochet hook is used for the arms, legs and body and the smaller 6.5 mm hook is used for the head and ears.
A crochet snuggler (also called a crochet cuddler) is a great gift and a cuddly friend. Be mindful that safety eyes are not safe for an infant or toddler, though, so be sure to embroider or crochet eyes instead for very young children.
Purchase the Beautifully Formatted AD-FREE PDF DOWNLOAD
More Baby Patterns
If you love the crochet snuggler pattern, you might also like to check out these darling patterns:

Purchase an ad free version of the Bear Crochet Snuggler Pattern Here
Bear Crochet Snuggler
Here is what you will need:
- US L 11/8.00 mm crochet hook and US K 10.5/6.50 mm crochet hook (these are my absolute favorite crochet hooks I recommend to everyone!).
- Super Bulky Weight #6 yarn:
- Main: 3.5 oz, sample used Premier Parfait Chunky in Teddy Bear
- Nose: 2 yards pink, sample used Premier Parfait Chunky in Rose
- 15mm Safety Eyes (Note: if making for a baby or young child, embroider eyes instead)
- Stitch Markers to keep track of rows and to mark center top of feet
- Polyester Fiberfill
- Tapestry needle and scissors
Gauge: Using the smaller, 6.50 mm hook, my gauge is 5.5 sc to 2 inches. However, gauge is not important in this pattern. You may use other weights of yarn. Adjust hook size to fit your needs.
Note: Use a stitch marker to mark the last stitch of each round as you work, moving the stitch marker as you work each round.
Resources and tutorials you may find helpful in following this pattern: Crochet Abbreviations, US to UK Crochet Conversion Chart. Find links to stitches on the “Tutorial” menu: Getting Started will show basic stitches such as the single crochet, double crochet and chain stitch used in many patterns and Crochet Stitch Dictionary shows our growing collection of crochet stitch tutorials.
Crochet Abbreviations:
- ch = chain
- sc = single crochet
- hdc = half double crochet
- sl st = slip stitch
- st = stitch(es)
Special Stitches:
Half Double Crochet 2 Together (hdc 2 tog): I use a modified half double crochet decrease in this pattern. Complete the stitch as follows: Yarn over, insert hook into next stitch and pull up a loop, insert stitch into next stitch and pull up a loop, Yarn over and pull through all 4 loops on hook. Half double crochet decrease made.
Finished Crochet Snuggler Size
Bear Crochet Snuggler shown measures 16-1/2” from bottom of feet to top of head (excluding ears)
If you’re looking to learn how to make the best amigurumi, be sure to check out my Amigurumi: A Beginner’s Guide. It’s a massive 165 page ebook of detailed tutorials, tips and tricks (plus exclusive patterns). You’ll learn everything you can think of from the magic ring and working in continuous rounds to invisible decreases and other pro tips. .

Legs (make 2):
Using the larger (L/8.00 mm) hook, make a magic ring.
R1: 6 sc into ring (6 sts). Work in rounds
R2: *2hdc in ea st, repeat from * around (12 st)
R3: *hdc in next 3 st, 2 hdc in next st, repeat from * around (15 st)
R4: hdc in next 5 st, (hdc 2 tog) three times, hdc in last 4 st (12 st)
Note: Use an additional stitch marker to mark around the 2nd decrease (to identify the top center of the foot)
R5: *hdc in next 2 st, (hdc 2 tog) repeat from * around (9 st)
R6: *hdc in next st, (hdc 2 tog), repeat from * around (6 st)
Stuff feet only, leaving rest of leg and body unstuffed.
R7-10: hdc around (6 st)
R11: *hdc in next st, 2 hdc in next st, repeat from * around (9 st)
R12: *hdc in next 2 st, 2 hdc in next, repeat from * around (12 st)
R13: *hdc in next 3 st, 2 hdc in next st, repeat from * around (15 st)
For first leg, at end of last round, single crochet into next stitch, slip into next stitch, then fasten off, leaving a long strand for sewing.
Repeat for 2nd leg, but do not fasten off.
Body:
In the next row, the legs are crocheted together and form the bottom of the body. Position the legs so that they are in the correct position with both feet facing forward, using the stitch markers in the top center of each foot to assist in alignment. Use an additional stitch marker to mark where the two legs meet in the middle. This stitch marker holds the center stitch from each leg to each other. Make sure that you also have a stitch marker in the last stitch worked in the leg just completed. This stitch will be the last stitch worked in this row.
R1: hdc in the next stitch of the leg just worked. Continue to half double crochet in each stitch until you reach the marker holding the 2 legs together. Work a half double crochet in the next stitch (which is the stitch holding the legs together). THEN work a half double crochet in the matching stitch on the OTHER leg. You can remove the stitch marker if you’d like. Continue to half double crochet all the way around the other leg (15 stitches on that leg). You are now at the middle of the doll on the opposite side. Half double crochet in the remaining unworked stitches on the first leg worked in this row, finishing in the stitch you marked as the end of the row. Count your stitches for this row. There should be 30 stitches in the row. If you have more or less than this, take a look at the stitches worked at the joining points and see if you’ve missed or worked an extra stitch here.
R2-4: hdc around (30 st)
R5: *hdc in next 3 st, (hdc 2 tog), repeat from * around (24 st)
Pause your work and sew up the hole between the 2 legs with the fastened off yarn left from one of the legs. Weave in ends, then continue with remainder of body as follows:
R6-7: hdc around (24 st)
R8: *hdc in next 2 st, (hdc 2 tog), repeat from * around (18 st)
R9: hdc around (18 st)
R10: *hdc in next st, (hdc 2 tog), repeat from * around (12 st)
R11: (hdc 2 tog) around (6 st)
R12: working in BLO, sc around (6 st), cut long strand, weave through ends to close.
Head:
Using the smaller (K/6.5mm) hook, make a magic ring.
R1: 6 sc into ring (6 sts). Work in rounds
R2: 2 sc in ea st (12 st)
R3: *sc in next st, 2 sc in next. Repeat from * around. (18 st)
R4: *sc in next 2 st, 2 sc in next. Repeat from * around. (24 st)
R5: sc in next st, 2 sc in next *sc in next 3 st, 2 sc in next. Repeat from * around until last 2 stitches, then sc in the next 2 st. (30 st)
R6: *sc in next 4 st, 2 sc in next. Repeat from * around. (36 st)
R7-14: sc around. (36 st)
R15: *sc in next 4 st, sc next 2 st together. Repeat from * around (30 st)
R16: *sc in next 3 st, sc next 2 st together. Repeat from * around (24 st)
R17: *sc in next 2 st, sc next 2 st together. Repeat from * around (18 st)
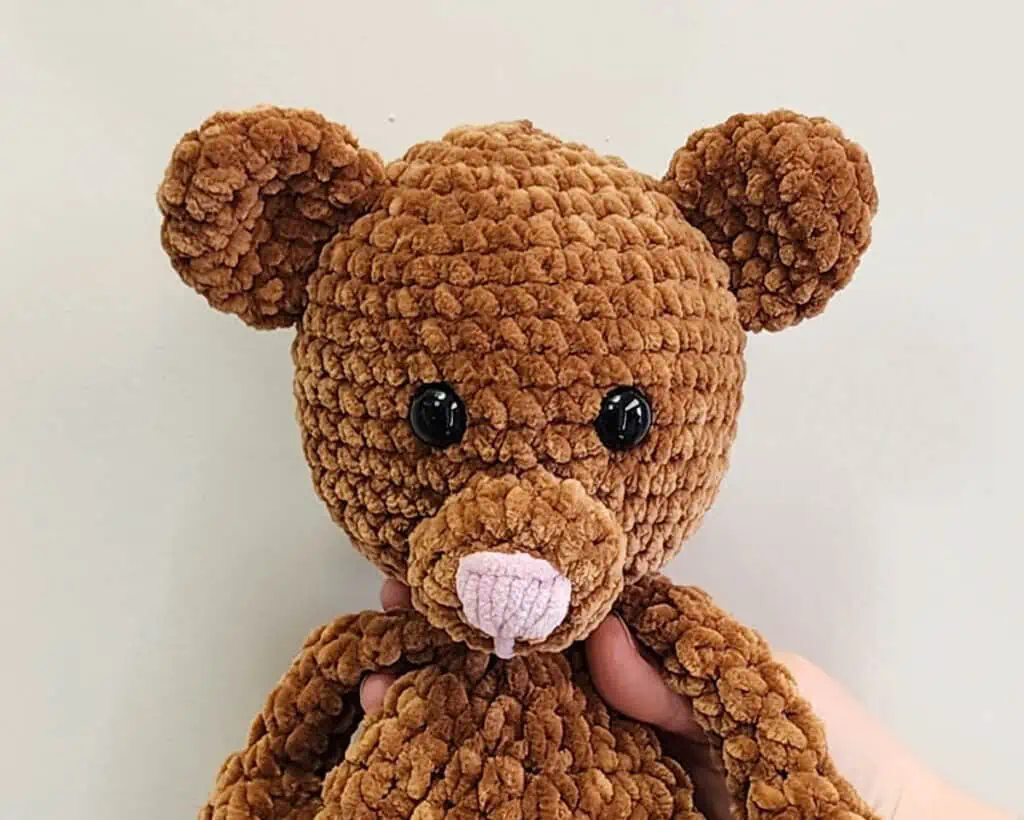
Insert safety eyes between rows 11 & 12, leaving 5 stitches in between them. Begin stuffing.
R18: *sc in next st, sc next 2 st together. Repeat from * around (12 st)
R19: *sc next 2 st together. Repeat from * around (6 st). Fasten off, leaving a long strand for finishing.
Muzzle:
Using the smaller (K/6.5mm) hook, make a magic ring.
R1: 6 sc into ring (6 sts). Work in rounds
R2: *2sc in ea st, repeat from * around (12 st)
R3: *sc in next st, 2 sc in next. Repeat from * around. (18 st)
R4: sc around (18 st).
Then sl st to next stitch and fasten off, leaving a long strand for sewing. Stuff lightly, then sew in place over rows 13-17 on the head, centering below the eyes.
Facial Features
Using a strand of pink yarn and referring to the photo to embroider the nose, working several stitches in a triangle shape, working from the center of the muzzle upward. Then outline the top of nose with a horizontal stitch and work one stitch down from the center bottom of the nose down 2 rows. Hide the starting and ending knots inside the stuffing of the head before fastening off.
Ears (Make 2):
Using the smaller (K/6.5mm) hook, make a magic ring.
R1: 6 sc into ring (6 sts). Work in rounds
R2: *2sc in ea st, repeat from * around (12 st)
R3-6: sc around (12 st)
Then sl st to next stitch and fasten off, leaving a long strand for sewing.
Arms (make 2):
Using the larger (L/8.00 mm) hook, make a magic ring.
R1: 5 sc into ring (5 sts). Work in rounds
R2: 2 hdc in ea st (10 st)
R3-4: hdc around (10 st)
R5: (hdc 2 tog) around (5 st)
R6-12: hdc around (5)
Sc in next st, sl st to next st and fasten off leaving a long strand for finishing. Stuff hand only, leaving rest of arm unstuffed.
Snuggler Assembly
Using strand of yarn from head, position on body so that head is facing the front. Attach last row of head to the free front loops from the last round of the body. Go around the head a second time, working through all layers to sew it firmly on the body. Then fasten off and weave in ends.
Flatten the top of the arms and whip stitch closed, then fasten the arms on either side of the body near the head.
Flatten the bottom of each ear and whip stitch closed. Then refer to photo and sew ears to each side of head over rounds 3-8, slightly curving the ears forward.
Purchase an ad-free printable version of the Bear Crochet Snuggler Pattern Here
Look for more crochet snuggler plushie toys patterns coming your way soon! These crochet kid patterns make an adorable gift and they are so fun to crochet you might just want to keep one for yourself too!
I love seeing your finished projects! If you enjoyed making this Crochet Snuggler Bear or any of my crochet patterns, I’d love to see yours on Instagram, be sure to tag me @crochet365knittoo. If you are on Facebook, stop over to the Crochet 365 Knit Too Facebook page or pop over to the Crochet365KnitToo Club and share a photo! I’d love to see your work!
Bernard is such a cutie! Thanks for sharing. He looks so soft and cuddly.
Snuggler Bear is just gorgeous, there’s something precious about a Teddy bear who brings comforting dreams to sleepy heads.
Aren’t you so clever to design this gem.
What size safety eyes do you recommend for this pattern?
15 mm safety eyes. I’m not sure how that got left off the materials list, but I’ve added it back on! Thanks for letting me know!
I could not make a magic ring with this yarn. The tail would not pull and the yarn pulled off the white string holding it together! I tried several times. Am working with a different yarn now, but sad!
It sounds like you might need to make your stitches looser on your magic ring. This particular yarn does take a bit of practice to get the hang of!
can’t wait to do this bear! have not gone from bottom up yet. curious to work this up.
Cheryl, hoping you can help. I’ve crocheted the body, arms and head and have finished the skein. The head seems too large. Before I attach it, can you let me know the approximate length it should be? I don’t want to scrap the project. Thank you.
Confirm that you worked the head in single crochet (and not hdc) and with the smaller size hook. A few crocheters have gotten so into the rhythm of the body and limbs that they just look right past the instructions to change hook size and work single crochet for the head. Hopefully that points you in the right direction.
Pretty new to reading patterns, I think I messed up his head on my first try so I just want to make sure – the head portion is starting from the top to bottom correct? Thanks for this guy, it has been a good learning process for me with all the pieces he has!
Correct. The head starts at the top and ends with an open end. I describe how to sew it to the body in the assembly directions.
is this American or Australian pattern🌷
All my patterns are written in US terminology.