
Great Lakes Messy Bun Hat
This post may contain referral/affiliate links. Please read my disclosure for more info.
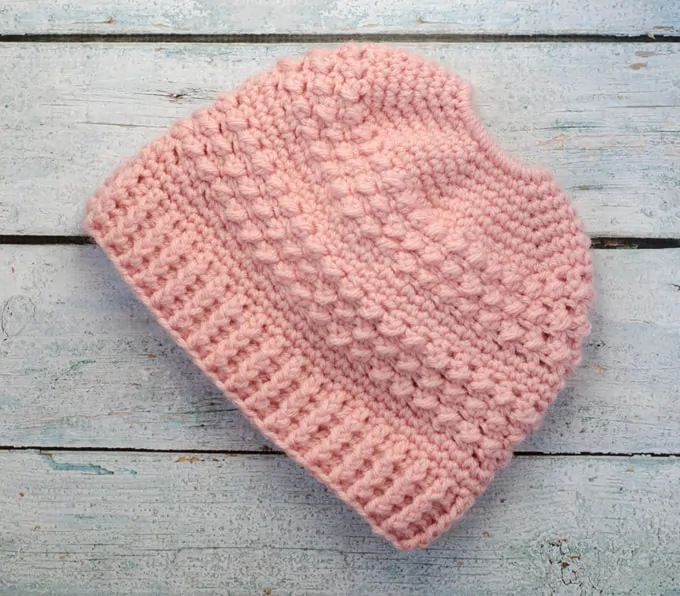
So we had the Great Lakes Beanie and the Great Lakes Slouch… and who thought we were done with Great Lakes projects?! Well.. a reader emailed me to ask about a Great Lakes Messy Bun Hat..and well..I couldn’t resist! I love the texture of the bumps on the Great Lakes hats, don’t you? Texture takes your crochet up a notch. And here it is achieved through a simple combination of basic stitches! The hats are a joy to wear and fun to make–what’s not to love about that, right?
I had this delicious pink Vanna’s Choice yarn leftover from making the Daisy Baby Afghan and I thought it would be just the thing! This is my first Messy Bun Hat..and you know what? They are super easy. You start with a hair tie like this: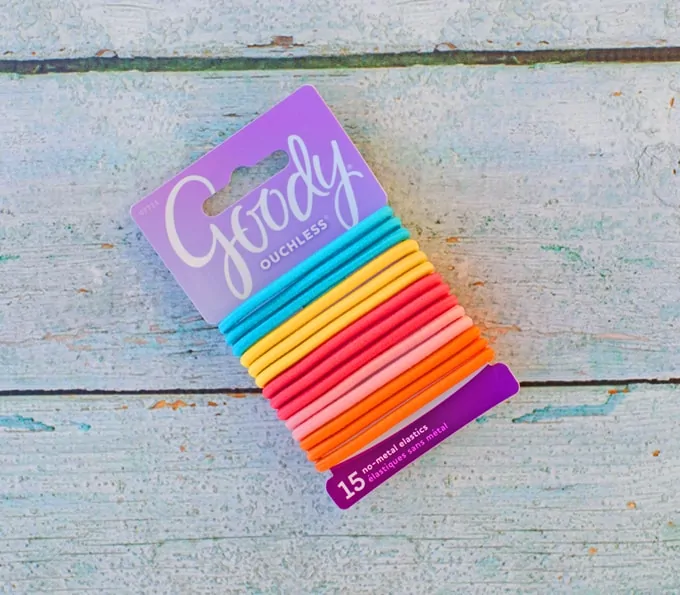 Then crochet a round of about 30 or so stitches on it. And then, just continue on with the hat. Let’s pause for a moment to check out these hair ties. I thought this photo might be helpful. You know..in case you’ve had short hair for the last decade or two and get a bit stumped when you see the assortment of hair ties available. Now you know.
Notice that there is a light pink one missing…one that just so happens to almost exactly match the color of the pink yarn. I love it when a plan comes together like that! But really, the color of the hair tie is covered up by the stitches for the most part, so just a color that blends will do.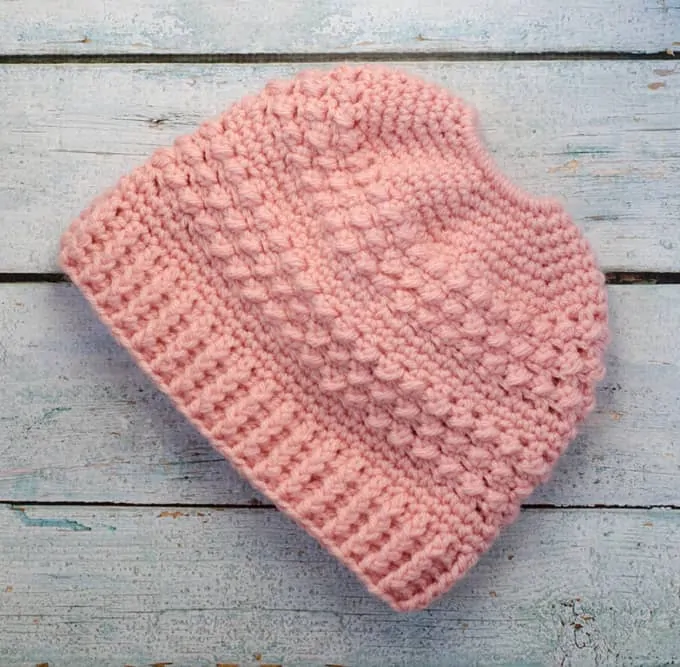
Great Lakes Messy Bun Hat Pattern
Purchase an ad-free printable version of this pattern
Here is what you will need:
- US H8/5 mm crochet hook (Did you know you can purchase my go-to hooks on Amazon?)
- 4 oz Worsted weight yarn. I used Lion Brand Wool-Ease in pink
- tapestry needle and scissors
Fits a medium sized adult. Finished size: About 20″ around by 8″ long.
Resources and tutorials you may find helpful in following this pattern: Crochet Abbreviations, US to UK Crochet Conversion Chart. Find links to stitches on the “Tutorial” menu: Getting Started will show basic stitches used in many patterns and Crochet Stitch Dictionary shows our growing collection of crochet stitch tutorials.
Attach yarn with a slip stitch to the hair tie.
R1: ch1 and single crochet around. Do not join to first stitch; you will be working in the round. (30 sc)
R2: Starting in the 1st sc of the last round, *sc in next 4 st, 2 sc in next st, repeat from * around (36 st)
R3: *sc in next 5 st, 2 sc in next st, repeat from * around (42 st)
R4: *sc in next 6 st, 2 sc in next st, repeat from * around (48 st)
R5: *sc in next 7 st, 2 sc in next st, repeat from * around (54 st)
R6: *sc in next 8 st, 2 sc in next, repeat from * around (60 st)
R7: *sc in next 4 st, 2 sc in next, repeat from * around (72 st)
Note: in the next section, work rows by starting and stopping each round, joining with a sl st to the start of each round.
R8: Slip stitch to next st. ch1, sc in same st, ch 1, skip next st, *sc in next st, ch 1, skip next st*, repeat * to * around. Sl st to first sc at end of round.
R9: TURN WORK so wrong side of hat is now facing you. *Sl st in next space, hdc in same space*. Repeat * to * around. At the end of the round, sl st to 1st sl st. This will make bumps on the right side. At the end of the row, there should be 36 bumps.
R10: TURN WORK so right side of hat is now facing. Ch 1, sc in same st as joining, ch 1, skip next st, *sc in next st, ch 1 , skip next st* Repeat * to * around.
R11-14: repeat rows 9 & 10 twice
R15: Ch 1, sc in same st as joining, *sc in next space, sc in next st*, repeat around working a sc in ea st and space around. (72 st)
R16: On right side of work, ch1, sc in same space as joining. sc around (72 st)
R17-25: Repeat rows 8-16 once
Now continue to work the brim as follows:
R26: ch 2, hdc around (72 st), join.
R27-30: ch 3, *front post hdc in next st, back post hdc in next st* repeat * to * around.
Fasten off and weave in ends.
Purchase an ad-free printable version of this pattern
Love the Great Lakes Messy Bun Hat? Be sure to check out the Great Lakes Beanie and Great Lakes Slouch!
I love seeing your finished projects! If you enjoyed making one of my patterns I’d love to see yours on Instagram, be sure to tag me @crochet365knittoo. If you are on Facebook, stop over to the Crochet 365 Knit Too Facebook page or pop over to the Crochet365KnitToo Club and share a photo! I’d love to see your work!
Beautiful
Having trouble with row 10. It doesn’t say to join at the end, so when you go back to do row 9 there is a weird gap, and I’m not clear where to do the slip stitch at the beginning of row 9. Then when you move to row 15, it doesn’t say to turn your work, and the row before has no join. I’m really struggling with the row 9-14 section
If you refer back to the note before row 8, it says that this section is worked in joined rows by ending each row by joining with a slip stitch to the start of the round. So yes, that row IS joined. This is one of my early designs and I can see how that could be a bit confusing. I will try to do some re-wording the next time I do a revision to the pattern.
Row 7 is 66 stitches doing (4 sc, inc) around. Is it supposed to be a different increase?
Row 7 is written correctly. Row 6 has 60 stitches. In Row 7 you are increasing in every 5th stitch which adds 12 stitches to the row = 72 stitches at the end of row 7.
Lion Brand Wool Ease is a bit thinner yarn so it may work up a little tighter than a different type of yarn. If you find they are too LOOSE on your head, use a smaller hook size. That will make the hat tighter on your head. Because the messy bun starts out by working over a hair tie, it might look a little more square than a regular hat. I hope that helps.
Is there a variation of the great lakes patterns for say, an 8year old? I’ve made numerous for adults, but I am terrible at redoing a pattern to make it smaller.
That’s a good idea for a future design! 🙂 For now though, you could stop the increase rounds sooner and maybe leave out a row or two here and there until the ribbing. The texture is in a multiple of 2, so as long as the number of stitches in the row are divisible by 2, the pattern will work.
Thank you. I figured out my yarn was a 6oz instead of 4 oz. I took 4 stitches out and did 26 instead of 30 for my third hat, and it came out great. Thank you for tour suggestion of love your pattern and will try it again doing that.
Great job adjusting your gauge to work the pattern!
I also want to make this in children’s sizes.. for a 7 year old and a 10 year old. I think the 12.15 and 17 year olds have adult size heads…Oh and a 5 year old also.and a 1 year old
It sounds like your hook is going to be busy!! So glad you like the pattern!
I guess I’m not familiar with some girl things as I have boys. What is a the hair tie you are referring to in the beginning of the instructions?
Love the pattern for gifts.
If you scroll up, there is a photo of the exact ties I used near the top of the post.
I’m a newby and on round 9, but confused (which is prettying normal for me). Am I placing the he. In the ch spaces from the previous round, or into the top loop spaces (I’m not sure if that makes sense). Thanks, this pattern is beautiful, just hoping I can get it done for Christmas! ?
The space is the space created by the ch in the previous row, so insert your hook right into that space created by the chain, enclosing the actual chain into your new stitch. Hope that helps.
I’m fairly new to crocheting, so your patience is appreciated! On row 9, when you say to turn the work so that the wrong side is facing you…should the inside, or the outside of the hat be facing me?
When you turn the work to the work with the wrong side facing you, the “wrong” side is considered the “inside”. This keeps the “bumps” on the outside (or right side) of the work. I hope that helps.
To adjust for not using a hair tie, could I just chain 31, then skip the first chain stitch, single crochet 30 around, and then slip stitch the ends together? I want to make sure I don’t make the opening too big/small. I love the look of this hat!
I have found on other hats I’ve made that the hair tie makes it hard to get the opening around my bun without wrecking it.
Thank you for your help!
That is not something I have tried, but I think it makes sense and it could work. You could always work a few rows and try it on and see what you think.
Hi Cheryl,
I have a question about R9. When it says slip stitch in next space. Is that the sc from the previous row? Then I do the hdc in the ch1 space from previous row?
This is a beautiful hat.
The chain one of row 8 creates a space in the following row and you work the slip stitch and hdc in the space created by the chain (so put your hook into the space created by the chain and work the slip stitch and hdc right over that chain). Hope that helps
Hi Cheryl,
I have crocheted 7 rows and have 72 stitches. Row 8 would appear to also have 72 stiches. My question, how will I end up with 36 bumps without skipping a stitch? I must be missing something. Help!
In row 8 you are making spaces by chaining and skipping every other stitch. In row 9 you work the hdc and sl stitches which create the 36 bumps.
In working SC instead of hdc this is worked up at around 6 inches long for me. Way too short for an adult women. What have I done wrong? I worked it up exactly as the purchased pattern using worsted wt “I love this yarn” and an H hook. Thanks.
The hat should be about 20″ around and 8″ tall. If the entire hat is too small (including the part that should measure 20″ around), then you should try again with a larger hook size. Gauge can change from person to person, hook to hook and yarn to yarn. All those things can affect gauge. If only the height is too small (and it measures 20″ around), carefully go back over the pattern. Some rows have sc in the row and other rows have hdc (which is taller). Or you might have missed a repeat section. If you still are having trouble, you could also adjust by adding rows before starting the textured portion or after or make the ribbing longer. Hope that helps.
Thank you
I had the same problem. I followed this pattern exactly the way it was written and when I was done and tried it on – it was waaaay too short.
Is the hat 20″ around? It’s possible you are working to a smaller gauge. You can go up a hook size. Or simply add more rows either in the body or the ribbing to get it to a length you prefer.
If making one for a 3 year old, how many sc would you start with in the 1st round? 20? And if making it bigger would you increase your starting stitches by 2?
I have not worked out the math for other sizes… you could experiment with stitch count or maybe even find a smaller elastic band to start. Hope that helps!
Thank you so much for this pattern. It is exactly what I was looking for for my friend. She is going to love it. The hat was easy to make and pattern well written. This thanks again.
Thank you so much for this pattern. It is exactly what I was looking for for my friend. She is going to love it. The hat was easy to make and pattern well written. Thanks again.
I don’t understand row 9. It doesn’t say to skip the sc and then work stitches in ch 1 space. I don’t see another way to do it if I don’t skip the sc.
The last thing you do in row 8 (the previous round) is to chain 1 and then slip stitch to the starting stitch. Then you turn. The ch 1 from the prior row makes the space that is referenced (in which you work a slip stitch and a hdc). Hope that helps clarify.