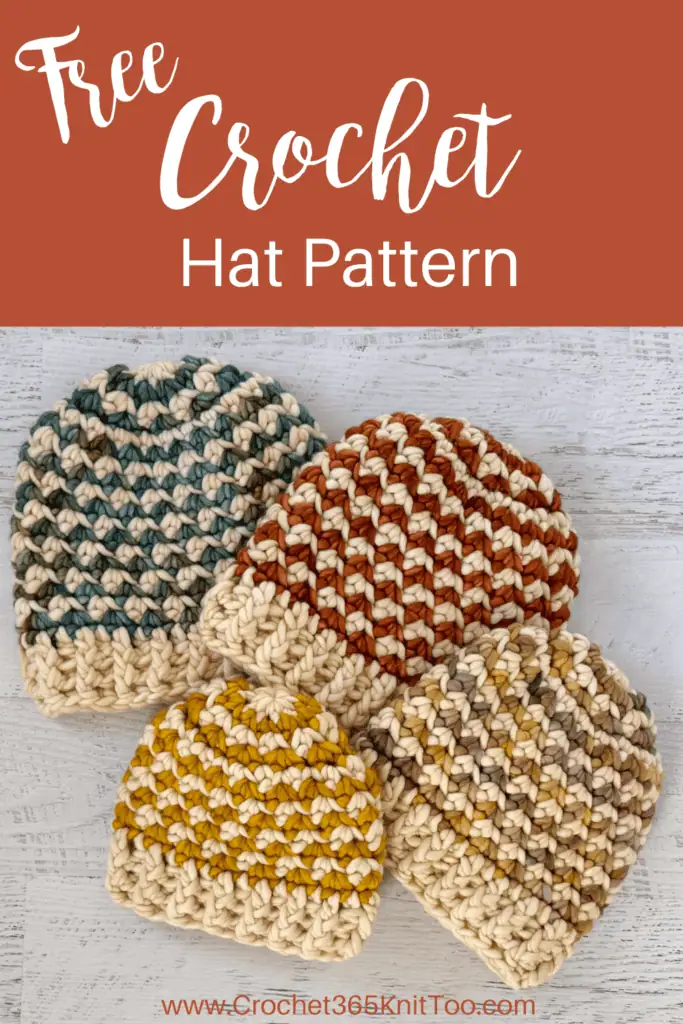
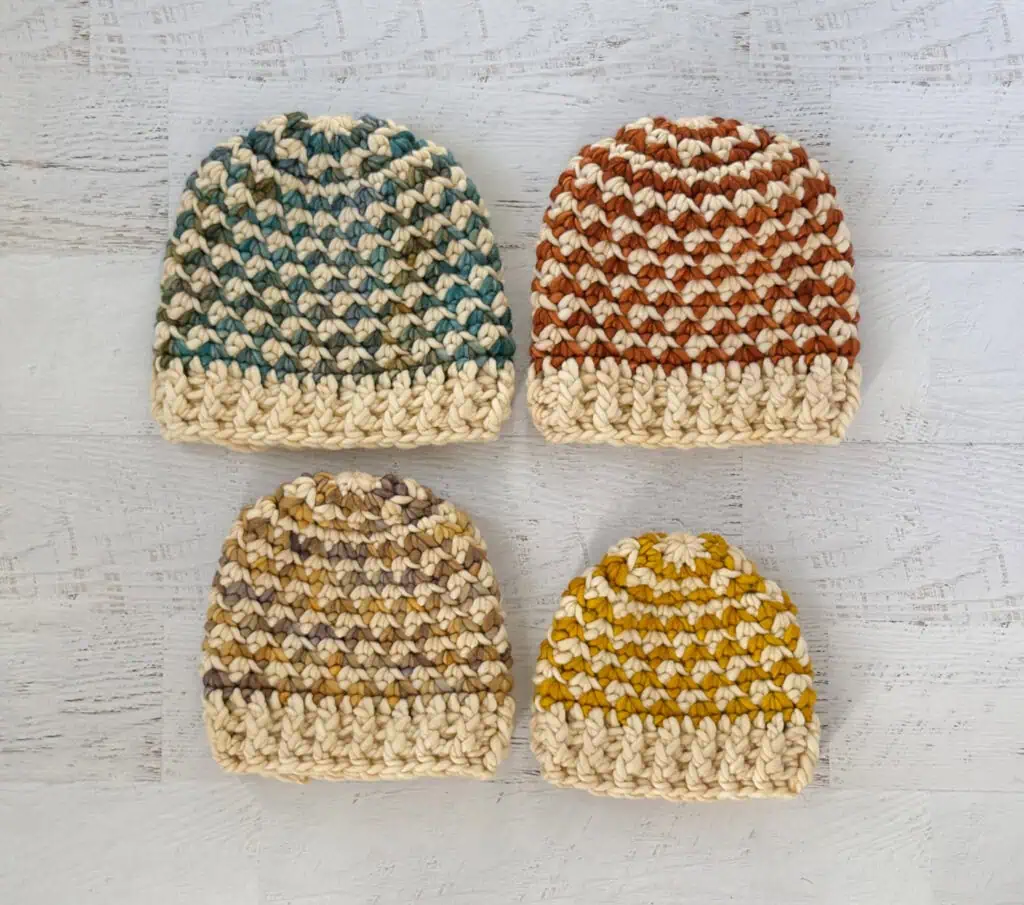
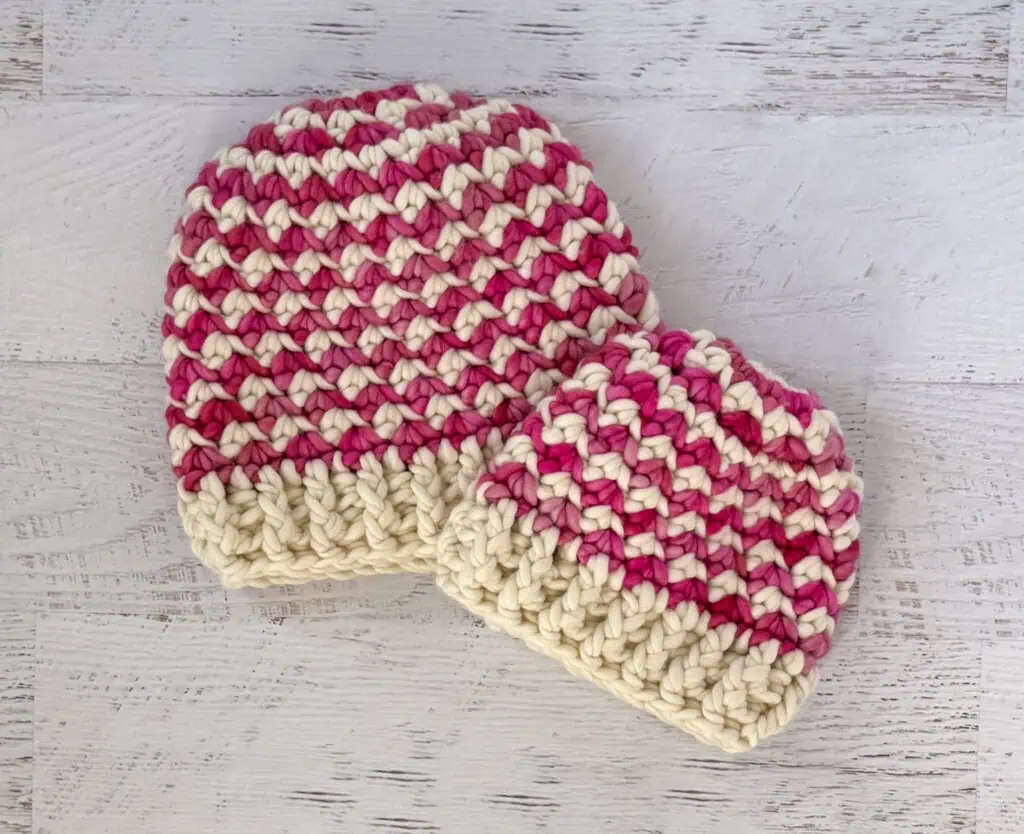
Superior Ridge Beanie – Waistcoat Stitch Crochet Hat
This post may contain referral/affiliate links. Please read my disclosure for more info.
There’s just something about a crochet waistcoat stitch hat that makes you stop and stare — and the Superior Ridge Beanie is exactly that kind of showstopper.
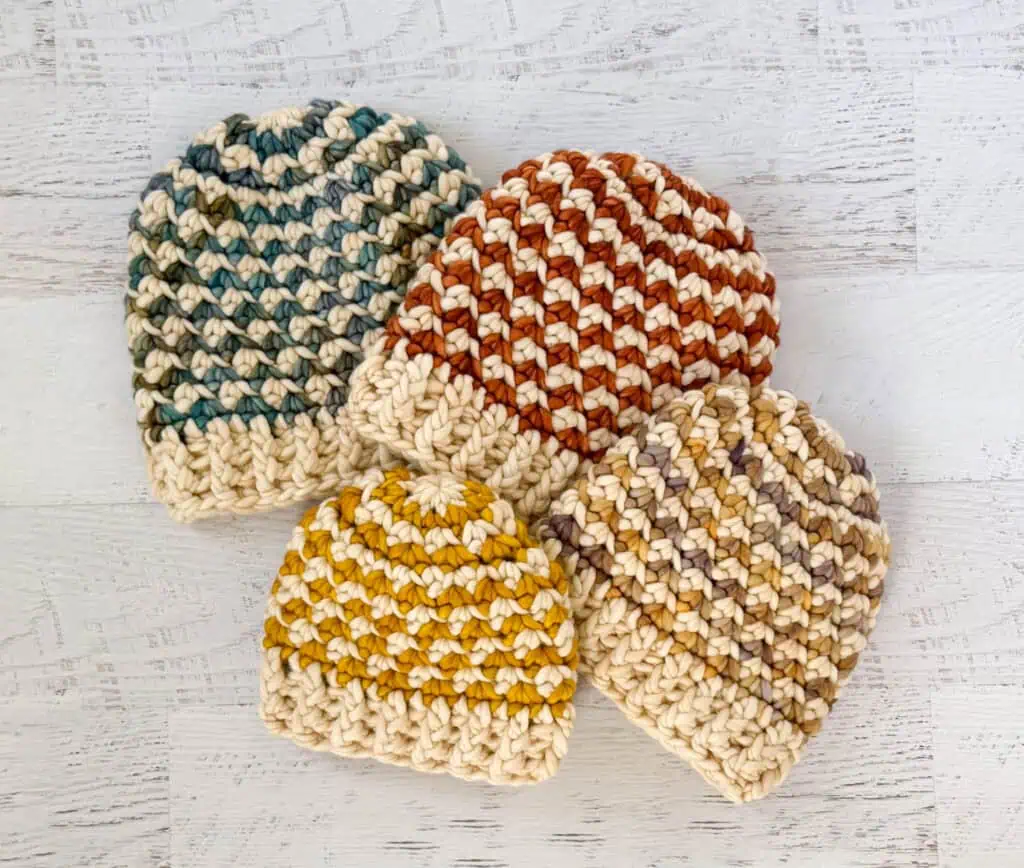
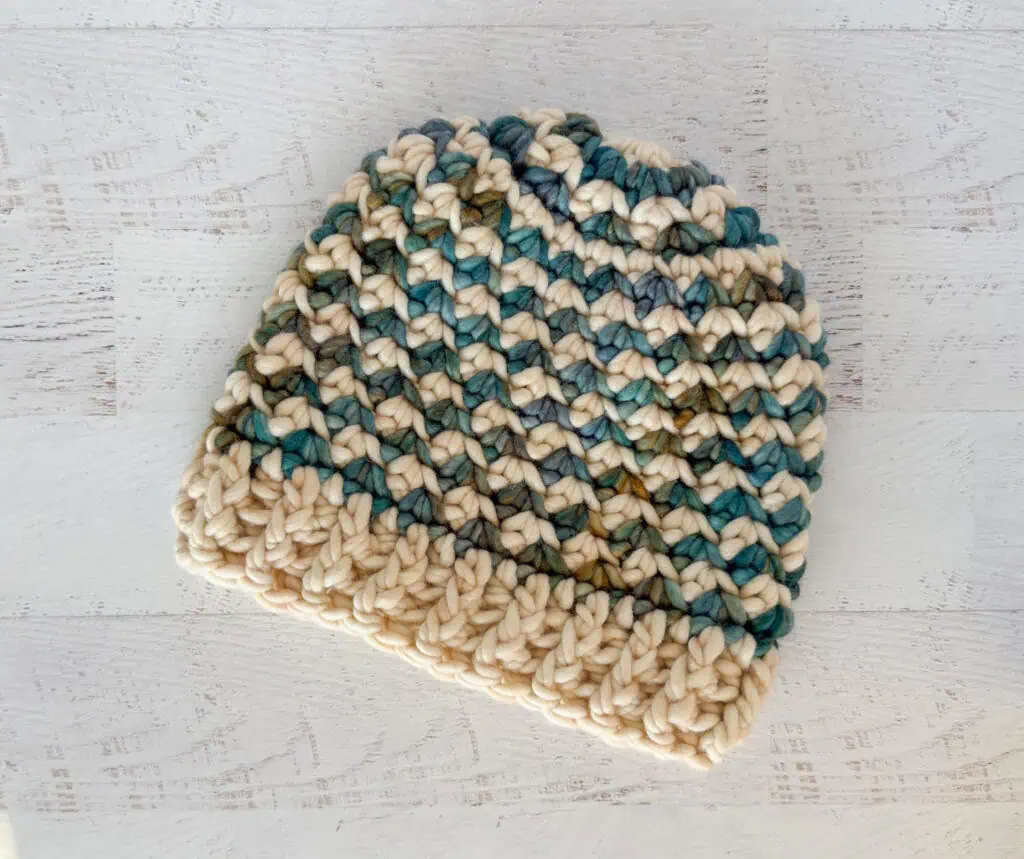
This beauty is worked from the top down in bold, confident stripes, using the gorgeous center single crochet stitch (aka. waistcoat stitch) for that irresistible knit-look texture. It’s one of those stitches that makes people lean in and say, “Wait… you crocheted that?” And yes. Yes, you did.
The Superior Ridge Beanie is warm. Like really warm. We’re talking thick, high-quality wool yarn that feels substantial in your hands and cozy against your ears. It works up surprisingly fast (always a win), but the finished result? It looks like something you’d find in a little boutique tucked along a lakeshore town — the kind of hat that costs more because it’s worth more.
This isn’t your everyday throw-on-and-go beanie. It’s a statement hat. The kind you reach for when the wind is biting and you still want to look pulled together. The kind that feels strong and beautiful all at once.
I named it the Superior Ridge Beanie after Lake Superior in Michigan’s Upper Peninsula — a place that’s both breathtaking and mighty. And this hat carries that same spirit: bold, beautiful, and not to be underestimated.
We love our Upper Peninsula. One of our favorite guilty pleasures is to pack up the car and the cooler and head north. The moment we drive across the Mackinac Bridge, everything changes. The trees grow denser. The towns are fewer and farther between. You’re surrounded by nature, never quite sure what you’ll see next.
There are countless waterfalls, off-the-beaten-path trails, and miles of densely forested landscape. When you pull over and step out of the car, you take that deep breath in — the kind that makes you feel fully alive as the everyday tension quietly slips away.
And when you go as far north as you can, you reach Lake Superior. Glorious. Magnificent. It’s the largest freshwater lake by surface area in the world, and it feels endless. The Pictured Rocks shoreline rises in dramatic color and stone, carved by wind and water over time.
But Lake Superior isn’t only beautiful. It’s powerful. Its waters have taken ships. Its winters are cold and relentless. The U.P. doesn’t pretend to be gentle.
And so this hat.
Strong. Substantial. Beautiful.
The bold ridges echo rocky shorelines. The dense waistcoat stitch stands firm against the wind. The thick wool yarn doesn’t mess around. This is the hat you pull on when winter means business.
It may cost a little more to make — that quality wool always does — but it feels intentional. Thoughtful. Worth it. Just like a trip north.
Let’s talk details:
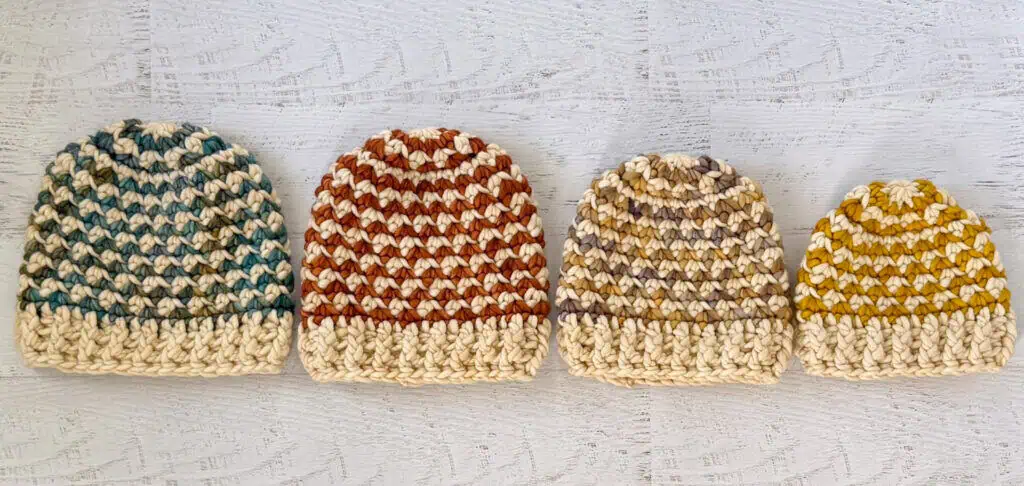
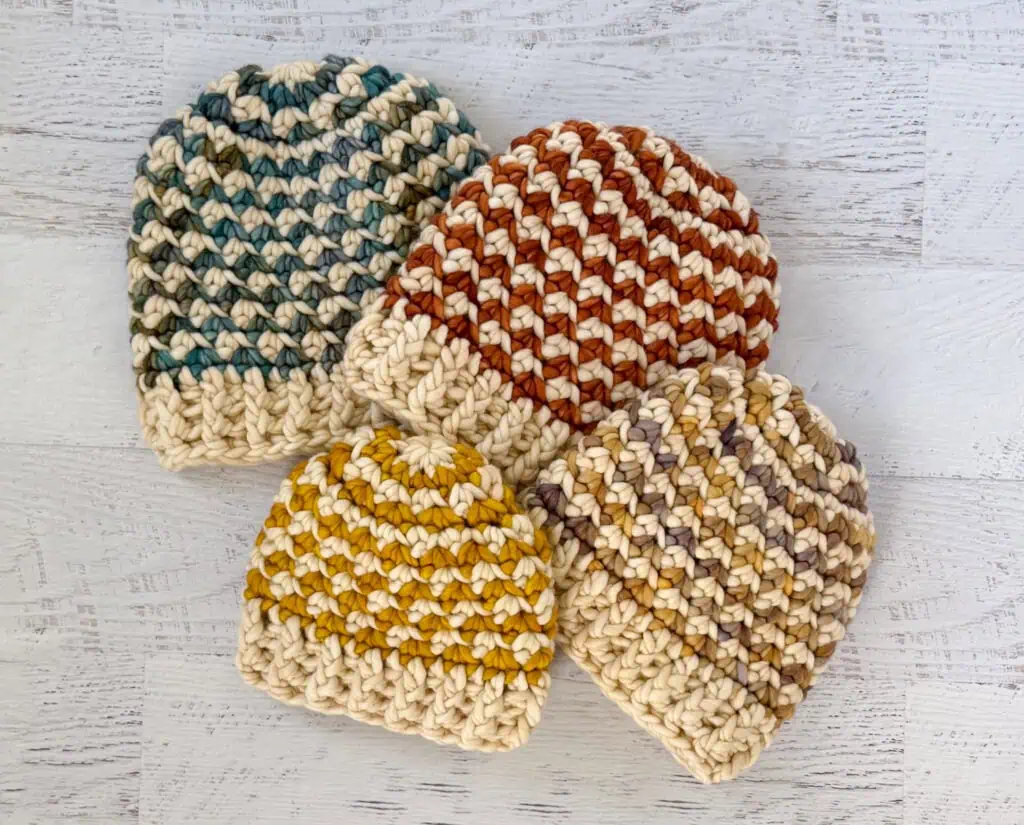
Like my Basically Brilliant Beanie, this pattern uses Malabrigo Rasta yarn which is a size 6 super bulky weight yarn in a soft, merino wool. Pick one color as a neutral (Ivory and Natural are my favorites) and then one contrast color. Most of the colorways feature subtle color transitions whether that is just a deepening or lightening of the same hue or a bit of a variegation.
Seriously I could look at this yarn forever. It is so beautiful.
The hat mostly features a Center Single Crochet Stitch which is also known as Waistcoat Stitch. This knit-look stitch hat is worked top down, starting at the crown. To keep the striped look (and make the initial increases easier), some of the stitches at the crown are in a regular single crochet stitch. And then we finish it all off by switching to a smaller hook for a few rounds of post stitch ribbing.
Purchase the Beautifully Formatted AD-FREE PDF DOWNLOAD
How to Center Single Crochet (aka Waistcoat Stitch)
Center single crochet is a single crochet stitch worked in a different location. A traditional single crochet is worked in the top of the stitch.
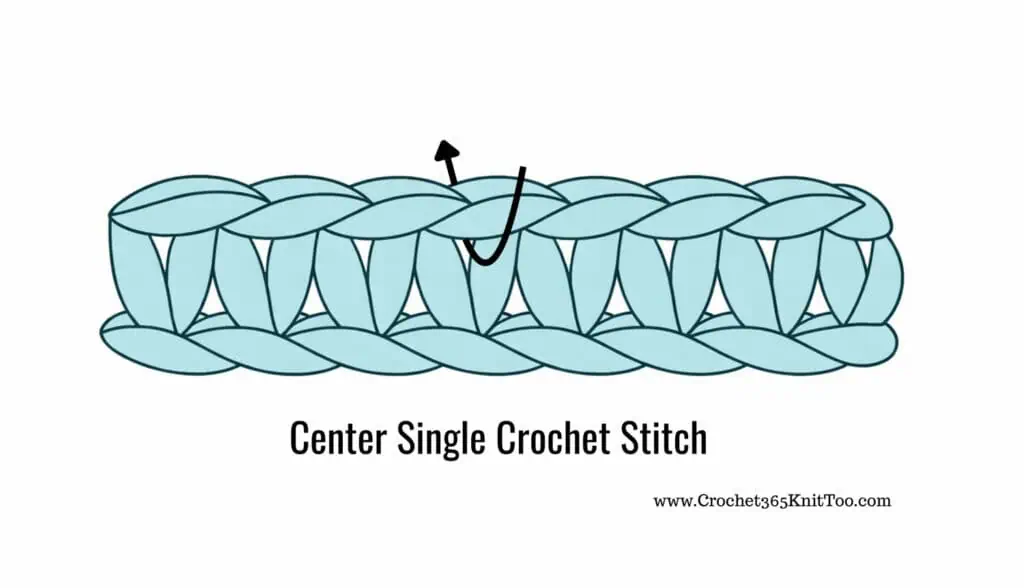
A center single crochet (CSC) is worked between the two “legs” that form the single crochet stitch. This stitch is also known as “waistcoat stitch”, “knit stitch” and “split single crochet stitch”. I use the term “center single crochet” since it best describes where the hook is placed.
Work the center single crochet stitch a bit looser than normal stitches. This will make it easier to insert your hook on the next round.
Let’s dive into the pattern.
Superior Ridge Beanie
Materials
- Malabrigo Rasta, size 6 super bulky weight, 100% merino wool, 90yds/82m per 5.29oz/150g skein. 1 skein MAIN and 1 skein CONTRAST needed for each hat, 4 – 6.5 oz in total used per hat:
- Main: 704 Ivory or 063 Natural
- Contrast Color:
- 190 Draco (green variegated)
- 142 Caramel (rust)
- 861 Laguna Negra (brown variegated)
- 035 Frank Ochre (gold)
- 057 English Rose (pink)
- US L11/8 mm and N13/10mm crochet hooks
- Stitch markers (helpful but not required)
- Tapestry needle and scissors
Resources and tutorials you may find helpful in following this pattern: Crochet Abbreviations, US to UK Crochet Conversion Chart. Find links to stitches on the “Tutorial” menu: Getting Started will show basic stitches used in many patterns and Crochet Stitch Dictionary shows our growing collection of crochet stitch tutorials.
Gauge:
My gauge is approximately 8 st and 10 rows to 4 inches.
Resources and crochet tutorials you may find helpful in following this pattern: Crochet Abbreviations, US to UK Crochet Conversion Chart. Find links to stitches and basic crochet skills on the “Tutorial” menu: Getting Started will show basic stitches such as the slip stitch, single crochet, double crochet stitch and chain stitch used in many patterns and Crochet Stitch Dictionary shows our growing collection of crochet stitch tutorials.
Crochet Abbreviations:
- ch(s) = chain(s)
- CSC = center single crochet (waistcoat stitch)
- dc = double crochet
- BPDC = back post double crochet
- FPDC = front post double crochet
- sl st = slip stitch
- st = stitch(es)
Special Stitch:
CSC = center single crochet (described above)
Finished Hat Size
Sizes listed as Adult (toddler, child, teen)
Circumference 20 (14.5, 17, 18.5)” around.
Height 8.5 (7, 7.5, 8.5)” tall
How to Crochet a Hat
Hats are worked top down starting at the top using the larger 10 mm hook. The increase rounds use a combination of single crochet stitches and center single crochet stitches; read carefully to ensure you are working the correct stitch. Once the increases are complete, the hat is worked in center single crochet stitches. The ribbing is worked in double crochet post stitches using the smaller 8 mm hook.
Hat (Adult)
Using a 10mm hook, make a magic ring
R1: With MAIN, ch 1 and work 10 sc in the ring, changing to CONTRAST in last st. Do not join; work in continuous rounds until brim. (10 st)
R2: With CONTRAST, 2sc in ea st around, changing to MAIN in last st. (20 st)
R3: With MAIN, *skip the next st, work 2 csc in next. Repeat from * around, changing to CONTRAST in last st. (20 st)
R4: With CONTRAST, *skip the next st, work 2 csc in next. Repeat from * around, changing to MAIN in last st. (20 st)
R5: With MAIN, 2sc in ea st around, changing to CONTRAST in last st. (40 st)
R6: With CONTRAST, *skip the next st, work 2 csc in next. Repeat from * around, changing to MAIN in last st. (40 st)
R7: With MAIN, *skip the next st, work 2 csc in next. Repeat from * around, changing to CONTRAST in last st. (40 st)
R8-17: Repeat R6 & 7 (5) times
R18: Repeat R6
R19: With MAIN slip stitch to next stitch and ch 3 (this counts as 1st dc here and throughout), dc in ea st around. At end of round, join to top of starting stitch. (40 st)
Change to 8 mm hook
R20-21: Ch 3 (counts as dc), *FPDC in next st, BPDC in next st* repeat * to * around. At end of round, join to top of starting stitch. (40 st)
Fasten off and weave in ends.
Hat (Toddler)
Using a 10mm hook, make a magic ring
R1: With MAIN, ch 1 and work 10 sc in the ring, changing to CONTRAST in last st. Do not join; work in continuous rounds until brim. (10 st)
R2: With CONTRAST, 2sc in ea st around, changing to MAIN in last st. (20 st)
R3: With MAIN, *skip the next st, work 2 csc in next. Repeat from * around, changing to CONTRAST in last st. (20 st)
R4: With CONTRAST, *skip the next st, work 2 csc in next. Repeat from * around, changing to MAIN in last st. (20 st)
R5: With MAIN, * 4 times, then work 2 sc in each of the next 2 st. Repeat from * once. (32 st)
R6: With CONTRAST, *skip the next st, work 2 csc in next. Repeat from * around, changing to MAIN in last st. (32 st)
R7: With MAIN, *skip the next st, work 2 csc in next. Repeat from * around, changing to CONTRAST in last st. (32 st)
R8-11: Repeat R6 & 7 (2) times
R12: Repeat R6
R13: With MAIN, sl st to next stitch and ch 3 (this counts as 1st dc here and throughout), dc in ea st around. At end of round, join to top of starting stitch. (32 st)
Change to 8 mm hook
R14-15: Ch 3 (counts as dc), *FPDC in next st, BPDC in next st* repeat * to * around. At end of round, join to top of starting stitch. (32 st)
Fasten off and weave in ends.
Hat (Child)
Using a 10mm hook, make a magic ring
R1: With MAIN, ch 1 and work 9 sc in the ring, changing to CONTRAST in last st. Do not join; work in continuous rounds until brim. (9 st)
R2: With CONTRAST, 2sc in ea st around, changing to MAIN in last st. (18 st)
R3: With MAIN, *skip the next st, work 2 csc in next. Repeat from * around, changing to CONTRAST in last st. (18st)
R4: With CONTRAST, *skip the next st, work 2 csc in next. Repeat from * around, changing to MAIN in last st. (18st)
R5: With MAIN, 2sc in ea st around, changing to CONTRAST in last st. (36 st)
R6: With CONTRAST, *skip the next st, work 2 csc in next. Repeat from * around, changing to MAIN in last st. (36 st)
R7: With MAIN, *skip the next st, work 2 csc in next. Repeat from * around, changing to CONTRAST in last st. (36 st)
R8-15: Repeat R6 & 7 (4) times
R16: Repeat R6
R17: With MAIN, sl st to next stitch and ch 3 (this counts as 1st dc here and throughout), dc in ea st around. At end of round, join to top of starting stitch. (36 st)
R18-19: Ch 3 (counts as dc), *FPDC in next st, BPDC in next st* repeat * to * around. At end of round, join to top of starting stitch. (36 st).
Fasten off and weave in ends.
Hat (Teen)
Using a 10mm hook, make a magic ring
R1: With MAIN, ch 1 and work 10 sc in the ring, changing to CONTRAST in last st. Do not join; work in continuous rounds until brim. (10 st)
R2: With CONTRAST, 2sc in ea st around, changing to MAIN in last st. (20 st)
R3: With MAIN, *skip the next st, work 2 csc in next. Repeat from * around, changing to CONTRAST in last st. (20 st)
R4: With CONTRAST, *skip the next st, work 2 csc in next. Repeat from * around, changing to MAIN in last st. (20 st)
R5: With MAIN, *2sc in 9 st, sc in next st. Repeat from * once. (38 st)
R6: With CONTRAST, *skip the next st, work 2 csc in next. Repeat from * around, changing to MAIN in last st. (38 st)
R7: With MAIN, *skip the next st, work 2 csc in next. Repeat from * around, changing to CONTRAST in last st. (38 st)
R8-17: Repeat R6 & 7 (5) times
R18: Repeat R6
R19: With MAIN, sl st to next stitch and ch 3 (this counts as 1st dc here and throughout), dc in ea st around. At end of round, join to top of starting stitch. (38 st)
R20-21: Ch 3 (counts as dc), *FPDC in next st, BPDC in next st* repeat * to * around. At end of round, join to top of starting stitch. (38 st).
Fasten off and weave in ends.
I love seeing your finished projects! If you enjoyed making the Superior Ridge Beanie pattern, I’d love to see yours on Instagram, be sure to tag me @crochet365knittoo. If you are on Facebook, stop over to the Crochet 365 Knit Too Facebook page or pop over to the Crochet365KnitToo Club and share a photo! I’d love to see your work!