
How To Make A Photo Backdrop
This post may contain referral/affiliate links. Please read my disclosure for more info.
Ever want an Instagram worthy photo of your crochet? Or maybe you’re a designer looking to take the best photograph of your work? Or maybe you just want to take your photos up to a whole new level! If so, this tutorial on how to make a photo backdrop on the cheap will change your life! I live in a tiny house. And by a tiny house, I don’t mean a trendy, HGTV worthy, ‘we’re minimalists and have a compost toilet’ tiny house. I’m talking the old fashioned tiny house. The bachelor guy upgrades from an apartment and then decides to get married and combine households kind of house.
There’s no basement. And one bathroom. We do have a room off the kitchen that I affectionally call the “three seasons room” but in reality it’s a previous owner do-it-yourselfer add-on that we use for storage. On good days, I’ll say we have a cozy home and there’s a lot of love here.
So sorry if I’ve disappointed you with the pictures of light infused goodness on hardwood floors and trendy brick walls. It’s all a ruse. I’m coming clean to show you how to make a photo backdrop so you can take amazing pictures of your handiwork. It’s incredibly easy. And it’s cheap too. About $10.
Maybe you want to post a nice picture of your work on Facebook or Instagram. Or maybe you want to sell your work or patterns, like I do. If so, you need to take good photos. But the good news is you can learn how! So I’ve carved out a little section of this blog to show you how to take good photographs of your crochet or knitting (or just about anything) and we’re starting out with this super easy DIY crochet photo backdrop.
 Meet my new friend: PVC pipe. It turns out you can make a large number of useful items out of PVC pipe. And if you don’t believe me, head over to Pinterest and check it out (and follow me while your there, ok?) If you are like me and completely clueless on the whole PVC phenomenon, prepare to be completely amazed. But I digress…
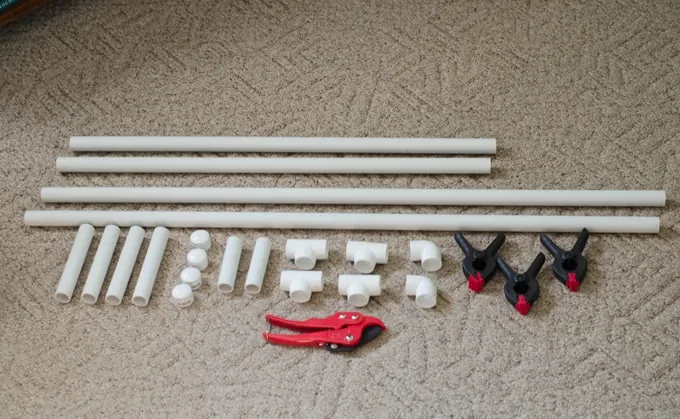
Head over to the hardware store and buy the following:
- (2) 3/4″ PVC pipes
- (4) 3/4″ End caps
- (4) 3/4″ T-shape pieces
- (2) 3/4″ Elbows
- Also pick up some clips that will fit over the pipe (I found them cheaper at Walmart)
Make sure the caps, t-shape pieces and elbows fit on the pipe you purchase because there are different sizes. You will need to cut the pipe, so be prepared to do this with a hacksaw or you can buy a PVC pipe cutter for an additional $13.99. I managed to get through my entire life without buying a PVC pipe cutter, but was able to somehow justify it for this project. It is really a fun gadget, so if you don’t mind more than doubling the cost of your project, go ahead and grab one of those too.
Cut the PVC pipe into sections as follows:
- (2) 42″ pieces for the posts
- (2) 30″ pieces for the cross bars (one at the top and one towards the bottom)
- (2) 4″ pieces for the bottom of the posts
- (4) 6″ pieces for the legs
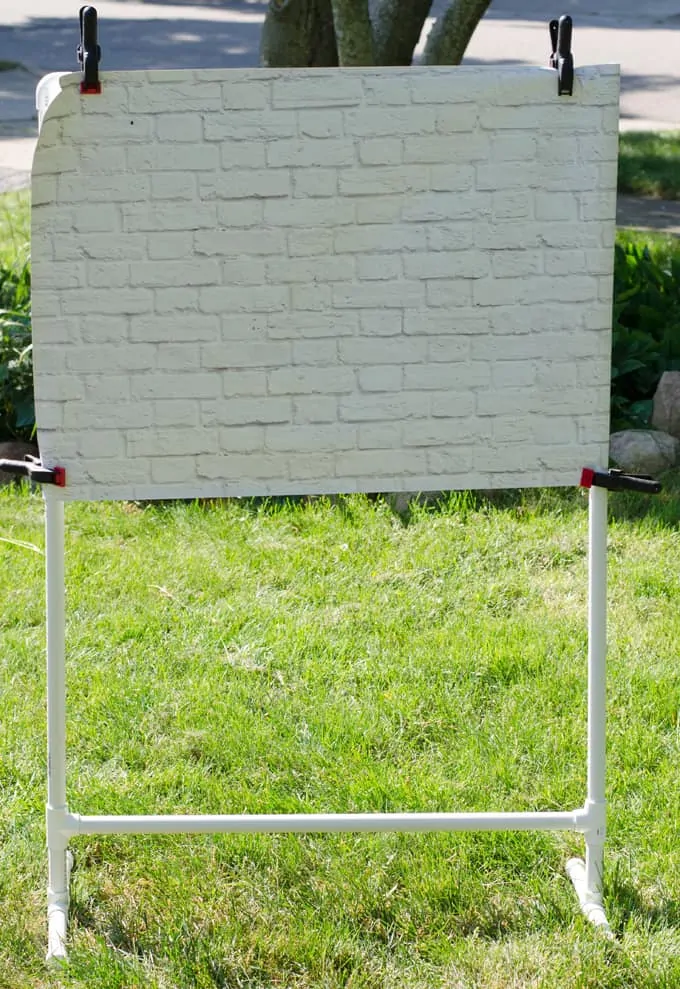
 To assemble refer to the photo and push the pieces into the appropriate connectors. They are easy to take in and out so you can assemble and disassemble at will. Attach an elbow on either side of the top bar. Then attach top posts in the opening of the elbows. Two t-joints connect next. The cross bar connects the 2 t-joints and helps to stabilize the backdrop. Then insert the small bottom post.
Next is the last set of t-joints and the legs. I made the legs small because my house is small and I need them small enough to get into small spaces. Because the legs are short they aren’t sturdy enough to hold the backdrop up in a breeze outside. In fact, when I was taking this picture, it kept blowing over! But in the house, it works perfectly. And I’ve been known to take a leg off to squeeze the backdrop into a tight space. But if you want to take pictures outside or have a lot of space in your house, you might want to make the legs longer.
Next buy yourself some vinyl backdrops. Vinyl backdrops are an amazing thing. Imagine a vinyl tablecloth, but one that has a wood or brick background. When it is photographed it looks like real wood or brick. I purchased mine on Etsy from both Ink and Elm and Swanky Prints. The 2 feet by 2 feet or 2 feet by 3 feet pieces work well for craft photography.
I purchased a 2′ by 3′ piece to fit on the backdrop and I use the clips to hold it in place. The rest of my backdrops are the 2’x2′ size which I use on my surface area. A word of warning. The variety of vinyl backdrops is amazing and it is easy to get distracted. I suggest sticking to backgrounds that are neutral. Remember, the focus of your photo is your work, not the amazingly beautiful background.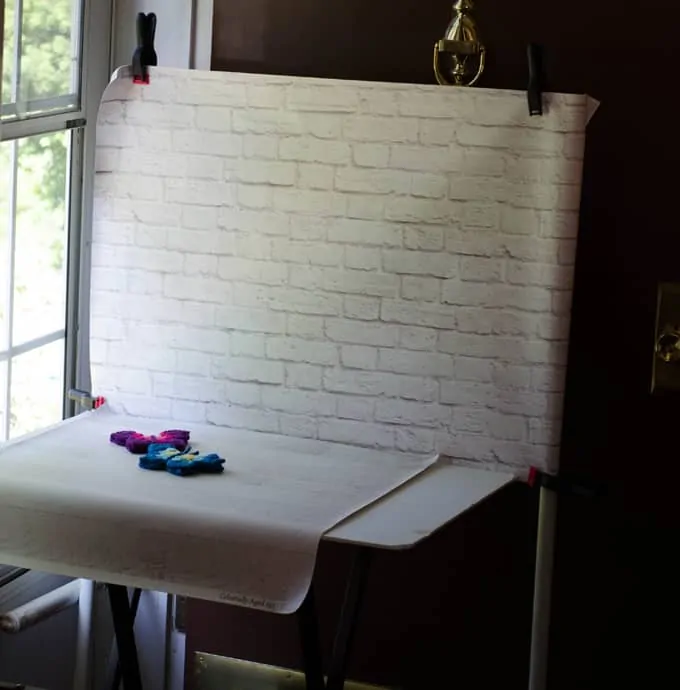 When I photograph I set up a tv tray near a door or window and position the PVC backdrop behind the TV tray. I put a white foam board on top of the tv tray and then put my background vinyl background on top of that. My project goes on top of that. I usually shoot from the front or off to the side. If you’re interested to see how the butterfly photo shoot turned out, head over to the blog post here.
And now you know how to make a photo backdrop! I’d love to hear if you enjoyed this tutorial. Leave me a comment and let me know if you are interested in more tips to make your crochet or knit photos pop!
I love seeing your finished projects! If you enjoyed making one of my patterns I’d love to see yours on Instagram, be sure to tag me @crochet365knittoo. If you are on Facebook, stop over to the Crochet 365 Knit Too Facebook page or pop over to the Crochet365KnitToo Club and share a photo! I’d love to see your work!

Thanks that really helps to make great pictures!
Would love to know what you use for taking your photos? And editing? I’ve been looking at your posts and you great colors and lighting 🙂 Now I’m off to shop for backgrounds 🙂
Thank you for your kind words! I use a Nikon D5100 (a DSLR camera) and love it! I have a good quality 50mm lens. And I shoot with a low aperture, which lets in a lot of light. For editing, I usually start with Lightroom and then use Photoshop Elements. Truthfully I could probably do all of it in Lightroom; just haven’t taken the time to learn all the things it does! LOL.
This was so helpful and Im so excited to try it now, THANK YOU SO MUCH for sharing