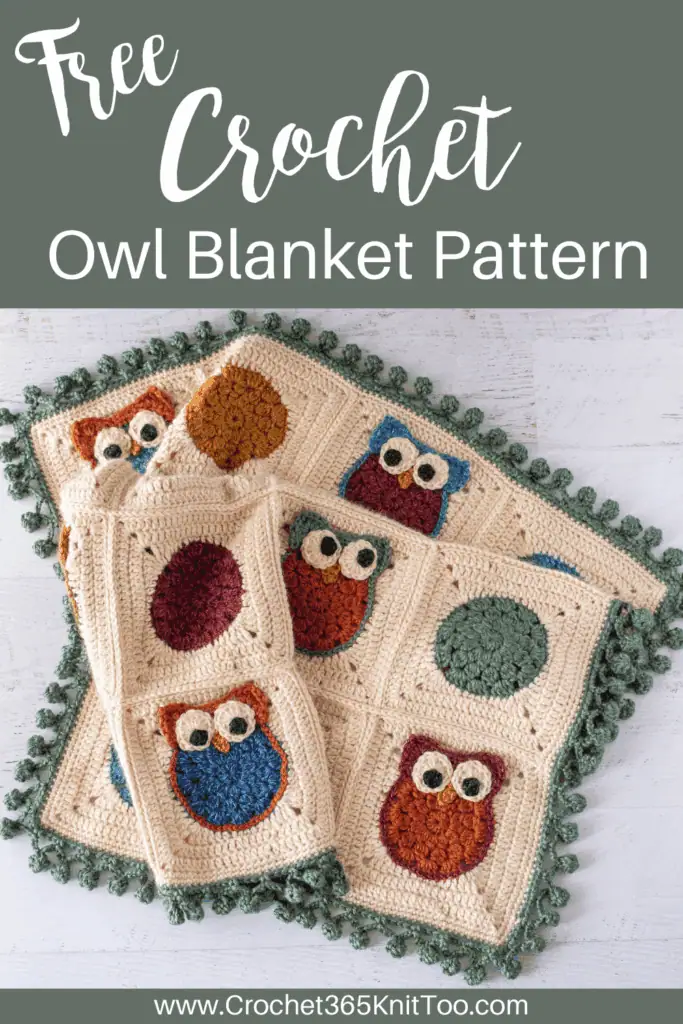
Little Hoot Crochet Owl Blanket
This post may contain referral/affiliate links. Please read my disclosure for more info.
I’m completely smitten. Smitten with this darling Crochet Owl Blanket, that is!
There’s just something irresistible about a blanket that’s both cozy and full of personality—and this crochet owl blanket delivers both!
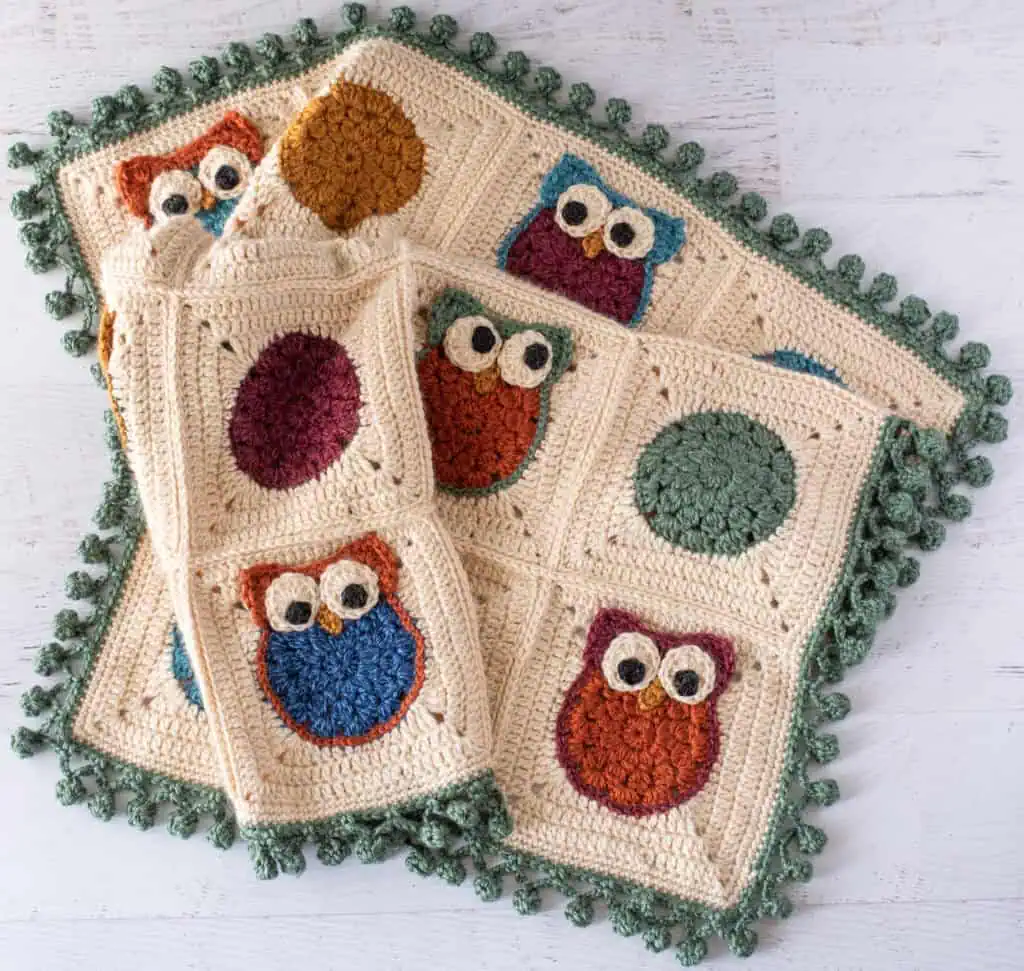
This darling piece of goodness is made in a granny style with each little owl face adding a touch of whimsy. And that pom pom trim… swoon… I’m so in love.
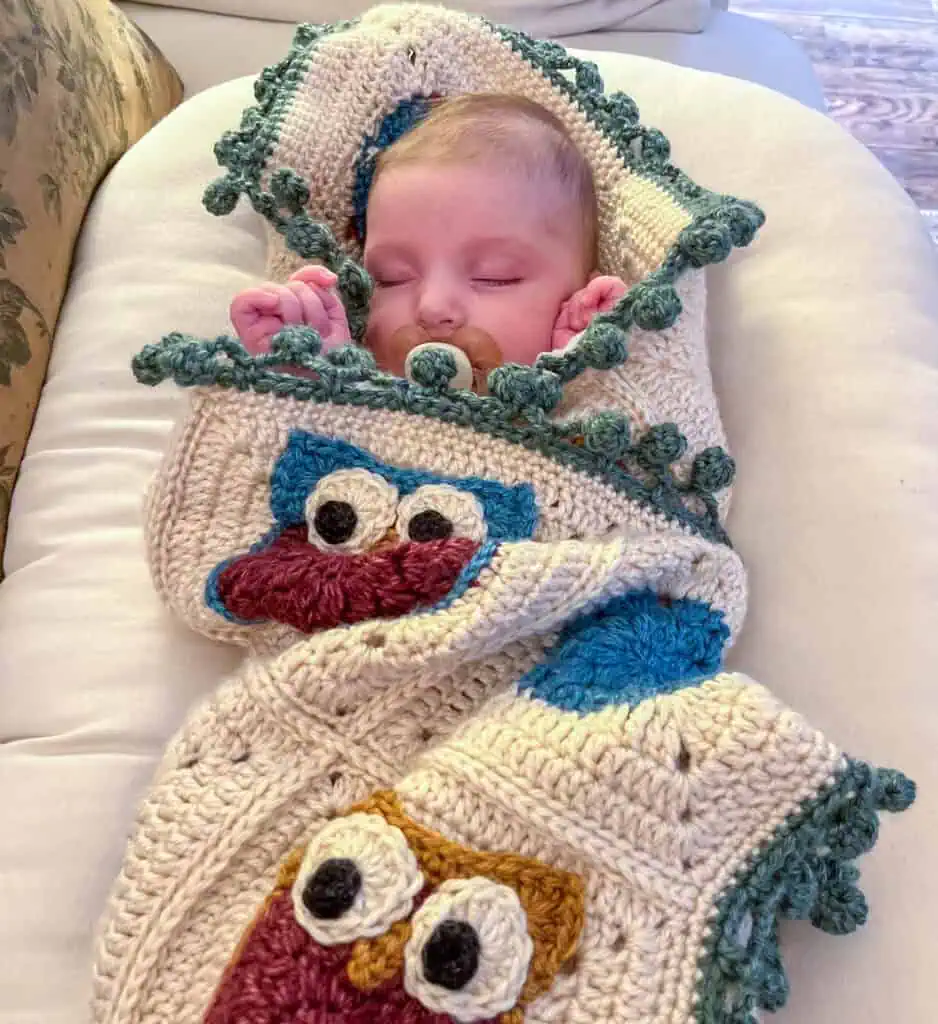
Designing an owl afghan has been on my bucket list forever. When I found out my niece was pregnant, I knew it was the perfect opportunity to pull out all the stops!
And here’s a picture of the little cutie modeling her handmade blanket. My great-aunt name, in case you’re wondering, is CiCi. My sister (the new grandma) is ‘MiMi’ (pronounced me me) so I figured I would be CiCi. You know, kind of like MiMi but with C’s for Cheryl. These things are important. But.. back to the afghan…
I love the idea of a motif-based owl afghan but it can be a bit of a challenge to work out ears that look nice and a body that doesn’t just blend in with the background. This pattern has some genius touches that solve all those problems.
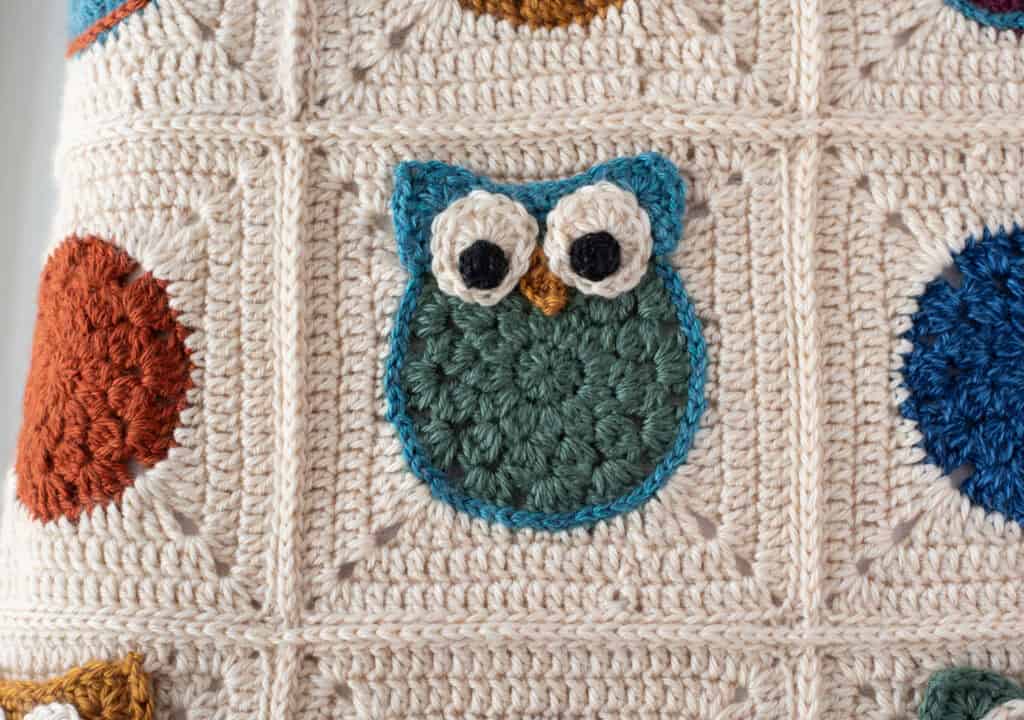
The ear tips are actually crocheted right IN to the final rounds of the granny square, so they are not going anywhere and will always lay nicely. Surface crocheting around the owl body in the same color yarn as the ears really sets off the owl.
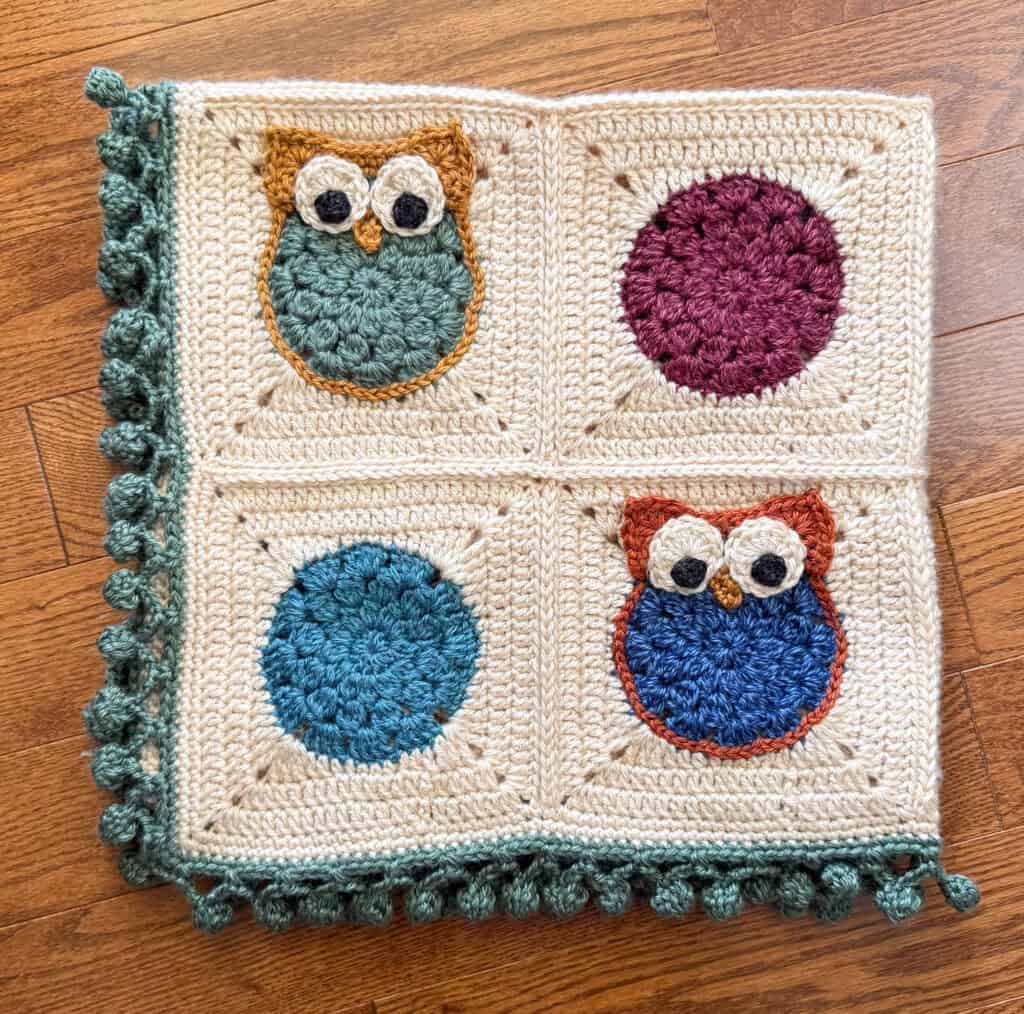
And, the crowning touch? That amazing pom pom border. I’ve been waiting for the perfect project to try out a pom border and this is just perfect. If you haven’t tried a pom pom border, you’re in for a treat.
The poms are not stuffed at all. Instead they are worked by crochet two halves that join back up to create a ball-like appearance. They are crocheted in a continuous border connected by chains, so they are not going anywhere. It might sound tricky, but it’s easy with my crochet pom pom border tutorial.
Purchase the Beautifully Formatted AD-FREE PDF DOWNLOAD
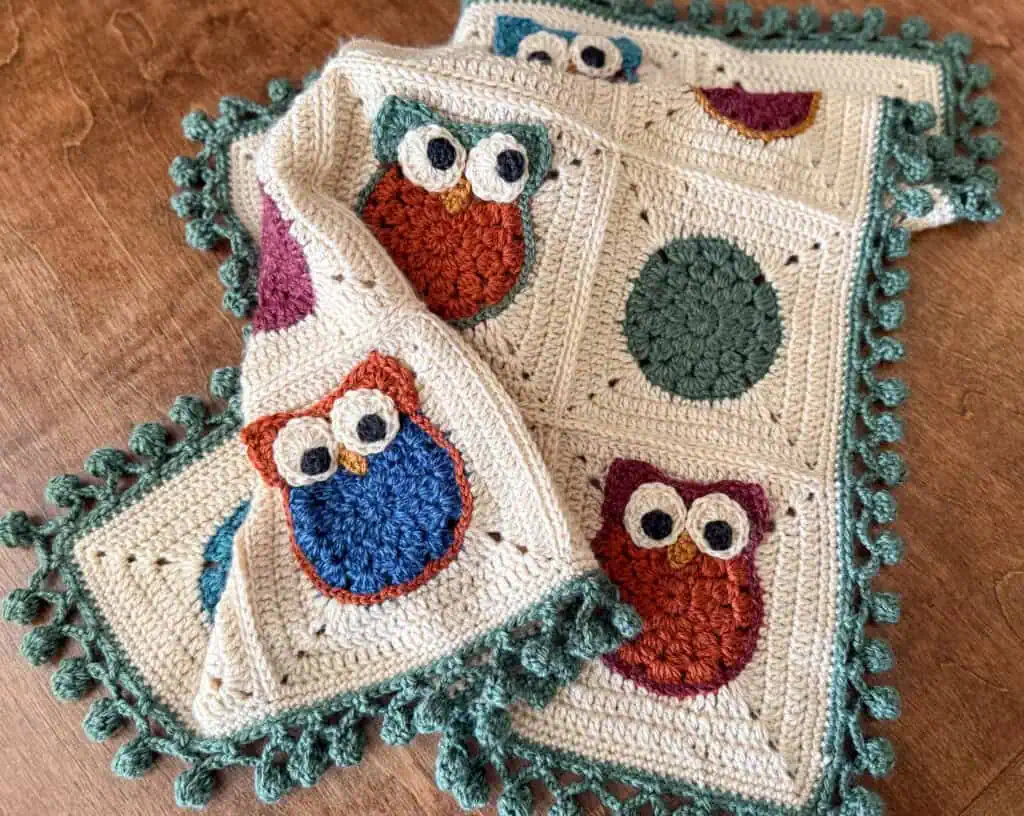
I had so much fun on the layout of this afghan. I thought it would be really fun to have the owls looking at each other and it’s so easy to do by simply changing where the pupils are positioned on each owl. Of course you can just make your owl’s pupils facing forward, if you’d prefer.
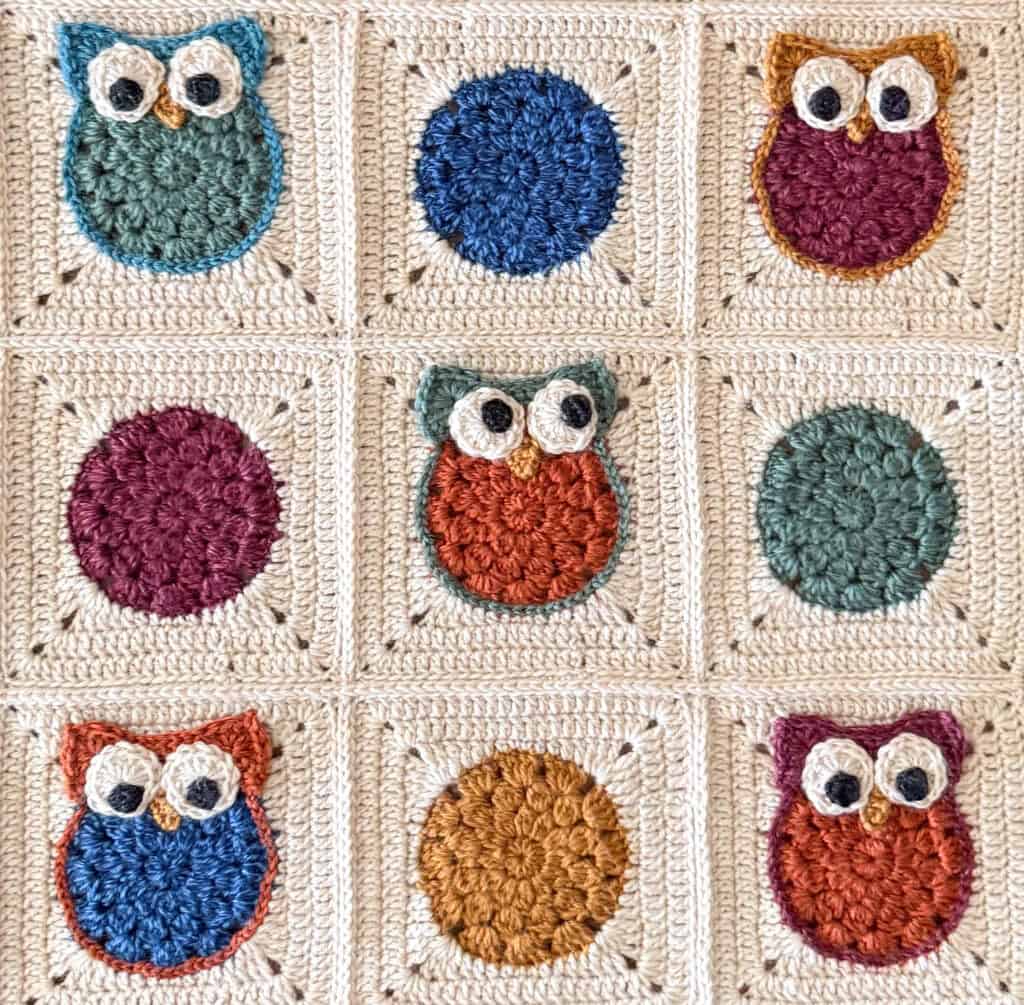
I’ve given you the color combinations I chose for this afghan, but you certainly can make it your own. I found it easiest to rearrange my squares to decide on overall block placement before I sewed the eyes down. And then after that I decided which way the pupils should be located.
I found it easiest to snap a photo on my phone so I could remember all those details. Then I sewed the facial features on and crocheted the blocks together, referring back to my photo as I needed to.
This pattern uses basic stitches, but because of the few special elements, I’d suggest having some crochet experience under your belt before giving it a try or at least have a spirit of adventure. It is so much fun to crochet this afghan and watch as all the pieces come to life!
This pattern uses Heartland yarn by Lion Brand, which is a worsted weight yarn. It is on the lighter side of worsted. I also found huge variances in dye lots with this line of yarn. So be sure to buy all the ivory and green yarn you need at the start of your project and ensure that your dye lots match. Amazon sells Heartland Yarn in 3 packs (in addition to a single skein). I had good luck with matching dye lots buying the 3-pack. Michaels stores also sell Heartland yarn and I bought some of my single skeins there.
Little Hoot Crochet Owl Afghan
Materials
- Lion Brand Heartland, size 4 worsted weight, 100% acrylic, 251 yds/230m per 5oz/142g skein (try Herrschners, Amazon or Lion Brand)
- 4 Skeins Acadia (Ivory)
- 2 Skeins Rocky Mountains (Green)
- 1 Skein each: Badlands (Red), Yosemite (Orange), Bryce Canyon (Gold), Glacier Bay (Med Blue), Olympic (Dark Blue)
- Small amount of Black Canyon (Black) for pupils
- US G+7/4.50 mm crochet hook
- Stitch markers to keep track of rows
- Tapestry needle and scissors
Resources and tutorials you may find helpful in following this pattern: Crochet Abbreviations, US to UK Crochet Conversion Chart. Find links to stitches on the “Tutorial” menu: Getting Started will show basic stitches used in many patterns and Crochet Stitch Dictionary shows our growing collection of crochet stitch tutorials.
Gauge:
My gauge is 8 dc to 2 inches. Alternatively, the inner circle (rounds 1-4) is 4.25” in diameter.
Resources and crochet tutorials you may find helpful in following this pattern: Crochet Abbreviations, US to UK Crochet Conversion Chart. Find links to stitches and basic crochet skills on the “Tutorial” menu: Getting Started will show basic stitches such as the slip stitch, single crochet, double crochet stitch and chain stitch used in many patterns and Crochet Stitch Dictionary shows our growing collection of crochet stitch tutorials.
Crochet Abbreviations:
- dc = double crochet
- hdc = half double crochet
- sc = single crochet
- sl st = slip stitch
- st = stitch(es)
- tr = treble crochet
Special Stitches:
This project uses cluster stitches that are worked similarly. A basic Cluster Stitch tutorial follows the stitch descriptions.
2dcc (2 double crochet cluster): *yarn over, insert hook in stitch, yarn over and pull through stitch, yarn over and pull through first 2 loops on hook*. Repeat from * to * once in same st. There are now 3 loops on hook. Yarn over and pull through all 3 loops on hook.
3dcc (3 double crochet cluster): *yarn over, insert hook in stitch, yarn over and pull through stitch, yarn over and pull through first 2 loops on hook*. Repeat from * to * two more times in same st. There are now 4 loops on hook. Yarn over and pull through all 4 loops on hook.
4dcc (4 double crochet cluster): *yarn over, insert hook in stitch, yarn over and pull through stitch, yarn over and pull through first 2 loops on hook*. Repeat from * to * three more times in same st. There are now 5 loops on hook. Yarn over and pull through all 4 loops on hook.
Standing Double Crochet: A standing double crochet starts with a slip stitch on the hook. Then carefully yarn over and hold against the hook. Insert hook into the stitch, then make a double crochet as usual.
Finished Owl Afghan Size
Afghan measures 31” x 31” including the pom pom border. Each square is approximately 7” square.
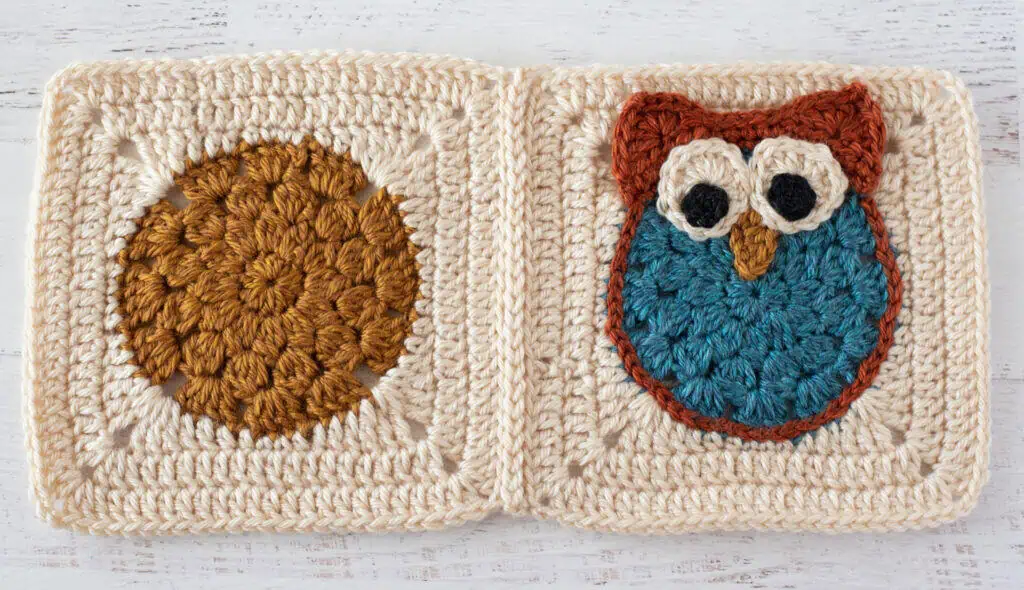
How to Crochet an Owl Blanket
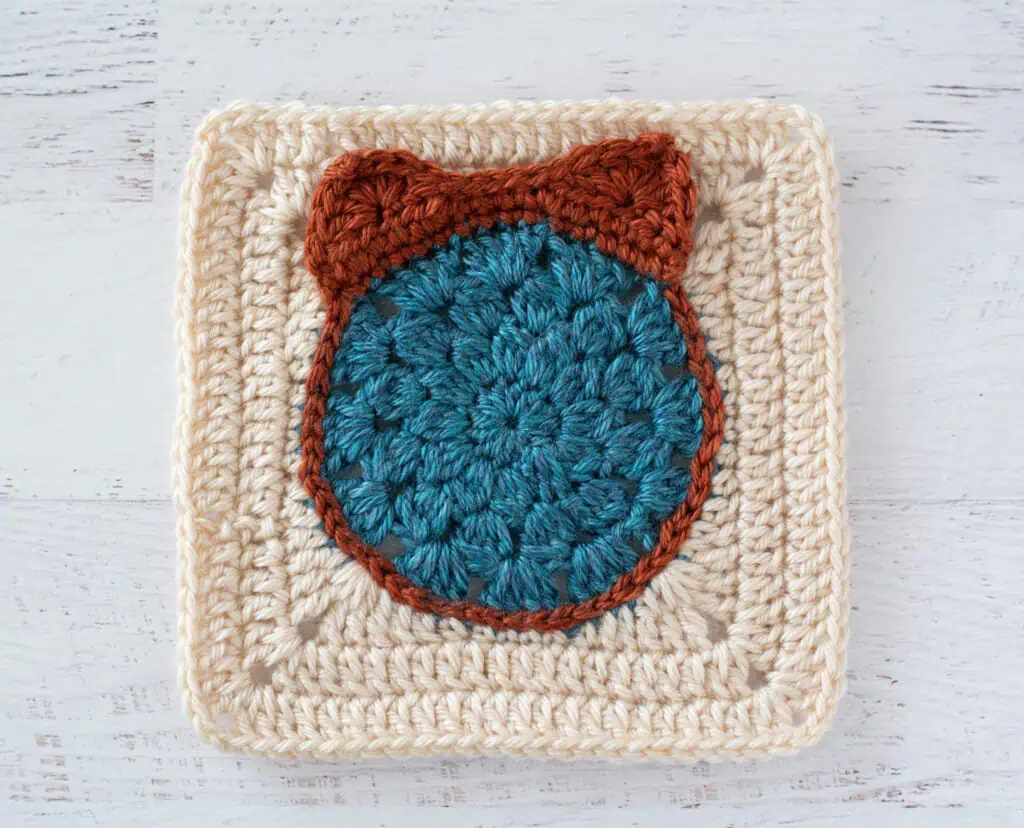
The afghan is comprised of 16 squares. All 16 squares start with a 4-round center motif. For half of the motifs, rounds 5-7 are worked in ivory and turned into squares. The remaining 8 motifs become the owl blocks, starting with the ears worked in the front loops only of the top of the head.
Then rounds of ivory are worked similarly to the non-owl squares. An outline of surface crochet to match the ears is worked around the circle motif and finally appliqued eyes, pupils and nose are sewn on to the owls. Then the squares are joined and the border is worked.
The afghan can easily be enlarged by adding more blocks; simply buy more yarn to accommodate additional squares. Note that it’s important to get the same dye lot of yarn for colors requiring more than one skein. I found a lot of variation between dye lots with this particular yarn line.
I’ve provided the color combinations I used in this baby afghan. Here are some tips for color options and placement: I found it easiest to lay out the 16 motifs and audition various options to determine best color placement before deciding on ear color. Note that the same gold color is used for the beak, so I opted to avoid using gold for an owl block for this reason.
I enjoyed playing with the eye placement so that the owls could look at one another. This requires a bit of thought, especially if you wish to sew on the eye applique pieces prior to seaming the afghan.

Color Combinations
For the baby afghan shown, here are the motif colors used:
| Color | Owl Block | Regular Block | Total Blocks |
| Red | 2 | 1 | 3 |
| Orange | 2 | 1 | 3 |
| Gold | 0 | 2 | 2 |
| Green | 2 | 1 | 3 |
| Medium Blue | 1 | 2 | 3 |
| Dark Blue | 1 | 1 | 2 |
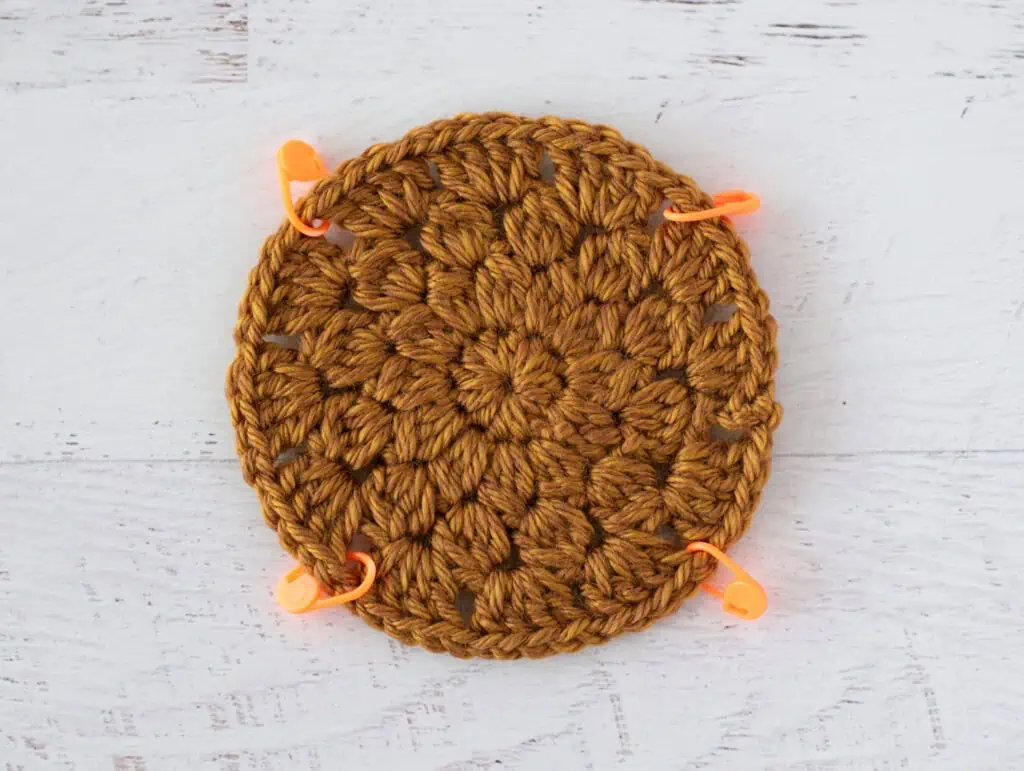
Center Motifs (Make 16)
Make a magic ring
R1: Ch 1 and work 12 hdc in the ring. Sl st to first hdc to join. (12 st)
R2: Ch 2, (2dcc, ch 1) in first st, (3dcc, ch 1) in each st around. Sl st to top of starting ch-2 to join. (12 clusters)
R3: Sl st to next ch-1 space, then ch 2, (3dcc, ch 2) in the same space, (4dcc, ch 2) in each remaining ch-1 space around. Sl st to top of starting ch-2 to join. (12 clusters)
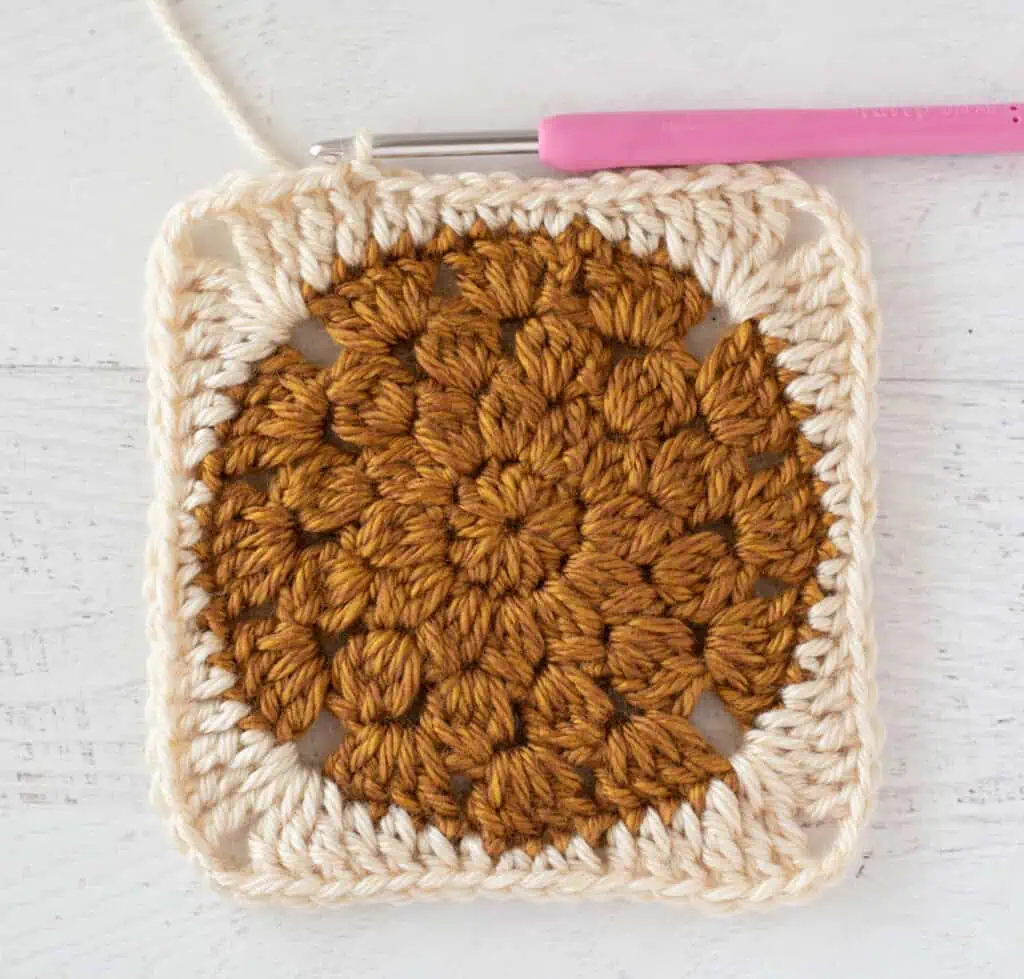
R4: Sl st to next ch-2 space, ch 3 (counts as dc here and throughout), (3 dc, ch 1) in the same space, (4 dc, ch 1) in each remaining ch-2 space. Sl st to top of starting ch-3 to join. (48 dc)
Fasten off, leaving a long strand for joining.
Regular (non-owl) Blocks (Make 8 per chart)
Use stitch markers to mark 4 corners. The corner spaces are separated by 3 groups of 4dc from row 4.
R5: The starting stitch of this round is 2 stitches to the right of a corner. With ivory color, work a standing dc in the starting stitch, *tr in next dc, (2tr, ch 2, 2tr) in corner space, tr in next st, dc in next 2 st, hdc in next st, skip the next space, hdc in next st, sc in next 2 st, hdc in next st, skip next sp, hdc in next st, dc in next 2 st. Repeat from * around. (Note in last repeat, omit final dc) and join with a sl st to top of starting dc. (Each side has a total of 16 st.)
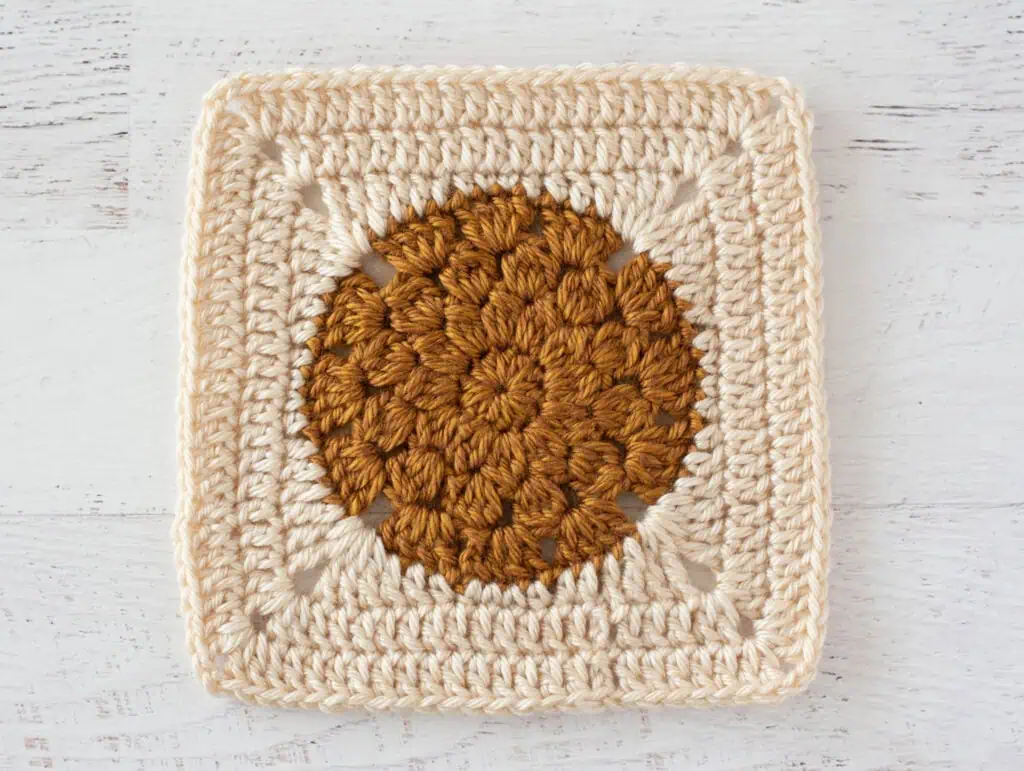
R6: Ch 3, work a dc in each stitch from the prior round. In each corner work (2 dc, ch 2, 2 dc). At end of round, join to top of starting chain. (Each side has a total of 20 st.)
R7: Ch 3, work a dc in each stitch from the prior round. In each corner work (2 dc, ch 2, 2 dc). At end of round, join to top of starting chain. (Each side has a total of 24 st.) Fasten off and weave in ends.
Owl Blocks (Make 8)
The ears and outline of the owl are worked in a contrasting color. Here are the colors I used for my owls:
| Owl Body Color | Ear/Outline Color |
| Red | Gold |
| Red | Medium Blue |
| Orange | Red |
| Orange | Green |
| Green | Gold |
| Green | Medium Blue |
| Medium Blue | Orange |
| Dark Blue | Orange |
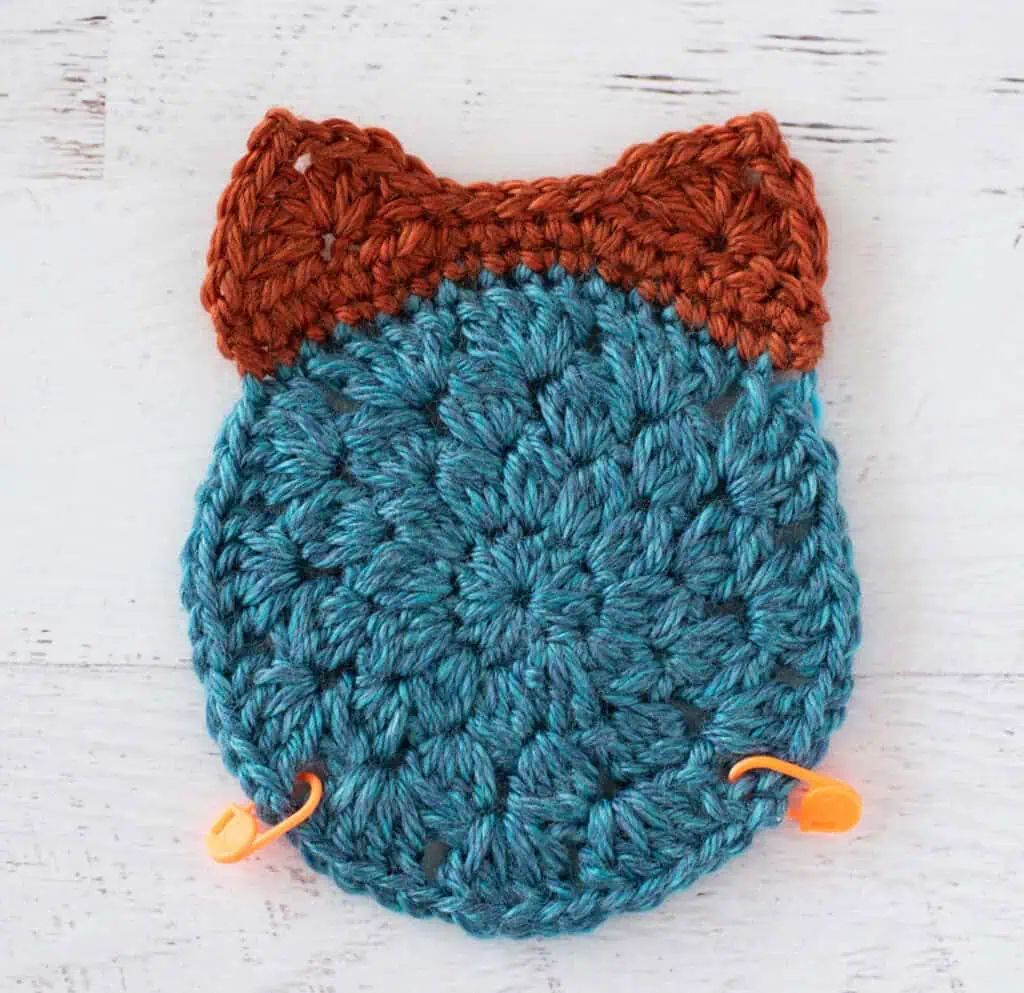
Use stitch markers to mark 4 corners. Corner spaces are separated by 3 groups of 4dc from row 4. Mark the starting stitch of the round: 1 stitch to the right of a corner.
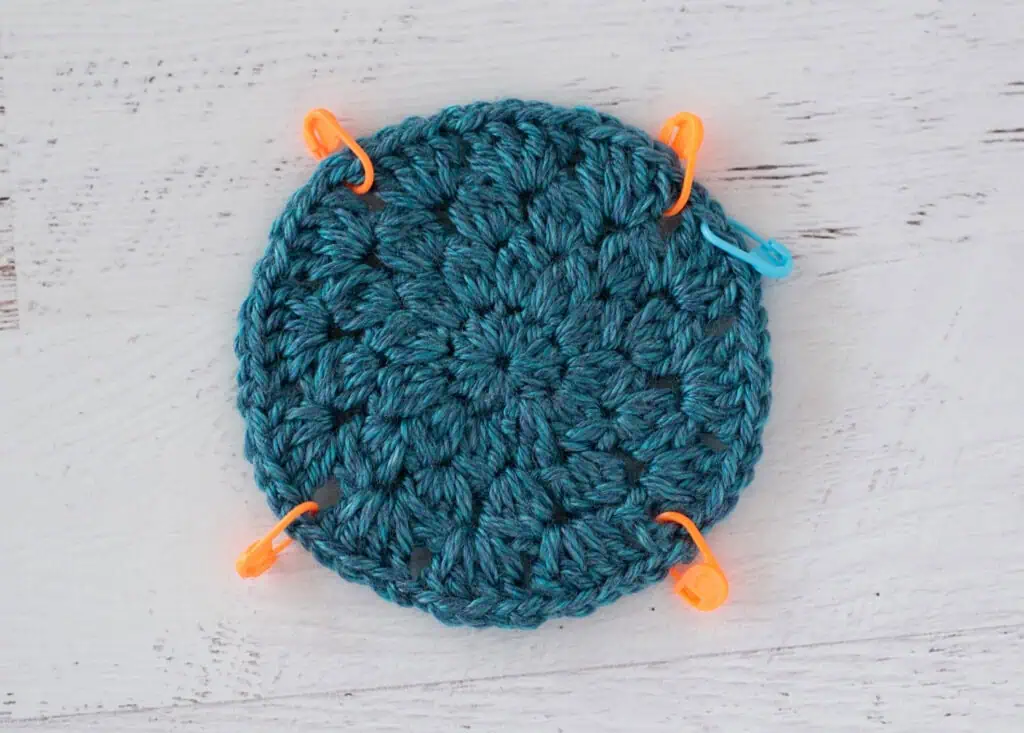
The owl ears are worked in the front loops only on some of the stitches. Then, the remainder of the square is worked in a similar way to the non-owl squares. In the final round of the square, we carefully grab the back of the ear tips to connect it to the square.
Owl Ears
R1: Work all stitches in the FRONT LOOP ONLY of ALL stitches in this round: Join ear color to the marked stitch (1 stitch to the right of a corner), sc in the same stitch, sc in the ch st, *sc in the next 4 st, skip the next ch, repeat from * once, sc in the next 4 st, sc in the next ch, sc in the next st. Turn. (16 st)
Remainder of ears are worked in both loops and the work is turned after each round.
R2: Working in both loops, ch 1 and sc in the same st, hdc in next 4 st, (hdc, sc) in next st, sc in next 3 st, (sc, hdc) in next st, hdc in next 4 st, sc in next st, sl st to last st. Turn. (18 st)
R3: Do not chain, sl st in next st, skip 2 st, in next stitch work all of the following [3 dc, ch 2, sl st to 2nd chain from hook (picot made), 3 dc], skip 2 st, sl st in next st (1st ear made), sl st in next 5 st, skip 2 st, in next stitch work all of the following [3 dc, ch 2, sl st to 2nd chain from hook (picot made), 3 dc], skip 2 st, sl st in next st. Fasten off yarn and weave in ends.
Complete Owl Square
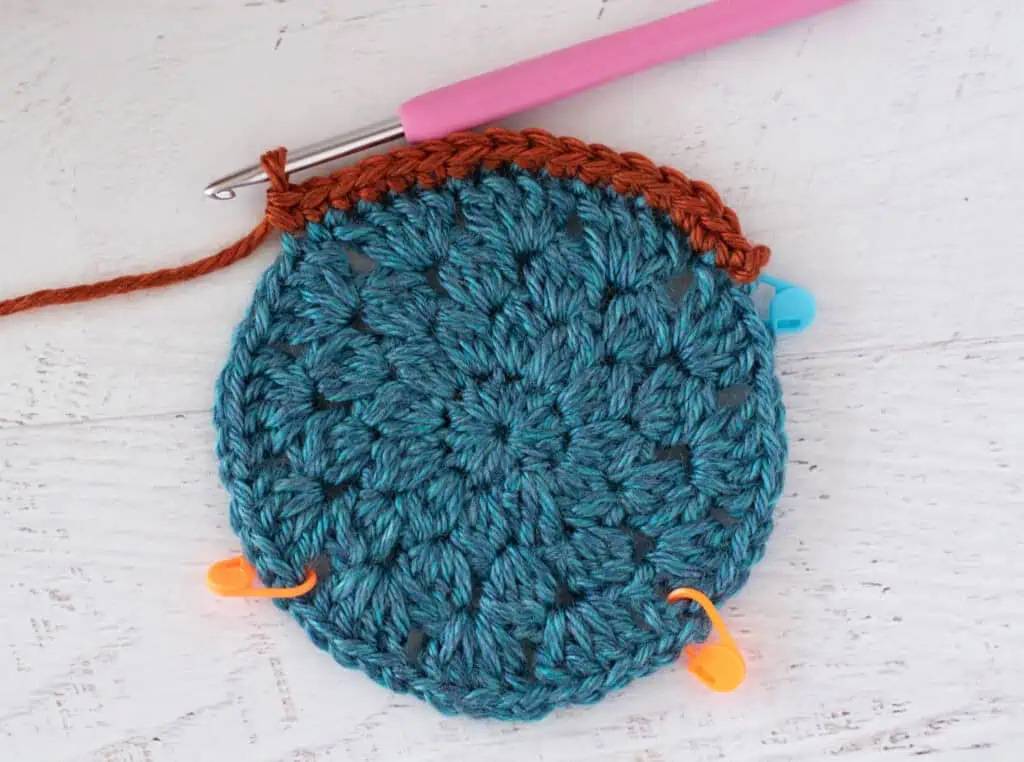
The next 2 rounds are worked around the original circle motif, similar to rounds 5 and 6 of the non-owl motif. For consistency’s sake, I will label these rounds similarly (as if we are continuing the circle motif and ignoring the row numbers for the ears).
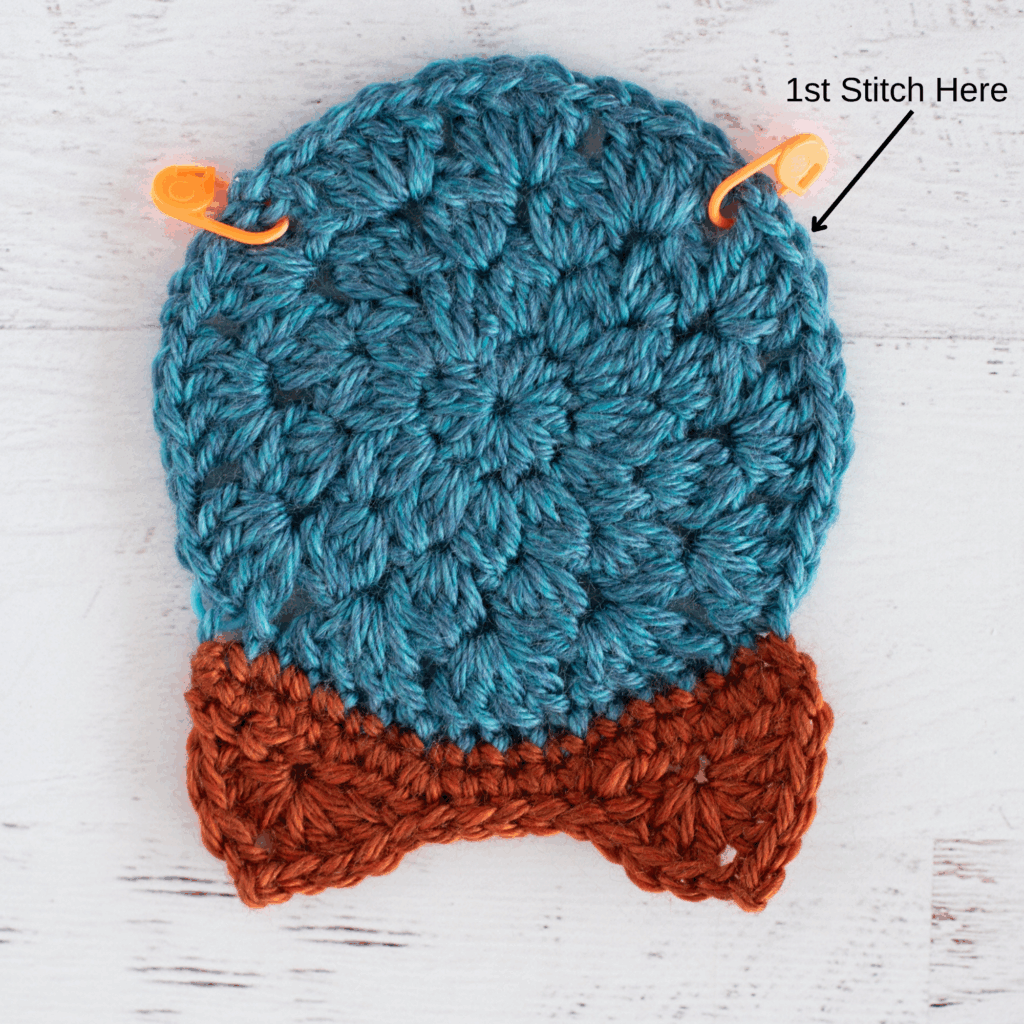
Round 5 is worked similar to a non-owl square. The first stitch is worked 2 stitches to the right of the indicated corner. When you come to the ears, work into the BLO instead. Note that there are some stitches that were worked in the front loop for the ears that are skipped when working in the BLO of this round. Read the instructions carefully. The rest of the round is worked through both loops.
Purchase the Beautifully Formatted AD-FREE PDF DOWNLOAD
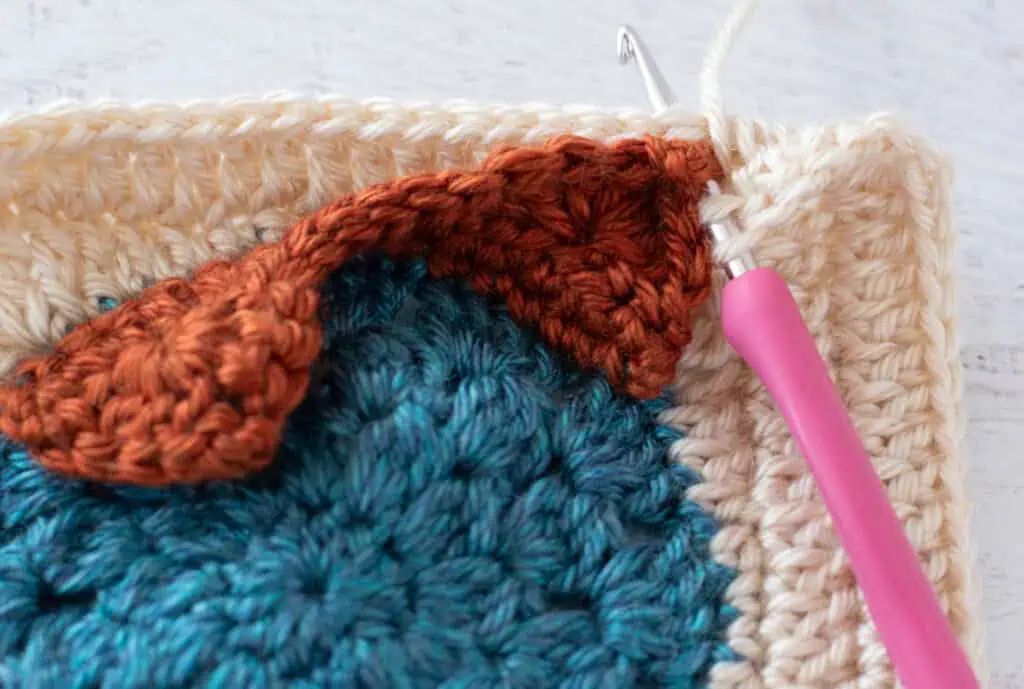
R5: The starting stitch of this round is 2 stitches to the right of a corner (see indicated stitch in the photo). With ivory color, work a standing dc in the starting stitch, *tr in next dc, (2 tr, ch 2, 2 tr) in corner space, tr in next st, dc in next 2 st, hdc in next st, skip the next ch-sp, hdc in next st, sc in next 2 st, hdc in next st, skip next ch-sp, hdc in next st, dc in next 2 st. Repeat from * around. (Note in last repeat, omit final dc) and join with a sl st to top of starting dc. NOTE: Remember to work in the BLO when you come to the ears. (Each side has a total of 16 st.)
R6: Ch3, work a dc in each stitch from the prior round. In each corner work (2 dc, ch 2, 2 dc). At end of round, join to top of starting chain. (Each side has a total of 20 st.)
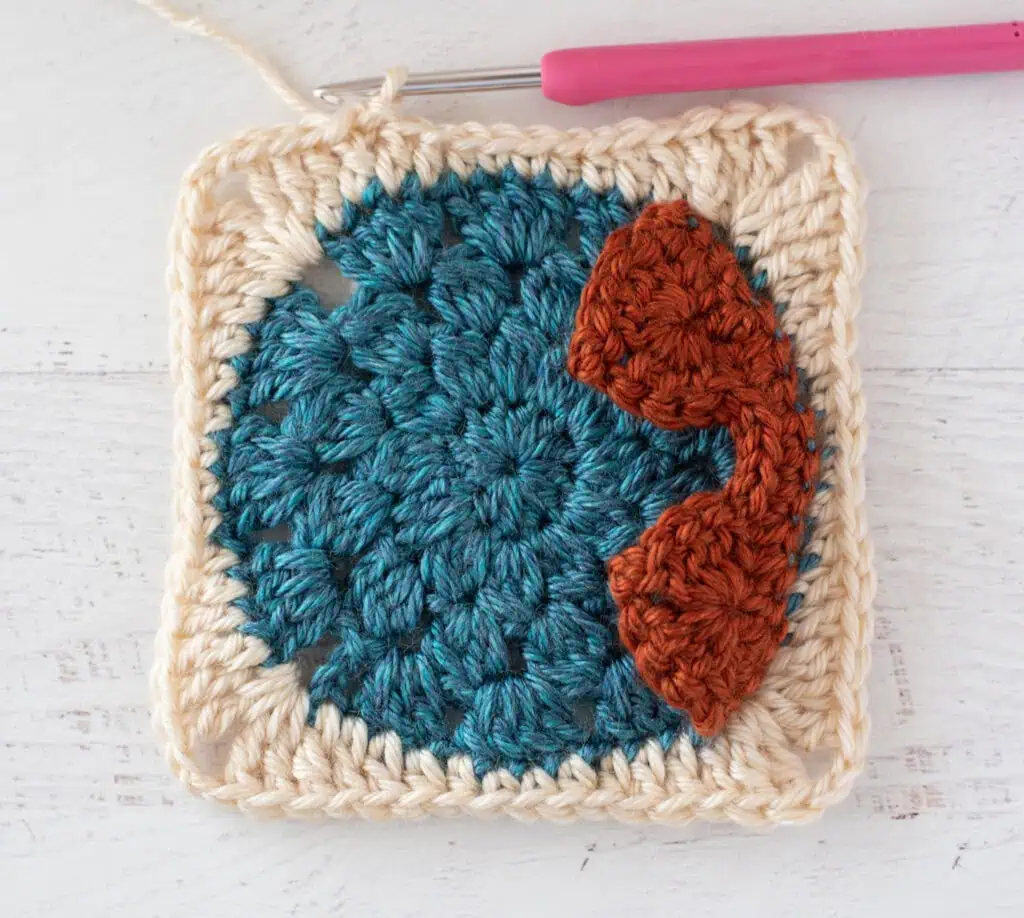
SPECIAL INSTRUCTIONS FOR ATTACHING THE EAR TIPS IN R7: Before working R7, you’ll need to understand how to attach the tips of the ears as you are working the round. Here are the steps:
Step 1: The tips of the ears line up with the 3rd dc from the corner of the previous round. Work the 2 double crochet stitches after the corner. Yarn over as if to make a normal double crochet into the 3rd stitch. Grab 2 strands of yarn from the back of the tip of the ear on either side of the picot.
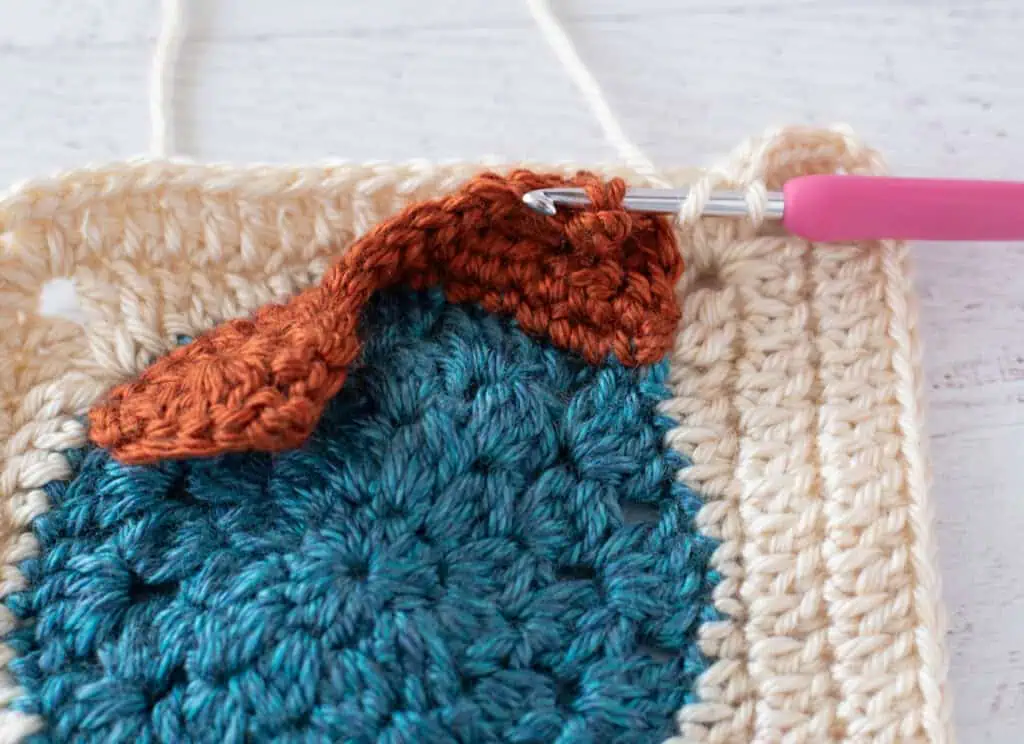
Step 2: Then insert your hook into the 3rd stitch on the block.
Step 3: Yarn over and pull through both the stitch and the 2 yarn strands. There are 3 loops on the hook. Complete the dc as normal (yarn over and pull through 2 loops, then yarn over again and pull through remaining loops).
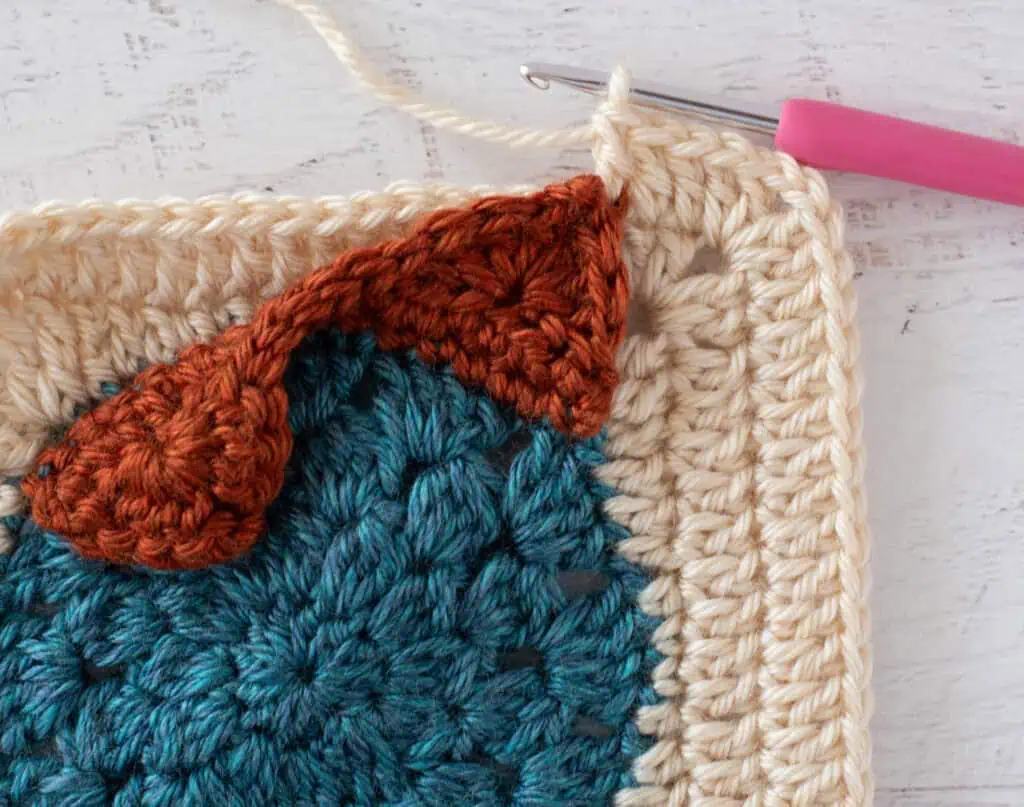
R7: Ch 3, work a dc in each stitch from the prior round. In each corner work (2 dc, ch 2, 2 dc). Be sure to connect the ears as described in the special instructions. At end of round, join to top of starting chain. (Each side has a total of 24 st.)
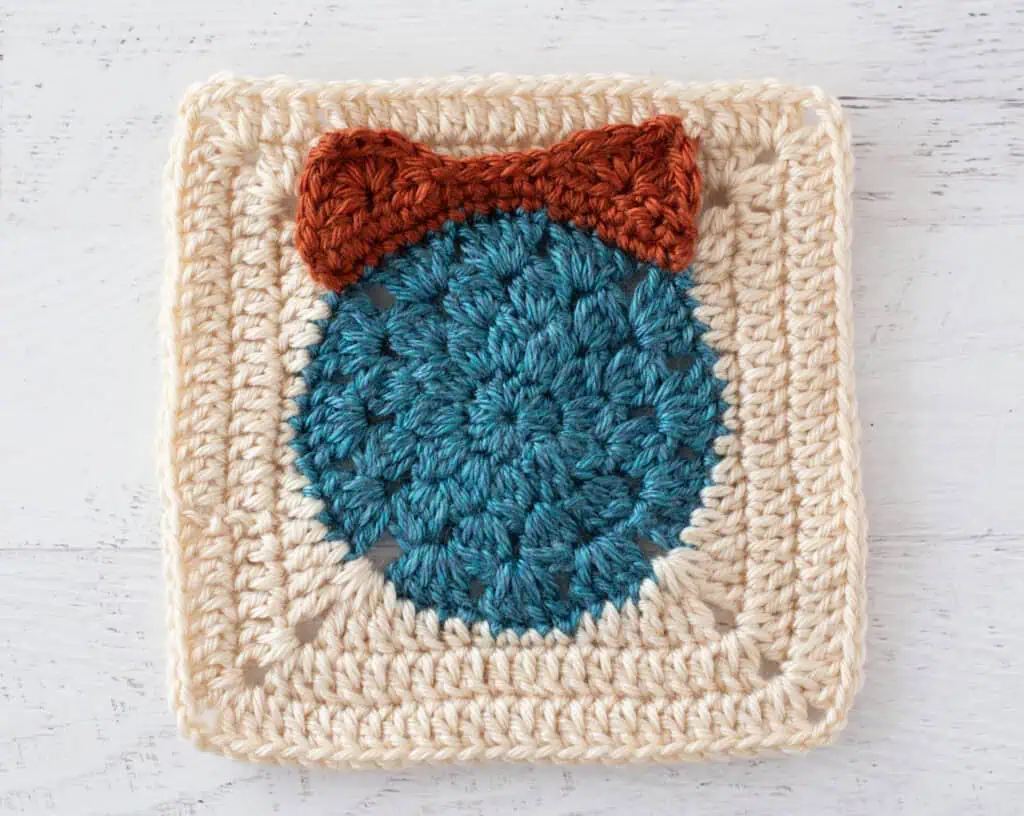
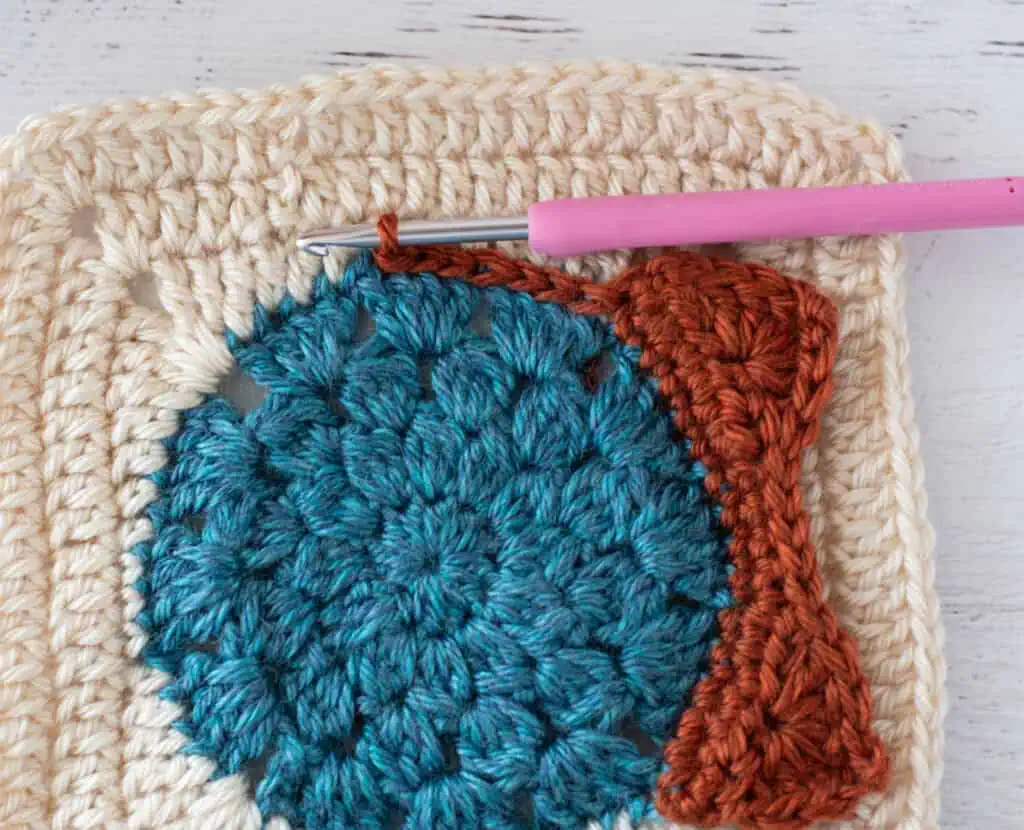
Using ear color, surface crochet around the color circle from ear to ear. See my tutorial on How to Surface Crochet.
Fasten off and weave in ends.
Eyes (Make 16)
Using Ivory yarn, make a Magic Ring
Ch 3 (counts as 1st dc) then, work 13 dc into magic ring. Join with an invisible join, leaving a long strand for joining. (14 st)
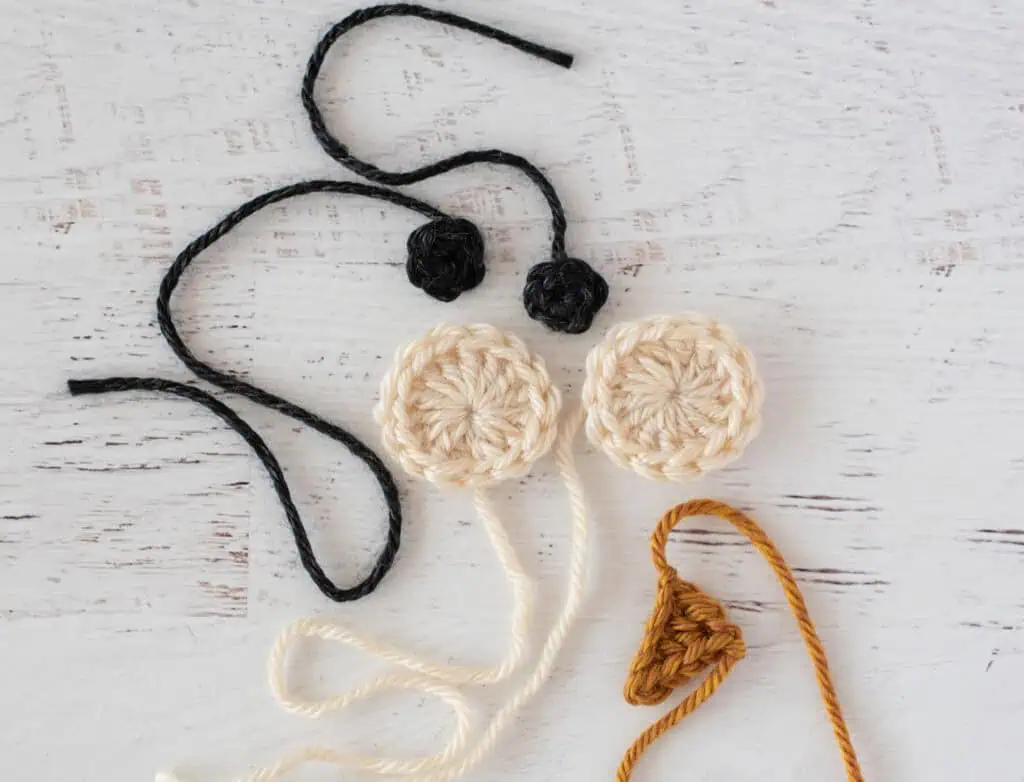
Pupils (Make 16)
Using black yarn, make a Magic Ring
Ch1, then work 6 sc into magic ring. Join with an invisible join, leaving a long strand for joining. (6 st)
Beak (Make 8)
Using yellow yarn, ch 5, sl st in 2nd ch from hook, sc in next ch, hdc in next ch, dc in last ch. Fasten off, leaving long strand for joining.
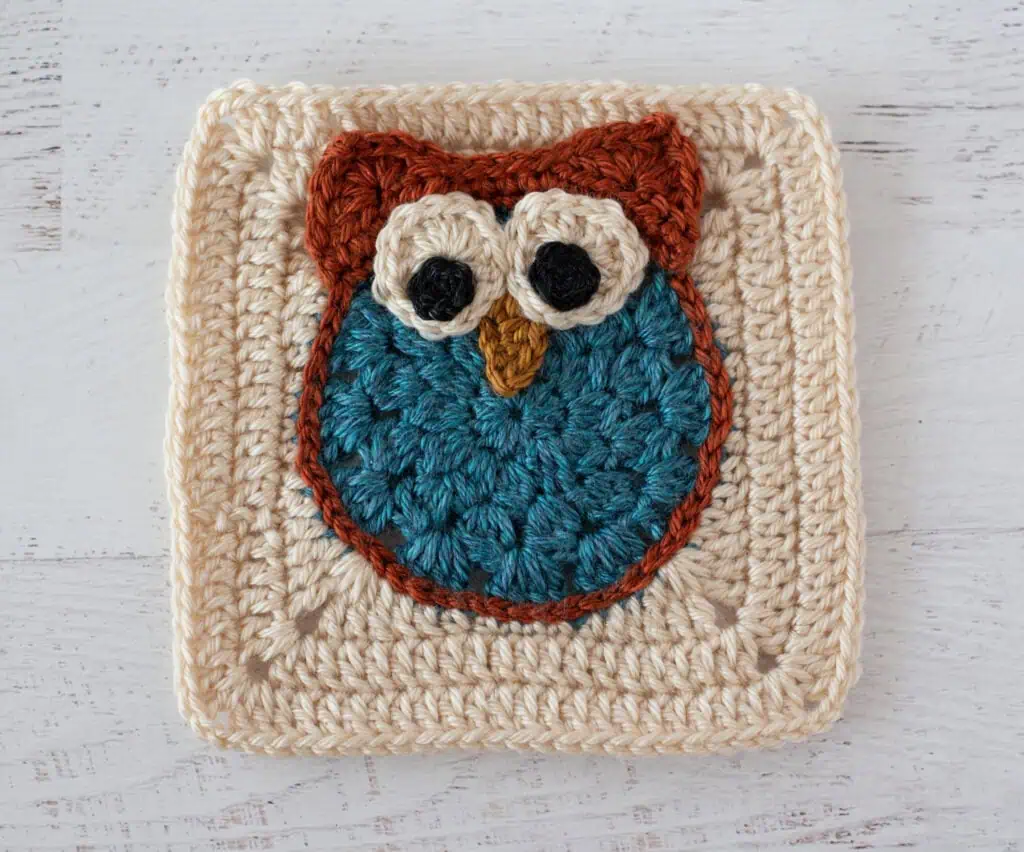
Finishing the Owl Block
Sew pupils to lower part of eye. Position eyes and beak on owl and sew down. Note that the eyes overlap the top of the beak. I also positioned eyes so that the owls were looking at different owls in the afghan. This requires laying out the afghan squares and deciding which way to position the eyes on each owl before sewing them down.
Blocking the Afghan Squares
I blocked my afghan after I completed it. If you prefer, you can block each square prior to sewing together (or opt out of blocking altogether).
How to Join the Afghan Squares
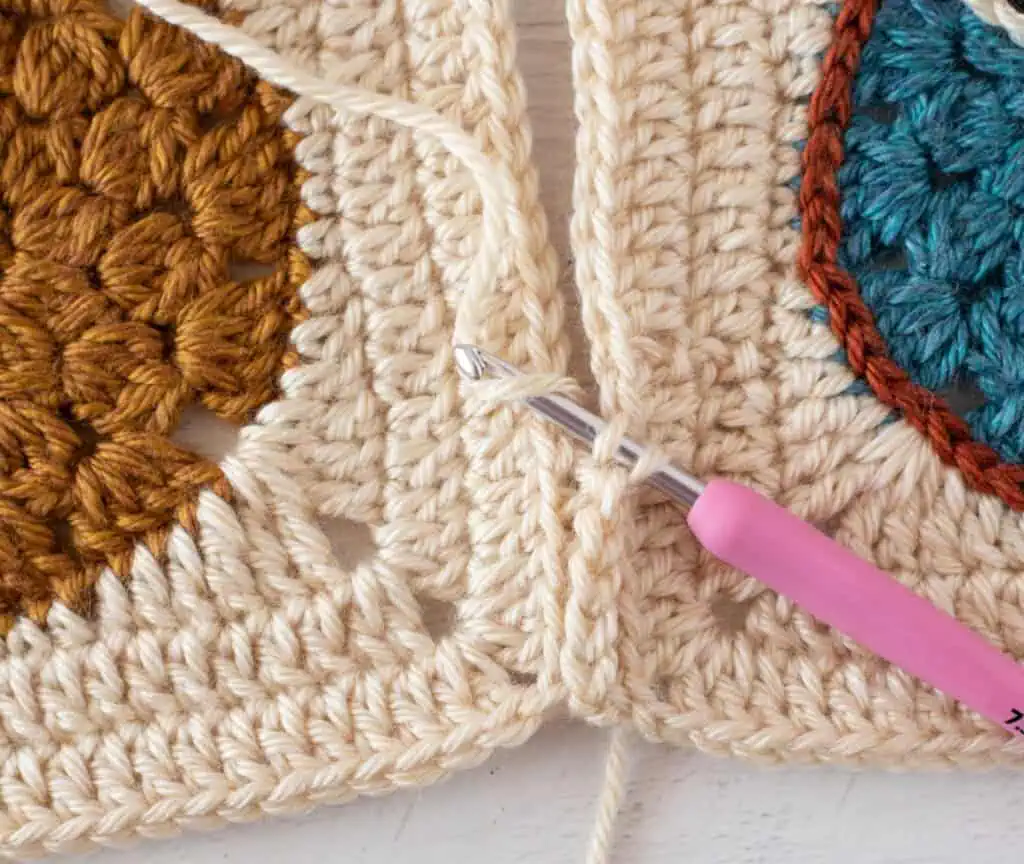
Join the afghan squares with your preferred joining method. I used a modified slip stitch join (see below). First, I attached 4 blocks to form a row. Then I joined the 4 rows.
Modified Slip Stitch Join
Start with a slip stitch on the hook or attach yarn to back loop only of the corner of first square from front to back.
The photos below show the join after a few stitches have been worked.
Step 1: Insert hook from front to back in back loop of first stitch on one square.
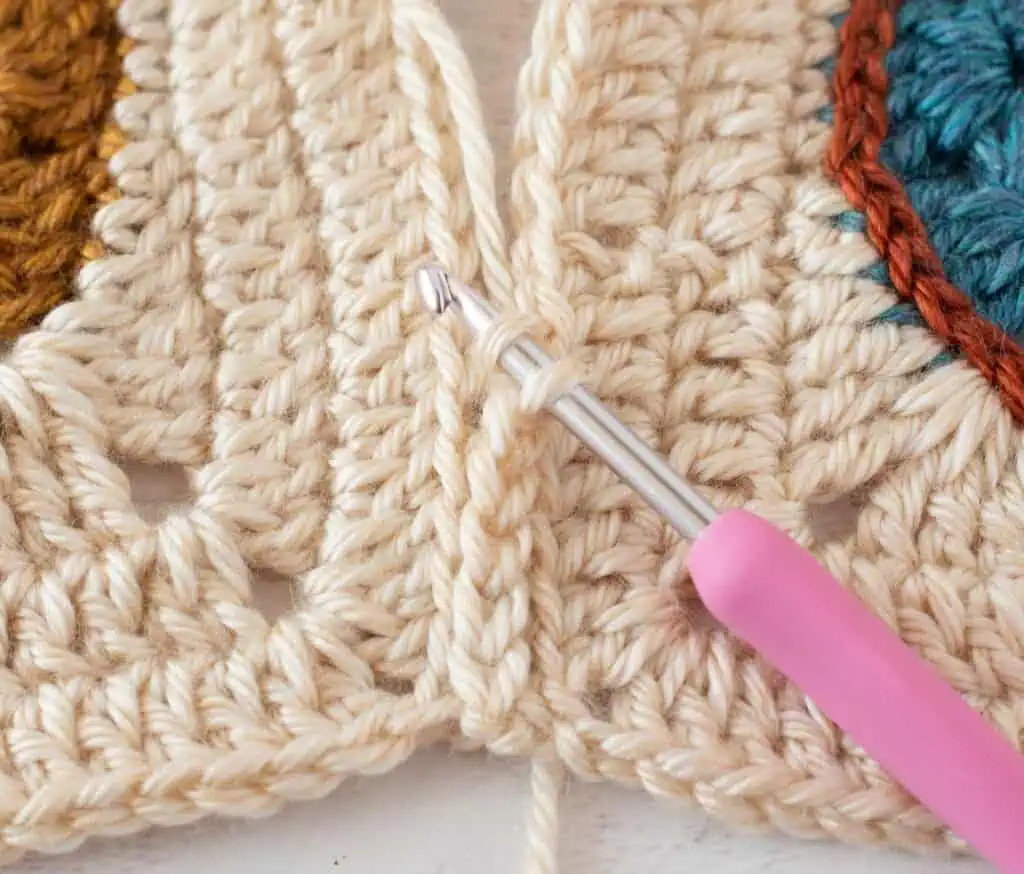
Step 2: Yarn over and pull through stitch only. This will leave 2 loops on hook.
Step 3: Insert hook into the BLO from front to back of corresponding stitch on 2nd square.
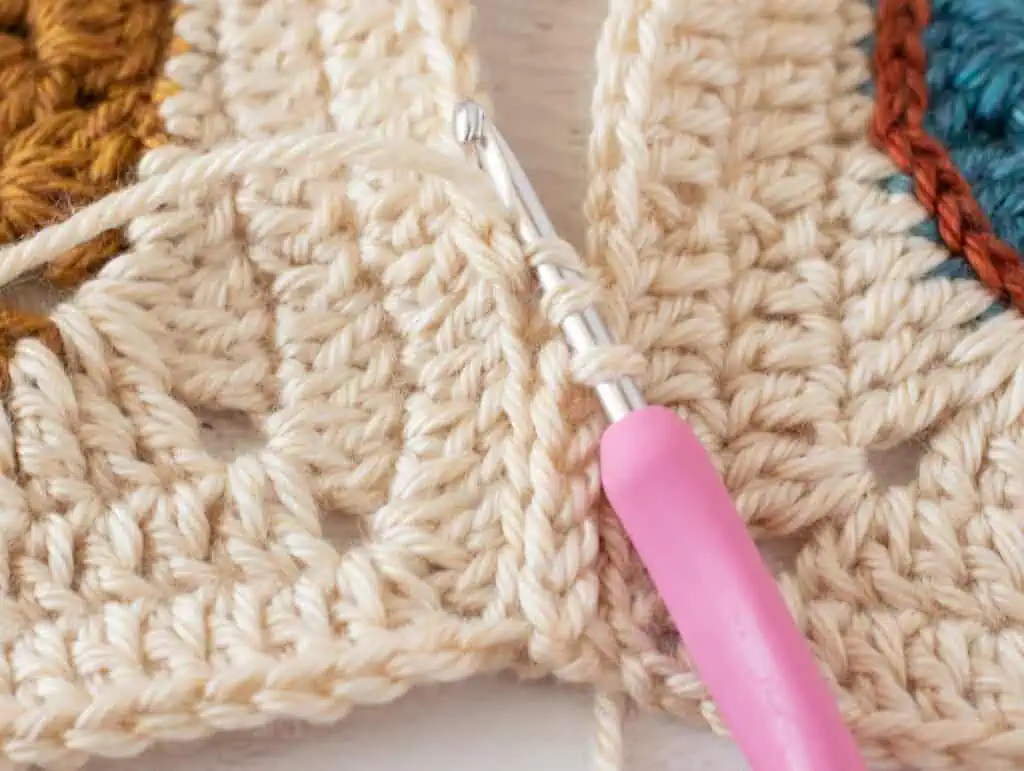
Step 4: Yarn over and pull through all loops on hook at once.

Step 3: Finished join lays flat between the two squares with the unworked front loops of each square visible on either side like so:
Crochet Blanket Border
The border is worked in 4 rounds. The first 3 rows are single crochet rounds. The final round is a pom pom border.
R1: With ivory yarn, attach yarn with a slip stitch to any stitch and ch 1. Sc around afghan, working a sc in the join between each square and 3 sc in each corner stitch. Join with a slip stitch to the top of the first sc in the round.
R2: Ch 1 and sc around, working a sc in each stitch on the side and 3 sc in each corner stitch. At the end of the round, join with a slip stitch to the top of the first sc, changing to green yarn.
R3: With green yarn, ch 1 and sc around, working a sc in each stitch on the side and 3 sc in each corner stitch. At the end of the round, join with a slip stitch to the top of the first sc. Fasten off yarn.
Pom Pom Border
Mark one of the corner stitches of the afghan. Counting this stitch as the first stitch, count to the 7th stitch to the right of this stitch and attach green yarn with a slip stitch, ch 1 and sc in this same stitch to begin.
General notes: work the pom pom border as in this post: crochet pom pom border, skipping 3 stitches between each “pom pom”. When you come to a corner, evenly space the skipped stitches so that the pom pom lines directly up with the corner stitch. This might mean you skip a different number of stitches so that the corner pom pom lays nicely in the corner.
Pop over to this post on how to work a crochet pom pom border for step by step instructions and detailed photos.
Finishing the Owl Afghan
Weave in any remaining ends. If you did not block your afghan blocks individually, you can now block the entire afghan. I blocked my afghan after it was completely assembled by pinning it to foam blocking mats and spraying with water and letting it dry
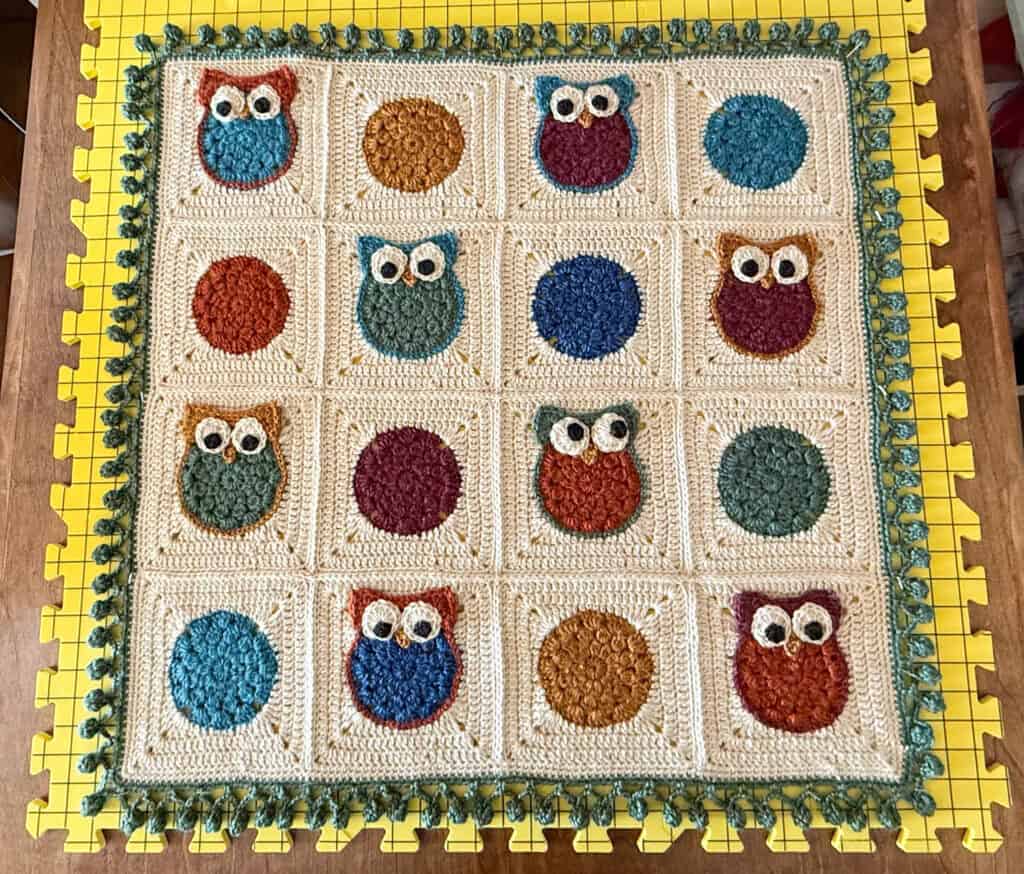
And your darling baby sized owl afghan is complete!

Tips for Enlarging the Owl Afghan
Enlarging the Little Hoot Owl Afghan is very easy. Simply make more squares and buy additional ivory for the background and green yarn for the border. You’ll have plenty of the other colors leftover to make many more owls.
You’ll want to play around with color placements so your owls look pleasing next to each other. And be sure to ‘audition’ the pupil placement so that your owls can look at one another. Of course, you can certainly just place all your pupils straight ahead if you prefer.
This is such a fun pattern to make truly your own!
I love seeing your finished projects! If you enjoyed making this Little Hoot Crochet Owl Afghan pattern, I’d love to see yours on Instagram, be sure to tag me @crochet365knittoo. If you are on Facebook, stop over to the Crochet 365 Knit Too Facebook page or pop over to the Crochet365KnitToo Club and share a photo! I’d love to see your work!