
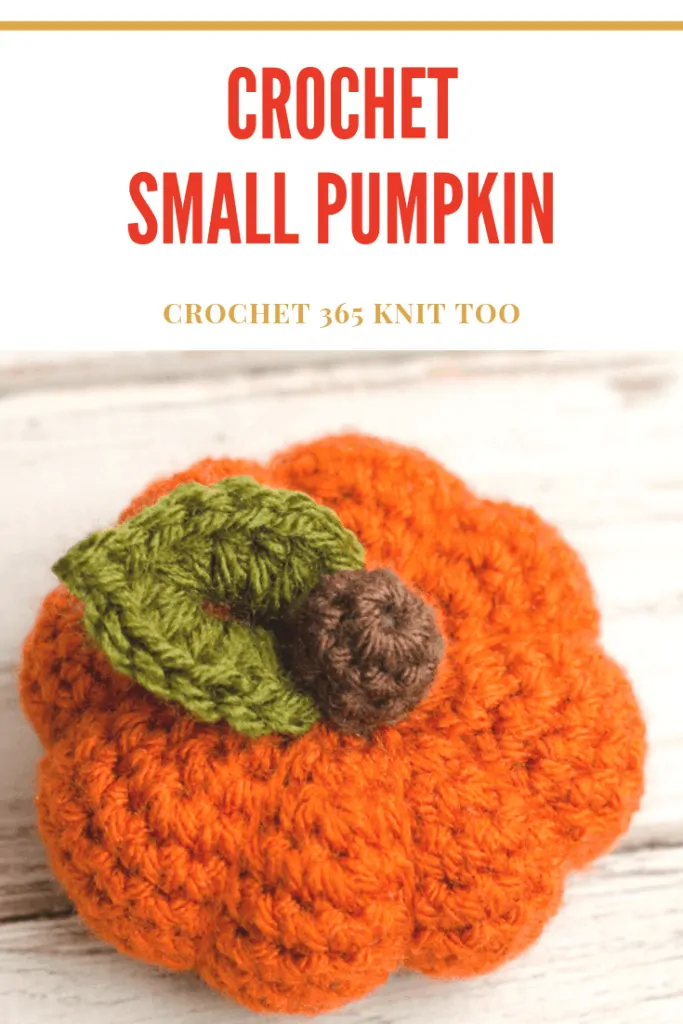
Small Crochet Pumpkin Pattern
This post may contain referral/affiliate links. Please read my disclosure for more info.
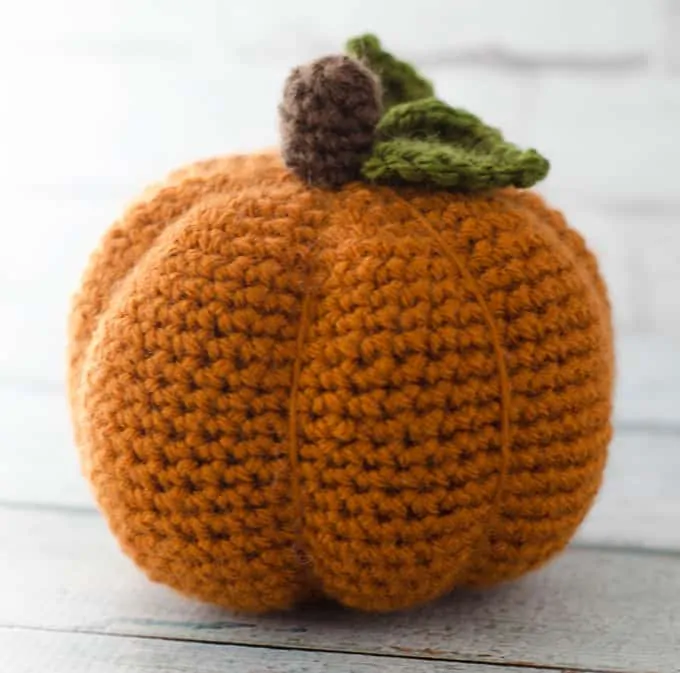
Meet my squishy little friend. Introducing the small crochet pumpkin pattern! Isn’t this pumpkin just adorable? I’m talking, of course, about the little short wonder on the left.

Fast to work up and, for some reason, it’s immensely satisfying to pull on that yarn and get the pumpkin bumps of goodness.
If you’re a fan of the girl on the right…well you can find a post and pattern all about the medium crochet pumpkin. And if you want the final pattern in the series, you can check out the large pumpkin pattern here.

If you’ve crocheted in the round before, you’ve probably noticed that most patterns have you working in multiples of 6. I sometimes like to work in multiples of 8 instead. (Take a look at the Peas in a Pod pattern if you want to see another pattern in a multiple of 8.)
I think it’s a perfect fit for a chubby pumpkin or two (don’t you think)? I also wanted a leaf and I played with some green yarn until I came up with this bit of loveliness. The little pumpkin has 1 leaf and the larger pumpkins actually have 2 leaves. And of course the short, stubby stem is a perfect fit for this little pumpkin pattern.
So get out your crochet hook and let’s get going!

Small Crochet Pumpkin Pattern
Materials
- 1 ounces worsted weight yarn in Orange, scraps of green and brown. I used Vanna’s Choice in Terra Cotta and scrap yarn for green and brown.
- US G6/4.00 mm crochet hook these are my absolute favorite hooks I recommend to everyone!)
- Fiberfill stuffing
- Tapestry needle and scissors
Resources and tutorials you may find helpful in following this pattern: Crochet Abbreviations, US to UK Crochet Conversion Chart. Find links to stitches on the “Tutorial” menu: Getting Started will show basic stitches used in many patterns and Crochet Stitch Dictionary shows our growing collection of crochet stitch tutorials.
Small Pumpkin Size:
Pumpkin measures approximately 3.5″ in width and 2.25″ in height.
Pumpkin:
Make a magic ring
R1: 8 sc into ring (8 sts).
R2: 2sc in ea st around (16 st)
R3: *sc in next st, 2sc in next st, repeat from * around (24 st)
R4: *sc in next 2 st, 2sc in next st, repeat from * around (32 st)
R5: *sc in next 3 st, 2 sc in next st, repeat from * around (40 st)
R6-11: sc around (40 st)
R12: *sc in next 3 st, sc 2 tog, repeat from * around (32 st)
R13: *sc in next 2 st, sc 2 tog, repeat from * around (24 st)
R14: *sc in next st, sc 2 tog, repeat from * around (16 st) Stuff

R15: sc 2 tog around (8 st) Fasten off, leaving a long tail for sewing segments.
Stuff the pumpkin. Gather up and close the opening. Then make the sections of the pumpkin as follows: Go all the way through the center, through the stuffing, to the center of the bottom of the pumpkin. Wrap yarn around outside of pumpkin and then reinsert yarn back through the center of the pumpkin, following the same path. Pull yarn tight to create indentation.
Continue to make each section by stitching through the center of the pumpkin. Pull tight after each pass. I found it easiest to first divide the pumpkin in half, then in quarters and then again to get 8 equal sections. Tie off yarn and secure.
MORE CROCHET PUMPKIN PATTERNS
If you love the this Small Crochet Pumpkin, you might also like to check out these other pumpkin patterns. You can find all our Home Decor Patterns here.


Medium Crochet Pumpkin // Crochet Wreath // Large Crochet Pumpkin Pattern
Now let’s finish up our small crochet pumpkin with the stem and the leaf:

Stem
The stem for the small pumpkin is short and stubby.
Make a magic ring
R1: 8 sc into ring (8 sts).
R2-3: sc around. At end of 3rd round, slip stitch to next stitch and finish off, leaving a long strand for sewing. Stuff.
Leaf
Chain 8 and join to form ring.
R1 in the ring just made work all of the following: ch 2, 6 dc, ch 3, sl st to 1st ch, 6 dc, ch 2, sl st. Fasten off.
Sew the leaf and stem in place on top of the pumpkin.

If the crochet leaves on this pumpkin caught your eye, you might also enjoy this crochet leaf pattern collection for more ideas for your crafty makes.
I love seeing your finished projects! If you enjoyed making the Small Crochet Pumpkin Pattern, I’d love to see yours on Instagram, be sure to tag me @crochet365knittoo. If you are on Facebook, stop over to the Crochet 365 Knit Too Facebook page or pop over to the Crochet365KnitToo Club and share a photo! I’d love to see your work!
Hi Cheryl! I have made your small pumpkins and the medium one too. I just finished what was supposed to be the large one, and it is actually smaller than the medium one. What on Earth could I possibly have done wrong?
Thanks so much!
Renee Leveque
It depends. The difference between the medium and large pumpkins are the number of rows in the middle (more for the larger size). In other words, the larger pumpkin is simply TALLER. So if your pumpkins are the same diameter and the large one just isn’t taller than the medium, then you need to work some more rows in the middle. If the pumpkin OVERALL is smaller it could be that you used a yarn that was slightly thinner or your hook size is different. Some days you just crochet different–you’re relaxed or you’re not, etc. Hopefully that helps a bit.
What did you use for the rafia curl on the medium pumpkin?
It is floral wire and I found it locally at Joann. I’m not sure if they still sell the exact product; but they should have a jute covered wire that will work nicely.
Is there a tutorial for the leaves
It’s at the bottom of the post. 🙂
Thank you for such a great pattern. I needed a quick pattern to make one for a gift and your pattern was perfect.
I just made the medium pumpkin but it doesn’t look as tall as your medium. My pumpkin is only about 2 ” tall (not counting the stem), Is that about right? It’s hard to tell from the pics.
Thank you for the patterns. I am having fun.
Yes.. your pumpkin is about the same size as mine! I recently went through and updated these earlier patterns with final pumpkin measurements. Hopefully that is helpful for everyone!
The leaf doesn’t make any sense to me. It doesn’t specify where do put to put each stitch. Can you please explain it to me?
When you make each leaf, you start with a chain that forms a closed circle (ring). Then you work AROUND that chain for the stitches. If you look closely at the photo for the leaf, you’ll see the “hole” in the center. Because of the sizes of the stitches it ends up making the ring more oblong and leaf shaped in the end. I hope that helps make it more clear.
??? this pattern! One problem I’m having is that there is a broken video link that pops up & I can’t close. It is very difficult to read the pattern around it. Any solution? I’ve made several of these cuties!
You can get an ad-free pattern from her Etsy shop! There’s a link for it in this post. 🙂
Do you slip stitch into the first stitch of the next round..
The pumpkin is worked in the round (in a continuous spiral), so no joining at the end of each round.
Hi, I love this pattern but the leaf confuses me, sl st to 1st ch is the bit i don’t get, is that sl st into the ch2 or the chain that forms the ring? if i do it into the ch2 then that will close it up so no room to get the other side of the leaf in, so i’m guessing it’s into the ring, am I correct with this thinking?
Everything is worked into the ring. At the end you chain 2 and then slip stitch into the ring. The chain 2 helps you get down to the ring from the previous stitch. They are 2 separate steps.
Your plaid pumpkin is particularly lovely.
Hi! I’m a little confused by your stitch counts. When I get to stitch 32 for example, I still have about 5 more stitches until I make it to my stitch marker. Is this correct or am I missing something..?
The stitch counts in the pattern are correct. If you are finding you have more stitches in the row, then you’ve likely added some extras stitches. I always suggest counting the stitches every row and then go back and re-reading the instructions if need be.
Thank you so much for the pumpkin patterns. I just crochet my first one and it turned out awesome.