
Finishing The Daisy Mae Granny Square Purse – CAL Part 4
This post may contain referral/affiliate links. Please read my disclosure for more info.
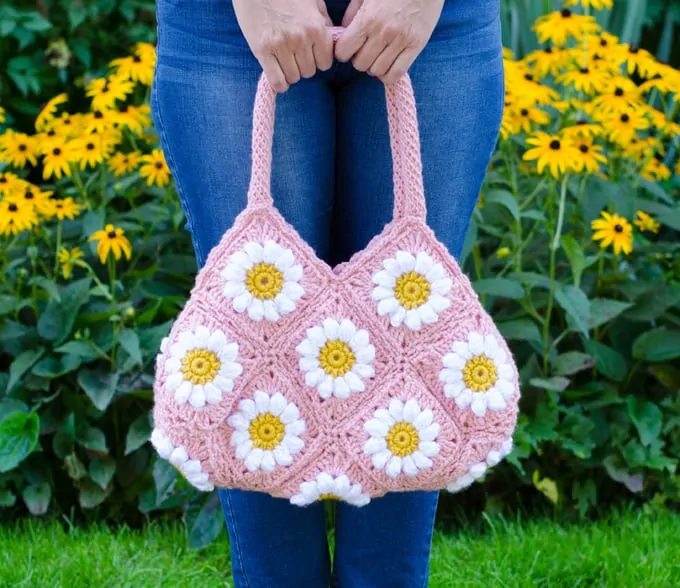
Well we’ve come to the end. Just a few more finishing touches and your Daisy Mae Granny Square Purse will be complete! This post will cover the edging, optional lining, closures and sewing in the handles.
If you’ve missed any part of the Daisy Mae Bag Crochet Along, be sure to read the Daisy Mae Bag Overview, Part 1 – Daisy Square, Part 2 – the Faux Braid Join and Part 3 – The Spiral Handle.
Purchase an ad-free printable version of the Daisy Mae Bag pattern here
Decisions, Decisions
It’s important to make a few decisions before moving on with the finishing. Namely: Do you want to make a fabric liner? And How do you want your granny square purse to close?
Some things to consider: How is your crochet? Do you have a lot of gaps in the crochet? What are you planning on using the bag for? Will you be using it as a purse and want to carry pens and small objects that might slip through the crochet? Or perhaps you are concerned about the weight of your purse. The weight could stretch out the crochet and if you line it with fabric, the fabric portion will absorb the weight and your bag is less likely to stretch. In this case, I would recommend a fabric lining.
If you are using your Daisy Mae granny square purse for something else–like a project bag where it is just carrying some yarn, notes and lightweight things, you might not want to line it at all.
If you line the bag, you can make an inside pocket, or go pocket-less. Finally, do you want a closure? You can opt for no closure at all if you don’t mind your bag flopping open. You can close the bag with a button and loop type closure (in this case, pay careful instructions to the edging so you can make the loop at the proper point). Or you can attach a magnetic purse snap to the lining.
I recommend a lining, a pocket (optional–I just like pockets) and either a magnetic closure or a button & loop.
Edging
I used the same yarn as I used for the blocks and faux braid join. You can use the same or a contrasting color. I used the same sized hook (H) as I did for the rest of the purse.
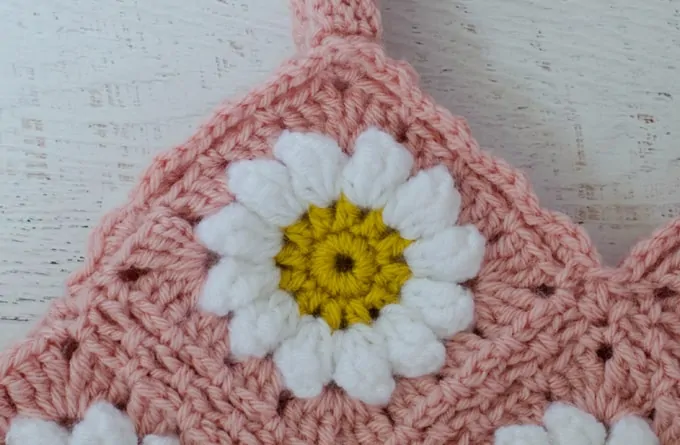
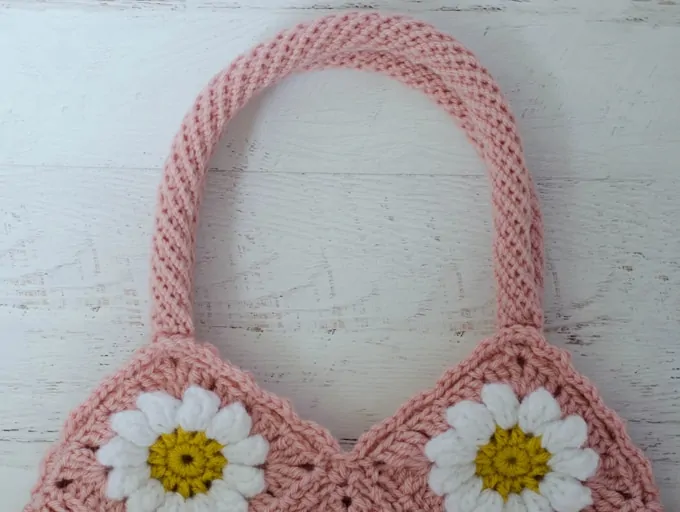
At this point, the blocks of your granny square purse are attached everywhere except the upper half of the two squares on either side of the bag. This portion forms the opening of the purse. You will notice that this looks a bit like two “mountains” with a peaks at the top where you will attach your handles. And valleys where the edge dips down: in the center front and center back and at either side.
If you remember from Part 1 when we crocheted the squares, the last round “prepped” us for the faux braid join. Therefore, the edges of the bag have chain-3 “spaces” separated by single crochets. In the corners you have a “sc, ch2, sc”.
Now that we have the “lay of the land”, let’s talk about how to work the edging/border around the open edge of the granny square purse.

Attach yarn with a slip stitch to the 2nd chain space after one of the side “valleys”. Work around the bag working the following:
- In each ch-3 space work a (sc, hdc, sc).
- Work a sl st in the sc stitches that separate the ch-3 spaces.
- In the space at the peaks (where the handles will attach), work 3 hdc
- When you come to the center front “valley” and center back “valley”, sc 3 together to cinch that inside corner in. If you are wanting to close your bag with a button and loop, when working the back valley, chain enough stitches to stretch over the front of the bag to where the button will be attached. Slip stitch the chain back to the last stitch worked to make a loop. If you are NOT using a button and loop closure, just work the back “valley” the same as the front.
- When you come to the “valleys” at the sides sc 2 together TWICE.
When you get to the end of the row, work an invisible join and weave in your end.
The object of this row is that your bag lays nicely without pulling or rippling. We all crochet a bit differently and you may have worked your bag slightly different when joining the squares. So feel free to adapt the “valley” decreases so that YOUR purse lays nice and flat when you are done.
Sewing on the Handles
If you are using a button closure, you are almost done. Just sew on the handles securely behind the edging as shown in the photo of the Daisy Mae granny square purse. Be sure to sew the handles securely and to attach it to several stitches on the bag.
If you are making a lining, I suggest waiting to sew the handles on until after you trace out your lining pattern onto paper. After that is done, go ahead and sew on the handles.
Here is What You Will Need For the Lining
- 1/2 yard of fabric (this is enough to do single layer of fabric lining plus pocket)
- 1-1/4 yard of fusible woven interfacing (Pellon Shapeflex SF101)
- Scraps of fusible heavy stabilizer (Pellon Peltex 71F) (only if using a magnetic snap)
- Magnetic Purse Snap
How to Make Lining Pattern
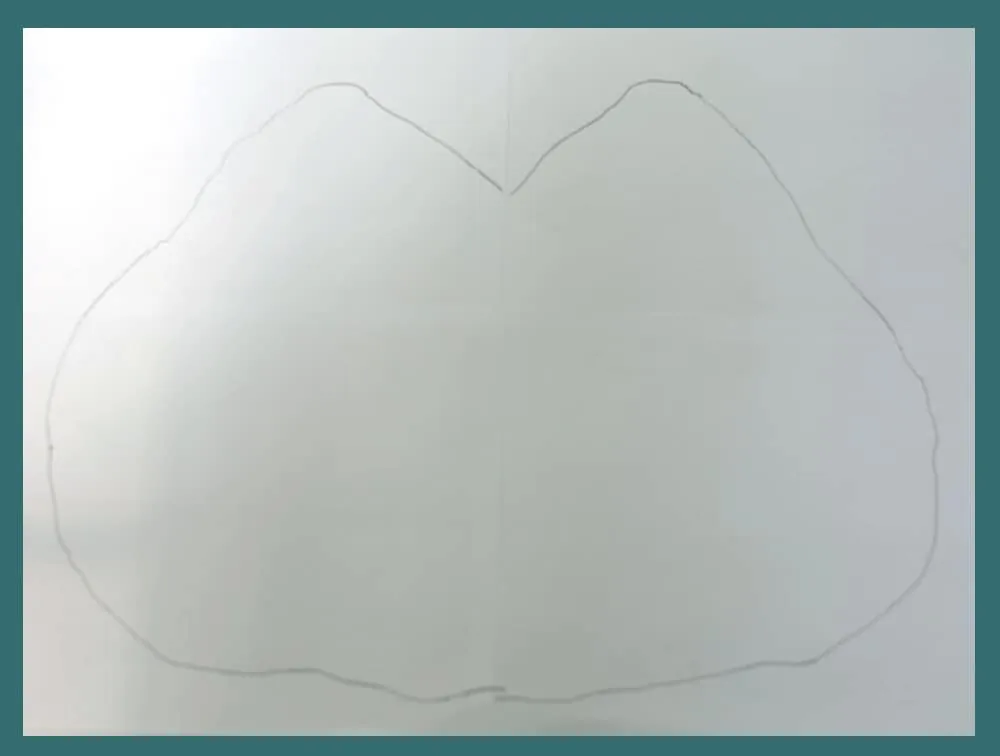
- Tape together 4 sheets of 8.5 x 11 paper or lay out enough paper to trace out your purse.
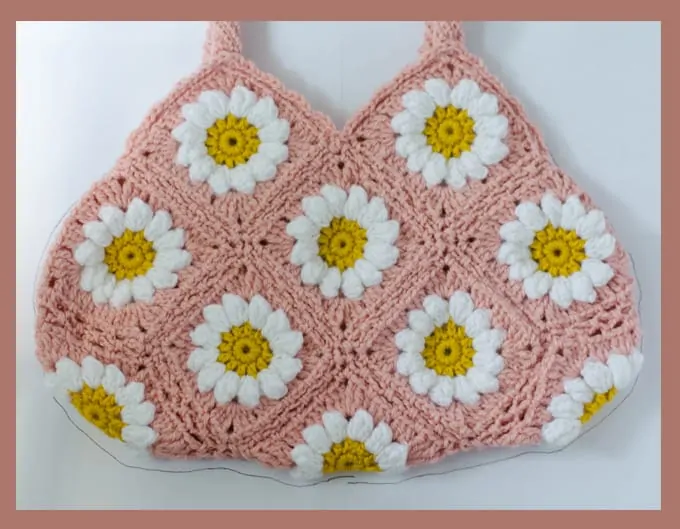
- Lay purse on paper and use a pencil to trace around purse. This is easier if you have not sewn down the handles.

- When you take the purse off the piece of paper you have something that looks like the above photo. NOW you need to “fix” the drawing before cutting it out to use as a pattern. First, fold the paper in half vertically so that the fold is along the center of the bag top to bottom. Measure from the top peak to each side about 2.75 inches and mark that point on the line you have drawn. Start drawing a new line from this point gradually out to 1/2 inch from the original line and then continue that line around the side and bottom of the bag. This new line is going to be the cutting line for the pattern. Note that the top points and center will NOT have the added 1/2 inch and the rest of the bag will. This is so the lining fits properly inside the crochet bag when it is finished.
- Cut out the paper pattern. Unfold the paper and both sides will match in size. Don’t worry about any imperfections (it is ok if the 1/2 inch marking on the opposite side doesn’t exactly line up). You are creating a custom pattern to your own purse.
Prepare Fabric
Iron fabric. Then following manufacturer instructions, iron on the interfacing. I find it is easiest to do this prior to cutting out the bag. If you want to conserve interfacing, you might want to cut out all the pieces of the bag and pocket out of fabric and then the same pieces out of interfacing and fuse them afterward.
Lay pattern on a double thickness of fabric, pin and cut out two purse pieces (a front and a back)
From remaining fabric, cut (2) 8″ x 7″ squares for the pocket. Prior to sewing, both the front and back of the bag should have interfacing, as well as both sides of the pocket.
Sew the Pocket
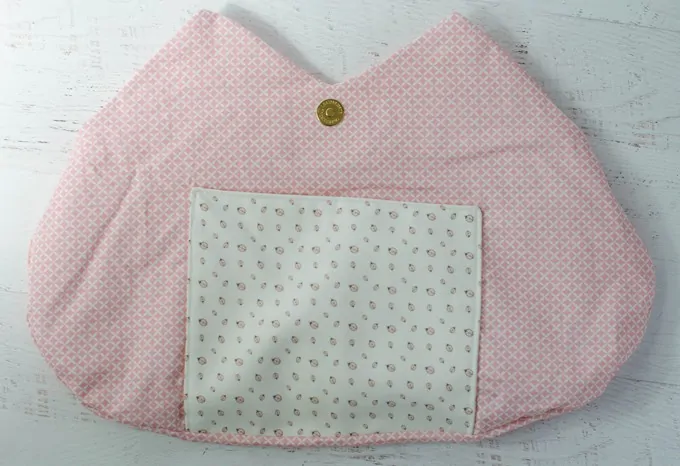
Using a 1/2″ seam allowance, pin right sides of pocket together. Sew the pocket together on 3 sides, starting with a short side, working across a long side and then down the other short side. Leave the bottom open. Clip corners, turn pocket and iron flat. Top stitch about 1/8″ away from the top folded edge, if desired. Then center the pocket on one of the bag sides, lining up the unfinished edge with the bottom edge of the bag and pin. The unfinished edge of the pocket will be encased in the lining seam when you sew the front and back of the lining together. Sew the 3 sides of the pocket down.
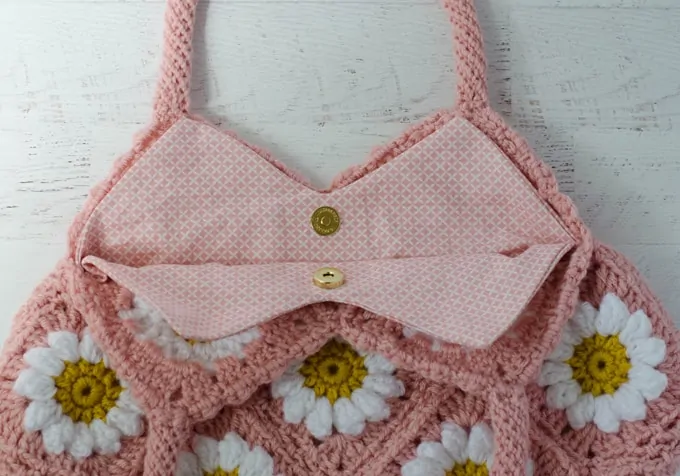
Prepare the Top Edges and Insert the Snap
Turn over the top edges of the bag (approximating where the bag will open) and press over the top edge 1/2″ to the wrong side. Note that you may have to clip corners a bit so that it lays nicely. Determine where the snap will go. Cut a piece of iron on stabilizer about 1-1/2″ square and iron on behind this location.
Then follow directions included with the snap to attach the snap through the stabilizer. You must use the stabilizer or something firm to secure the magnetic snap. Otherwise the magnet is so powerful, it could pull the snap and rip the fabric. Ask me how I know this.
Sew the Sides and Bottom of the Lining
Put right sides of bag together and sew the sides and bottom, using a 5/8″ seam allowance. (Yes, I do know that you allowed for only 1/2″ extra in your pattern; trust me, you need to sew at 5/8″ for the lining to fit properly inside). The above photo shows the finished lining with the right side “out” so you can see the pocket placement.
Attaching the Lining to the Granny Square Purse
Turn lining so that the right side is on the inside and the wrong sides are facing out. Slip lining into fabric purse. Pin top edges, lining up the lining and purse so that the lining fills up the bottom and sides of bag and the top edge is about 1/2″ below the top edge of the bag. Using thread and needle, hand sew the lining to the opening of the bag.
Note: You will notice from my photos that I used a contrasting fabric for the pocket. A careful look and you might also notice that I made a double thick lining. I don’t recommend this; I recommend going with the 1 thickness of fabric lining I described above. I was initially concerned that the edges of the seams would show through the finished crocheted squares. I realized afterward you can barely see anything behind the squares. Sewing a double layer of lining is much more work and unnecessary. It also hogs up the entire 1/2 yard of fabric which is why I had to use a contrasting piece of fabric for the pocket.
Purchase an ad-free printable version of the Daisy Mae Bag pattern here
Please head over to the Facebook Group: Crochet 365 Knit Too Club. Post your photos. Ask questions. Show me your progress! I can’t wait to see!
I love seeing your finished projects! If you enjoyed making one of my patterns I’d love to see yours on Instagram, be sure to tag me @crochet365knittoo. If you are on Facebook, stop over to the Crochet 365 Knit Too Facebook page or pop over to the Crochet365KnitToo Club and share a photo! I’d love to see your work!
Hello Cheryl
Thank you so much for this wonderful CAL. It was my first CAL and you made it so easy to follow the instructions. Toughest thing was that I had to wait a whole day for the next installment to be published after everyone else saw it – with South Africa being on the other side of the world!
My bag has attracted a lot of attention and its been wonderful to show people that the art of crochet is still alive!
Have a blessed day!
Yvette
Johannesburg
South Africa
I am so glad you enjoyed it! I am loving my bag too and all the compliments I am receiving on it!
Can you please explain this step? I’m new to sewing and can’t figure out where I’m supposed to draw what.
“Measure from the top peak to each side about 2.75 inches and mark that point on the line you have drawn. Start drawing a new line from this point gradually out to 1/2 inch from the original line and then continue that line around the side and bottom of the bag. This new line is going to be the cutting line for the pattern.”
Also, if I don’t include the snap/button, can I get away without the interfacing?
Thanks so much!
The lining section is meant to show one possibility of finishing a crochet bag. You don’t have to sew a lining at all, or can make it another way (with or without interfacing). It’s difficult to describe how to design one’s own pattern for a lining when we all crochet slightly differently. I tried to describe what I did as clearly as I could and to show a photo. I’m sorry that it’s confusing. The goal is to have a fabric liner that sits nicely inside the bag without any raw edges of fabric showing. I would try to make a paper piece that will fit inside your bag and allow a bit for a seam allowance.