
Buffalo Plaid Cowl
This post may contain referral/affiliate links. Please read my disclosure for more info.
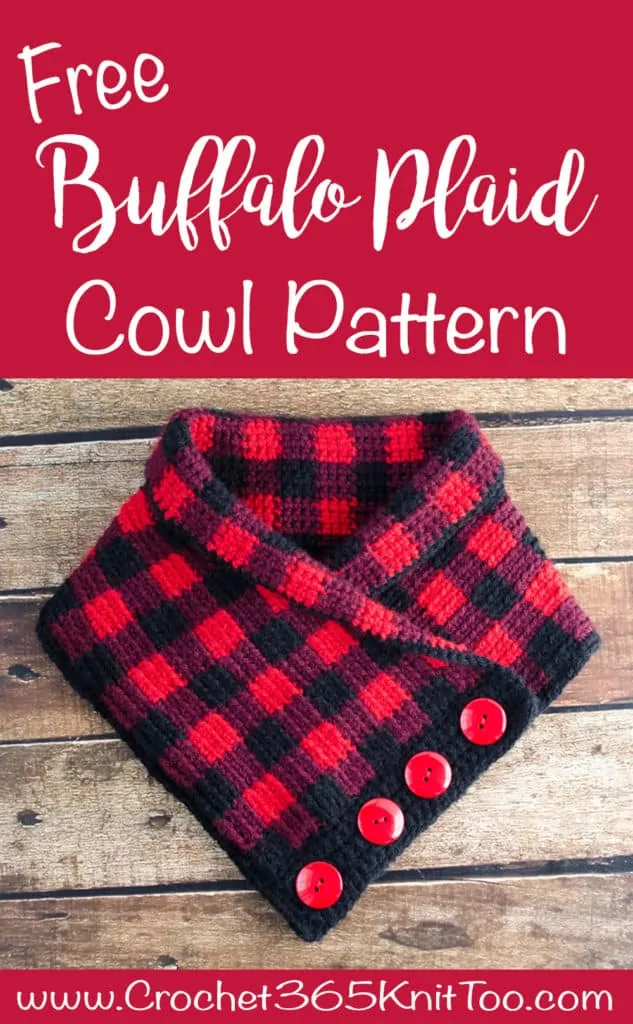
Introducing the Buffalo Plaid Cowl! I am so in love with this cowl. I can’t wait to wear it. It’s just a classic look that is fun and modern. Perfect for work but also great with jeans on date night.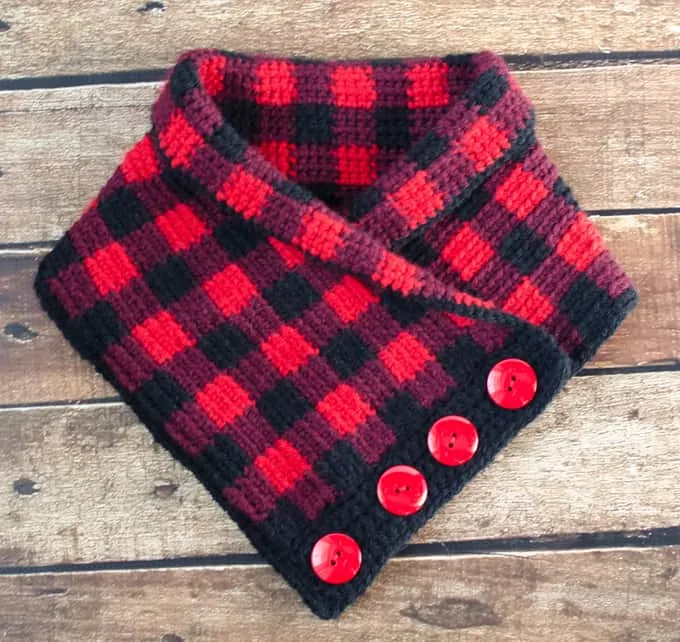 Are you having as much fun as I am with these Buffalo Plaid Projects? First up was the classy Buffalo Plaid Cup Cozy. Next came the stylish Buffalo Plaid Wristlet and now…THIS. The Buffalo Plaid Cowl! Aren’t those big, bright red buttons delicious? I love them. I “auditioned” many buttons for this cowl, but in the end, the classic red button was just the thing.
Like our other two buffalo plaid projects, we are using Lion Brand Vanna’s Choice in Scarlett, Burgundy and Black. I love this color combination! If you are going with another brand, be sure to check the 2 reds together under different lighting conditions to make sure they work well together.
As in the previous 2 projects, two colors are used in each row. The non working yarn is carried along and crocheted right over with the working yarn. Check out this post on how to tapestry crochet for everything you need to know on this technique. This project is worked on the right side of the work (no turning). Every row starts with a standing single crochet and the yarn is fastened off at the end of every row. For the Buffalo Plaid portion of the pattern, work into the back loop only. Let’s get started!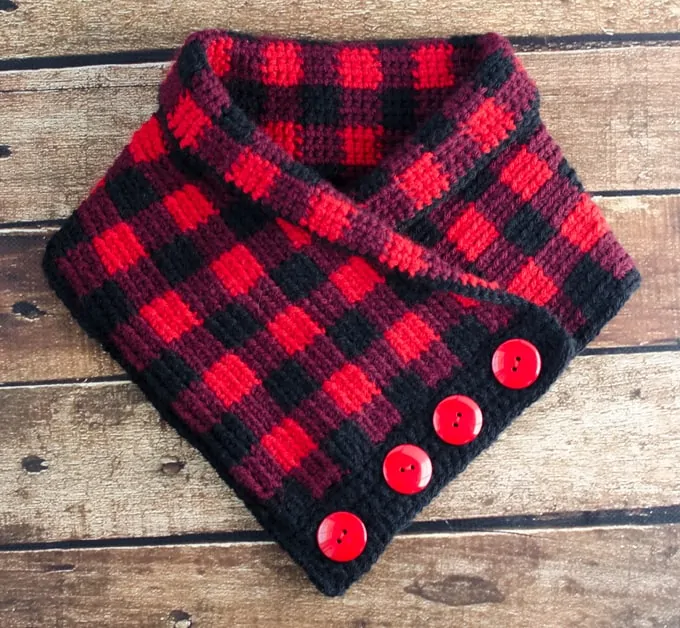
Disclaimer: This post includes affiliate links; yarn provided by Lion Brand
Purchase an ad-free printable version of this pattern
Buffalo Plaid Cowl
Here is what you will need:
- Lion Brand Vanna’s Choice: Scarlett, Black and Burgundy, 2-1/2 oz each.
- US H8/5.00 mm crochet hook (here are my favorite crochet hooks)
- 1-1/8″ – 1-1/4″ buttons, 4 each
- Tapestry needle and scissors
- Matching thread and sewing needle
Resources and tutorials you may find helpful in following this pattern: Crochet Abbreviations, US to UK Crochet Conversion Chart. Find links to stitches on the “Tutorial” menu: Getting Started will show basic stitches used in many patterns and Crochet Stitch Dictionary shows our growing collection of crochet stitch tutorials.
Be sure to read how to tapestry crochet so you understand how to change colors with this technique.
Size:
32″ long by 8″ wide, Each plaid “square” is 4 sc wide by 3 rows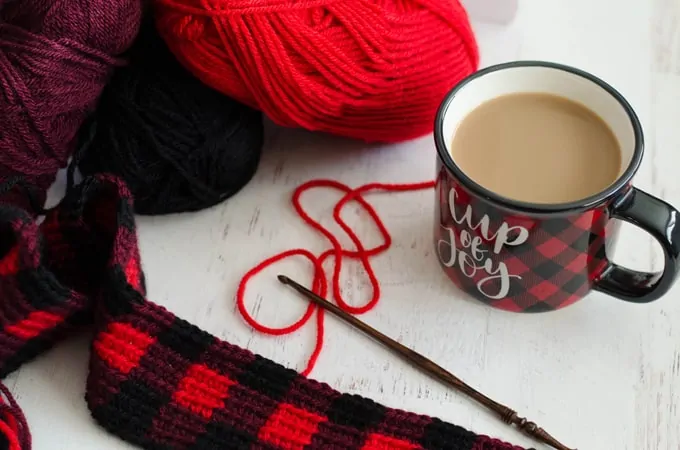
With black, chain 124. At end of row, fasten off. (124 chains)
Every row starts with a standing single crochet stitch. Carry the non-working yarn. Work into the back loop only.
R1: With black (and working over unworked burgundy yarn), sc in next 4 st, changing to burgundy in the last stitch, using burgundy, sc in next 4 st, changing to black in the last stitch. Continue to work sc across row, alternating 4 stitches in burgundy and 4 stitches in black. At the end of the row, fasten off and leave an end to weave in later.
R2-3: Repeat pattern, working sc across row, alternating 4 stitches in black and 4 stitches in burgundy. At the end of every row, fasten off and leave an end to weave in later.
R4-6: Pattern colors switch here to burgundy and red. Starting the row with a burgundy sc in the next 4 st, changing to red in the last stitch, using red, sc in the next 4 st, changing to burgundy in the last st. Continue to work sc across row, alternating 4 stitches in red and 4 stitches in burgundy. At the end of the row, fasten off and leave an end to weave in later.
Rows 1-6 establishes the Buffalo Plaid pattern.
R7-24: Repeat rows 1-6 (3) more times.
Buttonhole and Button Bands:
Weave in ends. I know, there are a lot, but the finished piece is worth this bit of work. When that is done, lay out the cowl so that the right side is up. As you look at the cowl, the right side edge will be the buttonhole band side and the left side edge will be the side that is underneath, that holds the buttons. Note that for the remainder of the pattern, you will be working in both loops of your stitches.
Buttonhole Band:
R1: Using black and a standing sc, work 28 sc along the short edge. Ch 1 and turn
R2-3: sc across, working in both loops, ch 1 and turn (28 sc)
R4 (buttonhole row): sc in next 2 st, *ch3, skip next 3 st, sc in next 4*, repeat * to * 2 more times, ch 3, skip next 3 st, sc in last 2 st. ch 1 and turn.
R5: sc in next 2 st, *3sc in next loop, sc in next 4 st*, repeat * to * 2 more times, 3sc in next loop, sc in last 2 st, ch 1 and turn (28 st)
R6: sc across (28 st). Fasten off.
Button Band:
R1: With right side facing and using black and a standing sc, work 28 sc along the short edge. Ch 1 and turn
R2-6: sc across, ch 1 and turn (28 sc).
Before fastening off, test out the length of the cowl by trying it on. The buttonhole band crosses over the button band at a 90 degree angle, so that the buttonhole band edge lines up with the bottom row of the cowl on the button band side (see photo). Try this on, pinning the edge down as if the buttons were sewn on. If the cowl feels too tight and you would like it bigger, crochet some extra rows of single crochet on the button band. The button band is completely hidden from view and no one will ever know! Fasten off.
Border:
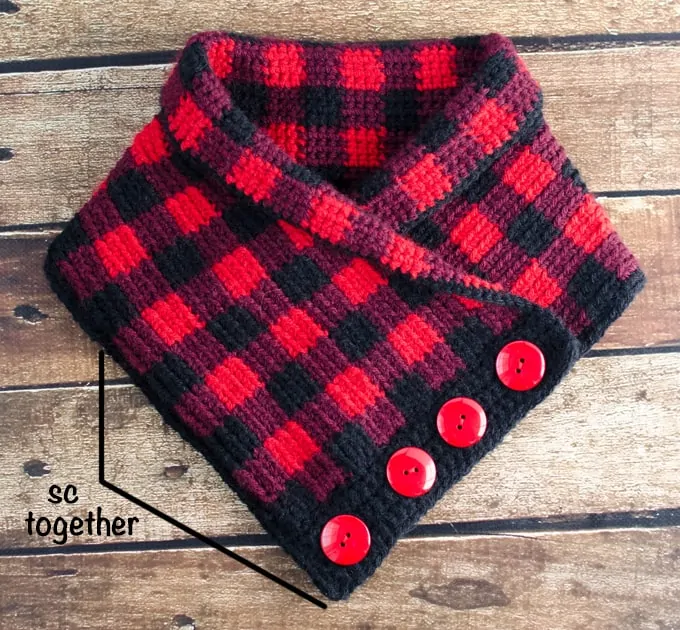
Work a row of single crochet around the buffalo plaid cowl, working on the right side. Work 3 sc into each corner. When you come to the front lower, left side (the front side without the buttonholes), work through a double thickness of the cowl. This helps hold the cowl in place in addition to the buttons.
It is easiest to do this in 2 steps (rather than single crocheting around continuously). Hold the right side of the work towards you, with the buttonhole band to your right. Attach black yarn in the bottom right corner. Sc across the buttonhole band, then 3 sc in the corner, continue along the top of the cowl until you come to the next corner. Fasten off the yarn. Then position the buttonhole band side of the cowl over the opposite side at a 90 degree angle. Pin the cowl down. Sc on the other long end of the cowl, working through 2 thicknesses when you come to the overlapping portion (see noted section on the photo below):
 Fasten off yarn. Weave in ends. Sew on buttons.
Ta Da! Your fantastic buffalo plaid cowl is done!
Looking for more Buffalo Plaid Projects? Then be sure to check out the Buffalo Plaid Wristlet and the Buffalo Plaid Cup Cozy.
I love seeing your finished projects! If you enjoyed making the Buffalo Plaid Cowl, I’d love to see yours on Instagram, be sure to tag me @crochet365knittoo. If you are on Facebook, stop over to the Crochet 365 Knit Too Facebook page or pop over to the Crochet365KnitToo Club and share a photo! I’d love to see your work!
Purchase an ad-free printable version of this pattern
I love seeing your finished projects! If you enjoyed making one of my patterns I’d love to see yours on Instagram, be sure to tag me @crochet365knittoo. If you are on Facebook, stop over to the Crochet 365 Knit Too Facebook page or pop over to the Crochet365KnitToo Club and share a photo! I’d love to see your work!
Love it thank you
I don’t know much about crocheting or kniting bu i do know that it would be really nice if some one would put together a dvd or a tuatorial of how to do all the difrent crocheting and knitting stitches. I think some one could make some good money doing this and in the Prosses help pepole that would really like to do all the crocheting and knitting they have always wanted to do
Thank you for this pattern. It is beautiful. Wondering if you can clarify a couple of things for me? First, we chained 124, but worked 120 (30×4). What is done with the remaining 4 chains? Second, we start each row at the right, with no turns (i.e., always working the right side). The last sentence in the instructions for R2-3 states, “Ch 1 and turn at end of each row.” Not sure how to proceed. Thank you in advance for responding. Blessings
Hi Debbie, Thanks for your note. There should be 124 stitches in each row. And there should be no turning, as you pointed out. I changed the pattern to reflect those corrections. I read the patterns over and over before posting and still sometimes little typos get by me. Sorry about that!
A bit confused with button band section. It seems that this is really just an extension band, as it is not where the buttons are sewn on. Are you indeed sewing the buttons on at the bottom row (alternating black/burgundy)? Perhaps a photo of what the cowl looks like flat and then slightly crossed over but not fastened (after buttons are sewn on) to make sure we have this down correctly? Thanks always for your beautiful and unique patterns 🙂
It is a faux button band; there are no button holes and the buttons are decorative. Hope that helps.
Could this pattern be enlarged and made into a shawl/cape? I’m thinking it could but can’t quite wrap my head around what it would come out like.
I think it certainly could be, though it is not something I’ve tried. Since the pattern is basically a rectangle that is folded to match a side to an end (with a space for the head opening), I’d start by looking for a similarly constructed afghan and then work out the math for the buffalo plaid squares with your chosen yarn.